Friday, November 5, 2010

Wood-Paper Experiment: British Line Infantry

I have been working, bit-by-bit, on refining my experiment with printing on paper and then gluing the results to the wooden pawns. I have to admit that I like the look of painted figures better, but I experiment for the fun of it and in the hopes that I will surprise myself.

I think these results surprised me a bit.

My first experiment did not go as well as I hoped. More painting than expected and more fiddly than I wanted (or for the result I achieved). My second experiment was more in line with what I was thinking. In fact, that is the model I have been building from. Compare the images in the second experiment with that below and you can see how much work I've added.
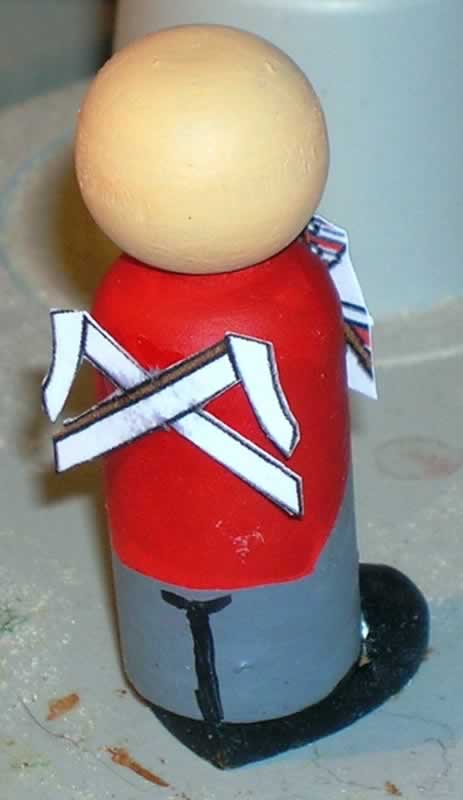
As you can see, I've added the cross-belts and pack straps. I've also emphasized some details, like the creases in the trousers, and made some changes to deal with curves, such as curving the collar upward. The figures below show simply gluing the cut-out to to the pawn, with no color beneath (it would be red on the shoulders). Here is the figure from the front.

The chest lace shows up nicely, as do the buttons. The collar is even discernable; more so than if I painted it. Here is the side shot.
Here you can see the cross-belts start to come together. I thought of printing the shoulder strap on, but it really should overlap the arm, so it will have to be a separate printed and glued piece. Here is the rear shot.
The seam is not perfect, but as I will put backpacks, bed rolls, cartridge boxes, and possibly canteens on here, the seam will be covered. (Note I used rubber cement to tack the paper down and a got a little on the paper, making it look dirty. I did not notice before I took the picture.)

When I put on the Belgic shako, I'll simply add a round dowel to the top of the head and glue the following on as the frontispiece.
It won't have the word "Test" on it though! :)

All in all I have to say it looked nicer than I expected. And given the level of detail, even the fiddly cutting part is far faster than painting it all by hand.

So, would I do all of the figures this way? No, I don't think so, as I like the colors from painting. The printing still looks washed out. But, this is a way to get an army up and done quickly, so that you have the leisure to paint up the troops, but it won't stop you from gaming. (Which, for me, gaming with the troops is the single greatest way to ensure that I don't lose steam on a painting project.) So, I will probably use this for a battalion or three of troops to get me started.

Saturday, October 30, 2010

British Light Dragoons

I found some pictures of the building process.

First, start with the standard pawn. To make them horse riders, their bodies will be shorter, as the legs will be painted onto the side of the horse, so you only need a pawn from about the hips up. So, take your mitre saw and shorten the pawns. (Save the pieces cut off.)


The pawn all the way to the left is the original. I cut both the tops and the bottoms off. The top cut makes putting the shakos on a bit easier. As you can see, I did not worry about making the height og each pawn exactly the same.

See my previous tutorial on making shakos, but note that because I have flattened to top of the pawn's head, I don't need to "scoop out" the inside of the shako to make it fit; it can also be a flat cut. Makes putting the two together much easier. Also, I filled the hole with a 1/4" flat head button plug. This saves me from having to use the Crayola modeling material.


We'll set aside the pawns for awhile (as I've run out of pictures), but you can pretty much just follow the previous shako tutorial. I used the same materials and techniques to add the peak, plume, etc.

Now let's look at the horse. At its core it is simply one spool for the body and to split eggs for the fore and back legs.


Note that I have flattened the bottom of the split eggs so that the model can stand on its own. Also this increases the surface contact area for gluing to the base.

To add a head to the horse, simply glue on another split egg. I flatten a spot on the split egg for the fore legs so increase the contact surface area, which helps create a strong glue bond. Then glue the fore and back leg pieces to a 1 1/2" disk to act as a stand.


Note that in my scale (42mm), this makes the infantry on 1" stands and cavalry on 1 1/2" stands. Keep this in mind for any rules you may write to use figures of this size.

I created a character by having a special horse in a rearing pose. As you can see in the figure below I trimmed some of the top edge on the rear of the spool and some of the bottom edge on the front of the spool so when the legs were glued on the back was naturally lower than the front, creating a rearing effect.


As I find more pictures I will post them. (Even though I am already violating my vow to put Wooden Warriors on the "back burner"!)

Decals

I recently bought some shield transfers (decals) made by Little Big Men Studios for my 15mm Xyston Carthaginians and Macedonians (they are beautiful, by the way) and I noticed that the back of the transfer sheet indicated that they were using stock decal transfer paper for inkjets. That got me to thinking.

What I liked about printing on paper and gluing to wooden pawns was that I could get good detail quickly. What I did not like was the color of large surface areas. Unless you are printing to very high quality stock, and using the best inks and highest resolutions, the color often looks washed out. In my experiments I ended up painting the coat color onto the paper (also due to color matching problems) to solve the wash out.

If I could combine painting the base colors on the wood with printing out the detail, while also keeping the precision cutting of the decals down to a minimum, I might have the "perfect" solution. What if I used clear decals? I've got to go to the office supply store and give it a try.

Latest news on the PC: I bought the wrong power supply so I have to send the one I bought back and get a new one with the right power connectors. Grrrrr!

Friday, October 29, 2010

Hit a Dry Spell

I haven't been blogging of late for a few reasons.
  1. My main computer, which I had just rebuilt several months ago, died again. This time it was a motherboard failure - so no lost data - but it was basically unrecoverable. Can't complain. I built that computer more than eight years ago and it has held up for all time, through Windows 98, Windows 2000, Windows XP Professional, and finally Windows 7 Ultimate. Even had Ubuntu on there once. I purchased the parts for Dale's PC, The Next Generation, and I have high hopes for it. Hopefully I will get it built this weekend, but because I have switched drive types, I will have to reinstall all of my old software (again), and copy over all of the old data. On the plus side the new PC is a smoker.
  2. Too many projects, not enough closure. I started too many projects and I wasn't getting enough of anything done. So I decided to start finishing some things started and setting aside those that were not far enough along yet. On the front burner: anything dealing with basing already painted troops. On the back burner: wooden warriors and solo DBA.
  3. Weather is turning cool, so I can go outside again (I am in Arizona). That means the wife wants me to start stringing more hoses and drip lines for the roses, trees, and such. When it gets cold I will be able to go inside again and work on my projects.
So, once I get the computer back up, I will try and post a little here and there about Solo DBA, DBA games in general, AWI, and such. I am trying to get organized with the local club and get some regular gaming going. Hopefully we will start a Wednesday Night DBA Fights soon.

As for Wooden Warriors. Well, I have some pictures to process - experiments with paper and Napoleonic cavalry - so that will make it here. I am also bugging Justo (but obviously not effectively enough) to do a guest blog entry on making ships in the Age of Sail. There is also a new member (Steve C.) on the Wargaming on a Budget forum that is doing some nice 42mm work (my scale!) and maybe I can convince him to do a guest blog entry or tutorial. Finally, Jim has done some nice paper/wood work that he can get some time to also do a blog entry.

I obviously am not making my November goal to have enough Napoleonic troops done in time for the release of Command & Colors: Napoleonics by Richard Borg and GMT Games. Maybe once I get a troop list from the scenarios I can get proper motivation. (Yeah, that's it!)

Saturday, September 25, 2010

Litko's Rank Movement Trays

Normally I would do product reviews on my Dale's Wargames blog, but as this product is related to my Wooden Warriors I put it here.

Once upon a time I used steel bases for my miniatures and laid magnetic sheets down in boxes for storage. It was after basing a Philistine DBA army, and being so proud of the basing, that I realized that the 40mm x 40mm chariot base I had used was not actually 40mm square. In fact, as I lined up the army I noticed that a number of bases were off by a few millimeters here and there, and sometime not even squared. It was at that point I stopped using steel bases.

So, casting about for a replacement I decided to try Litko's laser-cut wooden bases. I those the thickest ones, so  my fat fingers can grip them rather than the miniatures, and I never looked back. That is all I use for DBA or other similar games.

For my wooden warriors I have been mounting them on round 1" discs (1 1/2" for mounted figures) and it suits my purposes for skirmish games. But, my final goal is to be able to use these for mass games too, so I've been casting about for movement trays. I had seen Litko's skirmish trays, but it wasn't quite what I was looking for. Then they came out with the horde trays, but again, not quite what I wanted.

Recently (or at least recently known to me) Litko released rank movement trays, which looked to be exactly what I wanted. These allowed me to line them up nice and neat. A single tray is $4, so it is not a "budget wargaming" item, but I wanted to experiment with the concept to see if I wanted to try and build my own.

Here is the package you get, along with one built in a standard way.


There are four pieces for a two-rank tray: the bottom, the front and back cut-outs, and a center cut-out. If you order three- or four-rank trays you get an additional center cut-out for each rank; a one-rank tray has not center cut-out included.

Gluing these together is relatively simple, but unless you use a very quick-bonding glue, you will need to clamp the pieces. As it was, one of the packages I purchased had a warp in the bottom board, so wetting the board a bit and clamping it helps take that out.

I used white glue with a couple of dots of Gorilla Glue Super Glue. I should have used wood glue, for a better bond and a water-resistant finish.

One major point: 25mm is not the same as 1", when you are dealing with the tolerances of a laser-cutter. I had to sand down the edges of the 1" bases to get them to fit in properly.

I tried two experiments. As my figure's bases have magnetic sheet on the bottom, I wanted them to stick securely in the tray. The first experiment was putting magnetic sheet across the whole of the bottom wooden base before gluing on the top cut-outs. This worked, but not as well as I hoped. Magnetic sheets do not stick well to other magnetic sheets, but prefer metal.

The second experiment was to glue a metal sheet to the bottom wooden base before gluing on the top cut-outs. This worked fine, but cutting metal sheets to an exacting size is not easy. But the hold was of the strength I wanted while the magnetic sheets were not, so metal sheets it is.

Here are the boys in their new trays.


Now, all I have to do is get the trays exactly the size I want. These are 5 figures wide by 1, 2, 3, or 4 ranks deep, but I want them in 3-figure wide sizes with 1" (not 25mm) holes and I want two 1-rank bases to be the same depth as 1 2-rank base. I may have to email Jim at Litko and see what it will cost. In the end I will probably have to find a cheaper method of building these myself.

I knew I should have bought that laser-cutter a year ago, when I was thinking about it!

Saturday, September 18, 2010

Experiment #2 in Painting with Paper

After some discussion on the Wargaming on a Budget forum, I decided that the next experiment would be a "full" body" print - or as close to full as I could get it.

I started with this drawing.


I cut along the black lines for the coat, stopping at the lace on the chest. I also cut along the bottom of the collar, again stopping about where the chest lace extends. The idea was that I could wrap each section separately. This drawing clearly shows that I do not know how to deal with 3D shapes as the section for the top of the coat - which is to go in the shoulder area - will never work.

Nonetheless, I printed this version and an uncolored version out (the latter so I could draw on it and determine where other details should be drawn) and glued it on a figure. It actually did not look half bad for the portion below the shoulders.

My second attempt is more of an acknowledgement that I am not going to get the curved shoulders right anytime soon, so I just removed it. I also added some details, like the lines to define the legs, access panel for the trousers, turnbacks for the coat and changing the shape of the coat.

I am taking a break at the moment, but I think this second one will wrap around the pawn better than the first.

I have found that putting the heart on the bottom of the pawn - the feet, which also act as a platform for building the shoes up with modeling material - before gluing on the paper makes it easier to line up the cut-out onto the figure than if you glue it on before the feet. You definitely do not want to build up the modeling material, however, until after the paper is glued on as you would just have to cut out the area for the shoe if you put them on first.

Tuesday, September 14, 2010

Digitally Painting Experiment

So, as I had a few infantry figures lying around (experiments with using 3/4" Heart shapes and Das modeling clay for the feet), I decided to try printing out the lace, cross belts, shoulder straps, etc. for a British Line figure, glue it to the figure, touch it up with paint, and see what the result was.

The Experiment

I started with a basic figure (below left) and painted the basic colors onto the figure (below center and right).


That white goop on the top of the shoes is Das modeling clay. I found that it does not stick to wood any better than Crayola Modeling Magic Fusion, but is more solid after drying. It is messier, however.

I started with an image of the chest lace, etc. of the British Line, measured the dimensions on the wooden model, then resized the image appropriately. Because the image will wrap around the figure, the image needs to stretch horizontally more than vertically. This distorts the image to some degree, but it creates an exaggerated look that works for these figures. The image, front and back, is shown in the figure below left. I then cut out and tacked the printing to the figure with a small dot of super glue (below center and right).


Once the center is down firmly you can glue one side of the printing down with white glue and hold it in place until the glue hardens (which is fairly quickly, due to the heat from your fingers). Once one side is down, glue the other down. You may need to make notches in the paper to remove any wrinkles.


As the front and backs do not touch, you need to add paint for the belts to "meet in the middle". In this case I have to match up the shoulder straps, cross belts, and the canteen strap. While you are at it, you can touch up the edges with paint, cover the glue spots, and so on.


This figure, once assembled, took less than 20 minutes to paint to get to this point. At this point I would add the arms, paint them in basic colors, and then glue a printing of the cuffs and lace on the arm. To attach the arms you sand a flat spot on the sides of the figure to increase the contact surface for gluing, and use the super glue/white glue combination mentioned in previous blog entries.

Assessment

First let me state that the photographs show more detail and color variation than is easily seen with the naked eye viewed from about 3' away. (That's another way of saying it looks worse in the close-ups than in person.) That said, I am please with the result, as it brings the level of detail that I want while being fast. Gluing is a bit fiddly, but the time-savings makes it worth it.

As this was an experiment, I wasn't too concerned about color matching or fuzzy details. Future versions will be more precise.

To summarize, here are some things to think about with this method:

  • Make the print area as rectangular as possible, filling in the basic colors in printing, rather than relying on cutting out coat areas precisely.
  • Inner cuts makes the print much more fragile (although it is more flexible), especially when wet with glue. Also, cuts have white edges, which need to be painted. The longer the edges, the more precision painting need be done, which defeats the purpose of using prints.
  • Try to minimize the painting required for connecting the front to the back.
  • Try to match the coat color printed to that painted. This will help camouflage the print and will minimize the desire to overpaint, which will have to be precise.
  • Remember that some details will be covered. In the example above the cross belts on the back will be covered by a pack; the left shoulder belt will be partially covered by the cartridge box; the brown strap will be partially covered by the canteen; and so on.
Further Experiments

This figure is not done, of course, and the following areas are potential for using prints:

  • Shoulder straps. These could be a part of the print above, or a separate one glued on.
  • Collar. This has some detail, plus if it is made taller than the neck of the pawn, can stand out more than one painted on.
  • Coat turnbacks. A simple detail, but it wraps from front to back on both sides.
  • Shako plate. These can have some detail, but more importantly are hard shapes to paint.
  • Belgic shako frontispiece. The hard part about the Belgic shako, compared to the French shako, is its shape. At the heart it is a cylinder with a peak on front. However, the frontispiece is thin and taller than the body of the shako, so is an ideal candidate for being printed on paper.
  • Face. Interestingly, you could draw up numerous faces and hair color combinations and print out a page of them, then glue them to the head. To get around wrinkles formed by gluing paper to the round head of the pawn you might have to drawn only the "T" of the face (eyebrows, eyes, nose, mouth, and chin), rather than an entire face.
I would love to hear your ideas on this. Although I welcome comments on the blog, I prefer discussions on the Wargaming on a Budget forum (you are a member, aren't you?) as forum make better discussion platforms than blogs.

Contributors

Followers

Blog Archive

Popular Posts

Labels I Use in Posts