Showing posts with label terrain. Show all posts

Monday, January 23, 2023

New Conan Game for Scrum Con - Swords Against the Cult

 I am doing two Conan games for the upcoming Scrum Con in Silver Spring, MD in April of this year.  One of the games is the Conan game I did at Barrage two years ago.  I wanted to do two different Conan games for Scrum Con, so I picked another famous part of the original 1982 Conan the Barbarian movie.  The other two possibilities to me were the raid on the snake tower to get the gem and kill the giant snake, or the raid to capture the princess.  I went with the later just because I thought the terrain would be easier ... although in hindsight it has taken me three weeks to build this layout and I think I made an wrong calculation about which terrain would be easiest!

I am going to do something I don't normally do with terrain which is post a picture of the layout completely built, but unpainted.  This I hope will give a sense for how "rough" things look until you actually put some paint on them ... the paint to me anyway is the "magic."

Here are some shots of it on my basement floor.  The "board" is 3.5 feet long (a little longer but just a couple of inches) and 18 inches wide.  It's made out of craft foam (the thick 6mm kind), wooden craft pieces, and rubber tubing.  It's more or less finished (I have one more detail to add to the snake pillar but it's just a minor cosmetic part of it).

Here is a view from the front with the cave tunnel entrance to the main hall.  In the movie the orgy is happening around the snake pillar.  The stairs lead up to the upper level where Thulsa Doom and the princess are.  The four little round tables will have gold treasures on them and the two wooden pieces closest to the entrance are actually fountains, so they will have hot glue "water" on them as well, but not until after they are painted.


Here is a closer up view of the place where the orgy is happening.

The beads around the base will be painted as skulls (nice, right!?) and they are glued to the foam at this point so they won't move during play.  The circular raised platform is the top of a very large (13.75" I believe) paper mache box.  The round tubing was hot glued onto the foam.  In the movie, there is a rounded "railing" like feature on the stone, and this tubing was the easiest way to get this effect.  We'll see how it looks painted but I think it will look good. 

Another close up.

You get a better sense for the tubing here.  The smaller wooden pieces on each side of the stairs up are burning light sources for the room.  The styrofoam white piece is the stone bowl that holds the "pea soup" in it in the movie.  It can be moved so if Conan wants to push it over, he can.  The snake pillar in the middle will have another architectural feature under each of the snake heads, but this is more or less what it is going to look like.  It, too, is not glued to the raised circular platform so it can be moved if needed.

Here is a view from the rear of the whole game board.


The top layer is where Thulsa Doom (the figure will be on the circle in the rear of this picture) and the princess are located.  

I have all the figures done as well except for the three heroes, Conan, Subotai, and Valeria.  But I will show the figures like I normally do, after I paint them.


Thursday, August 11, 2022

The Sarlacc Pit!

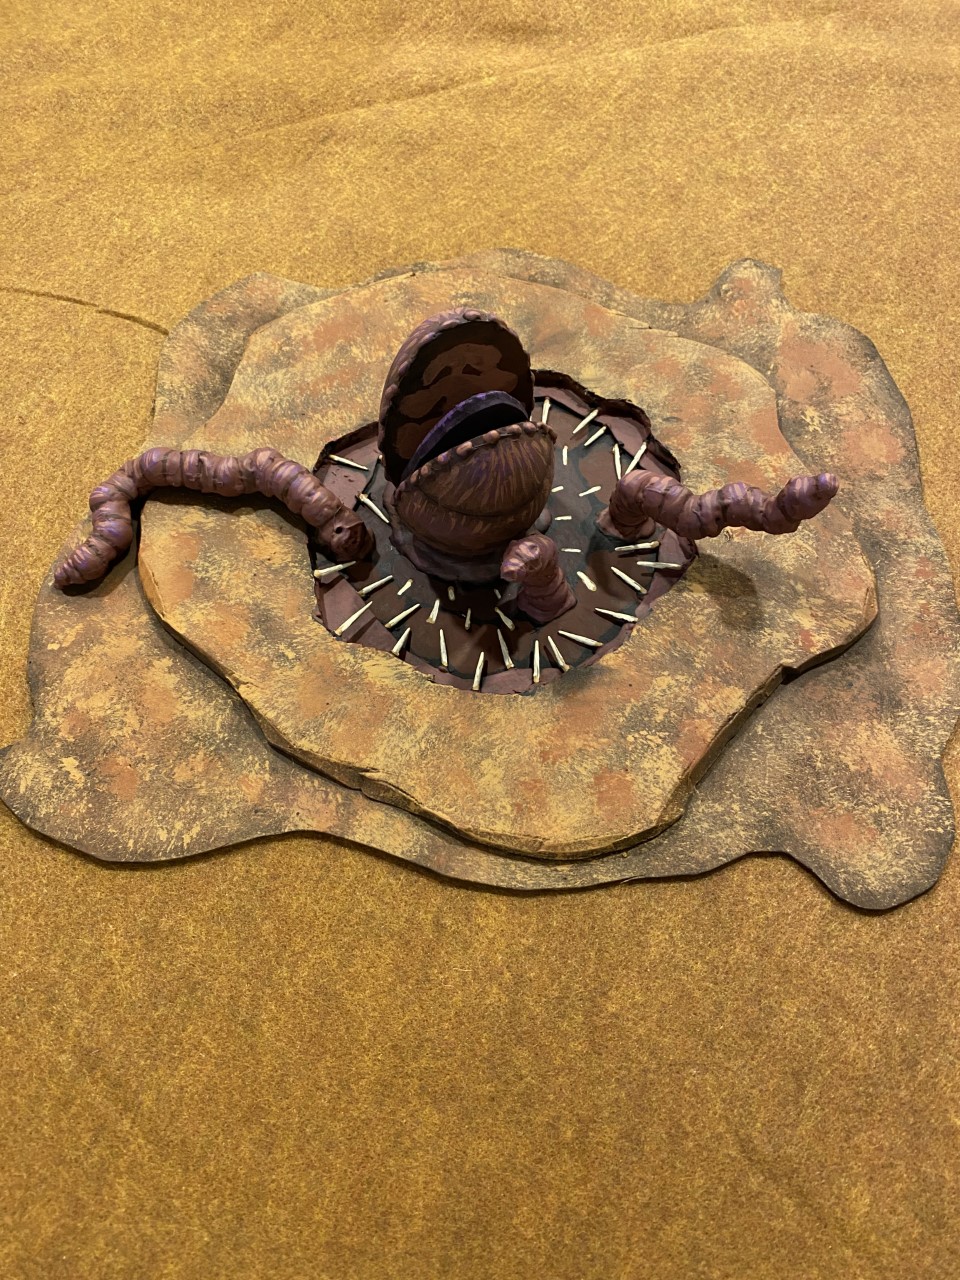
 Finished the sarlacc pit today so I thought I would post some pictures of it.  For the game, it is more of a "terrain piece" since it doesn't move or anything, but I treated it in my mind like a big figure so I would have more fun doing it.

A while ago I did some tentacles for the LotR games I was doing that were coming out of the water so I knew that I could use a similar construction approach with the tentacles of this beast as well.  They are beads hot glued together and then some white glue is put in the joints to increase strength.  After that, I used a hot glue gun again to smooth out some of the joints to make them look less like a beaded necklace and more like a tentacle, which essentially means that I covered up the white glue with more hot glue to make the transitions between the beads less severe.  It takes a lot of hot glue to do this, and some patience, but it's worth it in the end I think.

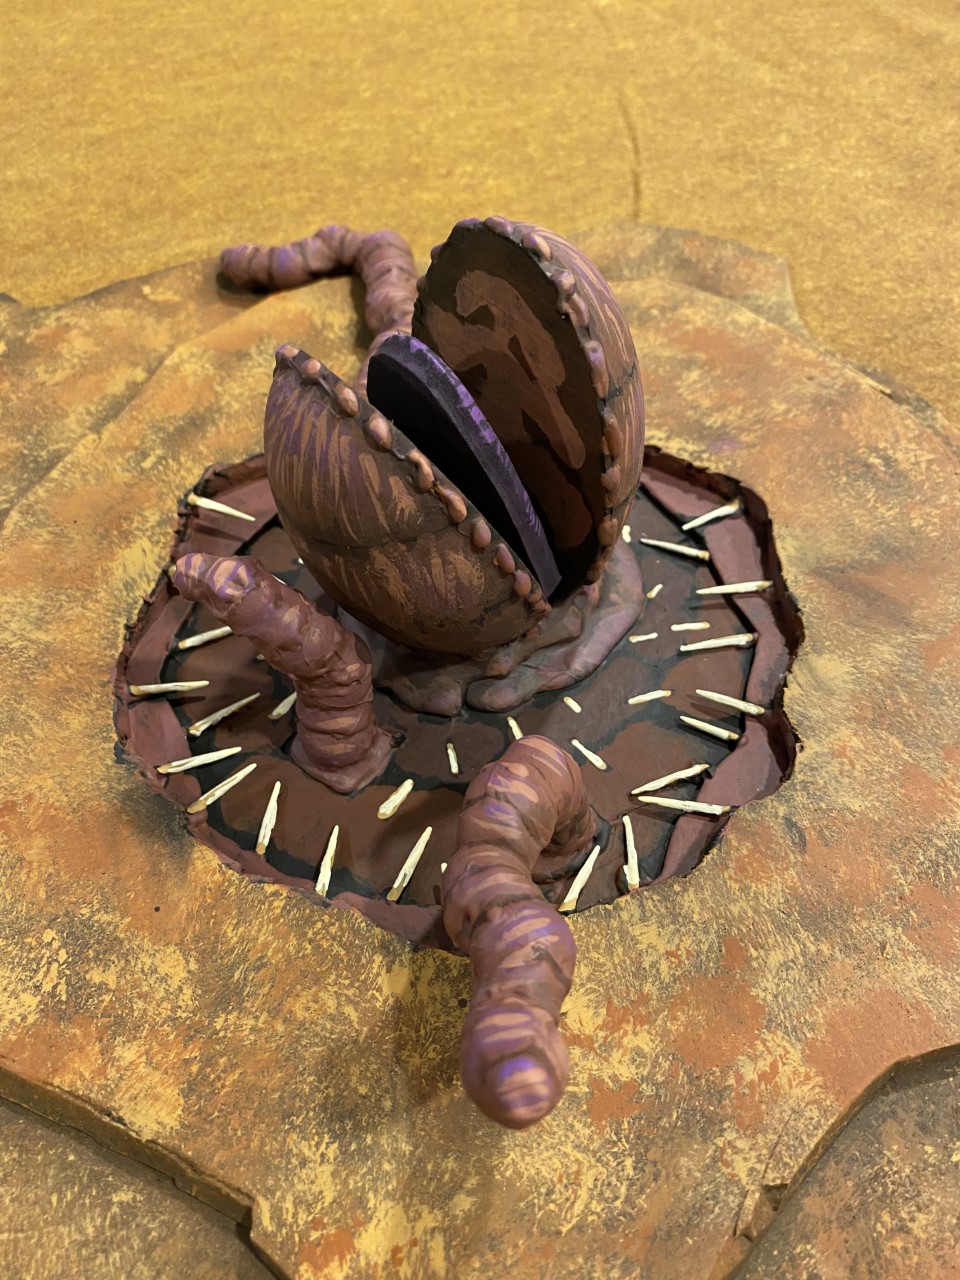
The head is made from two very large split eggs.  I used hot glue to make beads around its mouth just to give it some visual interest even though the "real" creature from the movies doesn't really have this.  Like the tentacles, the head is glued to a thin wooden pre-cut circle shape I bought at the craft store that I think is 6 inches in diameter.  I then took a large piece of the thin craft foam, cut it in an irregular shape much larger than the wooden circle, and cut an irregular center out of it that is smaller than the wooden circle and then glued that foam to the thin wood circle.  Then I took a smaller piece of the thick craft foam, cut it into an irregular circle shape that is larger than the wooden circle but smaller than the thin craft foam, and then cut the center out in an irregular circle as well but making sure it was a bigger circle than the interior of the thin craft foam.  My hope was that once the thick foam was glued onto the thin foam it would give a bit of 3D dimension and create a "hole" effect.  This seemed to work, especially when I then painted the center as if to appear that it is going down into the throat (?) of the creature.  On the top layer of thin foam closest to the center I added toothpicks with hot glue to give the impression of the spiky things on the inside of the creature's throat (?) and then painted smaller versions on the wooden circle closer to the center as the throat (?) descends into the depths.  The tongue is thick craft foam cut to shape and then I cut the part at the back of the mouth at a 45 degree angle to allow me to really squeeze the tongue down onto the base when gluing it so that it was snug up against the mouth pieces.

Here are some shots of it.

The base is painted with the stipple brush just like I did for the flight bases for the skiffs.  It's hard to see in this picture but the throat (?) of the creature is painted with a darker layer close to the neck of the head, then a lighter layer next to that, and then the lightest layer at the top which is the thin craft foam.  I was hoping that the darker to lighter color variation would create an illusion of depth.  I am not going to lie, it was really fun to build and paint this thing.

More pics.


You can see the toothpicks better here.  Can you tell which ones are painted on and which are actually 3D toothpicks?  Not easy, even in person.

Here is the pic from the movie that I used for inspiration.  How do you think I did?


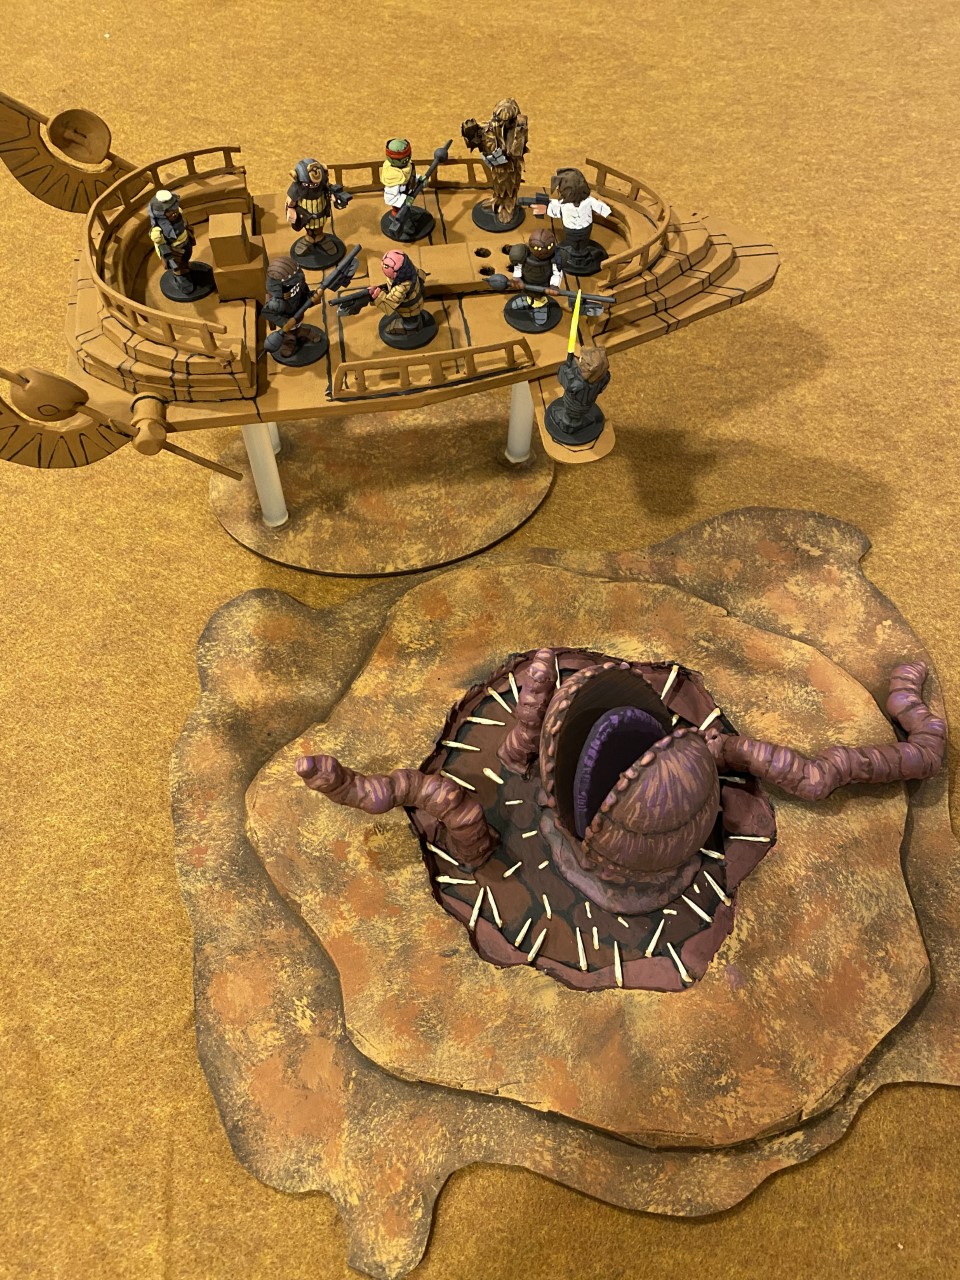
 And finally a pic with the skiff so you can get a better sense of the scale.  Watch out Luke!  Be careful!

I am pretty happy with it, it is large enough to be intimidating on the tabletop, but small enough that transport will not be an issue.

All that's left now are the figures on Jabba's barge, including the droids, Princess Leia, and Boba Fett, and the barge itself which is going to be a nightmare.  But I'm still doing good on time, still more than a month to the convention.


Thursday, April 9, 2020

Conan Princess Captive

I have been working on some of the terrain pieces for the Conan game.  There are a bunch of these natural stones that stand vertical all around the battlefield.  On one of them is the bound princess whom Thulsa Doom is trying to kill, and Conan and his colleagues are trying to return to her father.

Here is a promo photo from the movie.  This image does not exactly appear in the movie, there is a scene where Subotai actually kills this guard with an arrow that does show up in the movie, but this exact image here does not.  However, I really like it and it gives a good visual of the stone, the chains, the princess, etc.


So this is what I used to inspire my terrain piece for my game.

I used a large split egg so that the side she is on is flat, but the back side is rounded.  It is tapered at the bottom, because it's an egg, so I had to surround the bottom with paper and glue it on to make it more straight up and down.  I made the princess separate (standard construction, nothing new), and painted her up, painted up the piece, and then glued her on.  After she dried I painted on the chains.  The anchor points are split beads that I glued onto the split egg.  But the chains themselves from her wrists to the anchor points are painted on instead of being 3D.  It just wasn't worth it to me to try and do chains that small, and in my experience with other attempts, things like chains are really hard to do.  So I just painted them on.

Here is the finished piece.


I like how she turned out.  I used paint colors for the stone that are consistent with the drop cloth I will be using for the base of the board, so it's not exactly like the movie image.  The thing she is standing on is s premade wooden piece that I think is some sort of spindle or axle thing, but I have used them before for things like water containers, braziers, etc.  A gaming buddy of mine cut it in half for me so that I could make it rounded in the front but flat on the back so that it glued to the split egg well.

Here are some other images.


And finally here is a shot so that you can see it from the side.


I am pretty happy with it, it will look good as a goal piece on the board for the game.

Tuesday, July 31, 2018

New Dungeon Tiles!

I have been working on how to run a dungeon crawl convention game that is sort of like what I ran a couple of years ago at Barrage:  light rpg with a boardgame/minis game feel.  I want it to be somewhat random, so that I can run the same game again and again but not have it be exactly the same so that people can play in it more than once if they want to.  The biggest stumbling block, frankly, is how to do the dungeon itself.  It obviously needs to be modular, but the ones I had before while modular, were a) too big in terms of how many spaces were on each tile, b) not uniform enough so that you could avoid situations when the dungeon build was impossible (such as having a hallway be too long because it goes into an existing room), and c) they looked more than a little on the boring side.  The tiles were flat pieces of thin wood with spaces painted on them ... <yawn!>.


So I decided to take a look at the tiles used in some of the dungeon crawl board games.  There are several on the market where you build the dungeon as you go and you never know how it is going to turn out because each piece of the dungeon is randomly determined.  This is exactly what I needed!  There are several out there, but the ones I liked the best were from a game called "Dungeonquest."  There are two versions, an old GW effort and an updated modern one, and both of them used the same types of tiles.  They are squares with a random number of exits coming out of the tile.  The thing is, though, that the exits are always centered in that side of the tile.  This makes building a dungeon really easy and you do not run into the "tile won't fit here" problem because all the tiles are the same size, same shape, and the exits are always in the same place.  Perfect!  Plus, honestly,  I think they look really cool!


So I decided to give it a go and make some out of foam.  However, I wanted these to be a little more intricate than the foam ones I have been making which are essentially just a piece of thick foam with the floor painted on them and in some cases I draw on a grid.  I wanted to use thick foam for the floor, thick foam for the sides, and thin foam for individual tiles.  This would be some work, but I probably won't need more than 30 or so total tiles for a convention game that lasts a couple of hours.


I've got 5 of them made so I thought I would share them with you, arranged into what an actual game might look like.  I also made some new doors, but what's nice about these doors and the way this game is you only have to paint the front side.  After a door is opened, it stays opened so you can remove the door from play.  Here they are:


The entrance is there on the far right, stairs leading down to the dungeon from the outside.  The rest of the pieces are all the same size (9" squares) with a border for each depending on the type of room or hallway it is, and 1 1/8" thin foam tiles for the "squares" of the board.  I of course added some dungeon "furniture" and heroes and monsters for looks.


Here are some close ups of the various tiles.  First is the entry chamber.
Next is the torture room complete with Naga.


Now for the Troll's treasure chamber.


And finally another overview shot of a section of several tiles of the dungeon.
Here is a shot of a constructed but not painted tile.  It makes it a little easier to see all the pieces.  This is a "dead end" room that has only one entrance (at the top).
The tiles are durable, light, and easy to transport.  Since they are all the same size I can stack them easily and they should take up very little space in a box when transported relative to how much space on the table top they take up.  The construction takes a little bit of time, but most of the time is waiting for the glue to dry.  Painting them is a breeze.


Although this might not be ideal for a traditional rpg situation where the rooms differ in size as do the hallways, for a convention board or minis based game, I think they will work very nicely.

Monday, March 12, 2018

Thoughts for the Day

I've been thinking recently about this whole process of making miniatures from wood craft bits like I do, or developing them from a pawn or clothespin base form like Dale, Ken, and Stephen do, or the clay sculpture figures that Vicente does.  I have also started to think more and more about the general "crafting movement" in rpgs, in particular work on terrain by people like DM Scotty and DMG (check out their youtube videos if you haven't, they are both awesome).  I know we do it primarily out of a gaming need/desire.  But it has to be more than that. 

We are fortunate enough to live in a time when there are pretty much professionally sculpted miniatures and terrain pieces for anything you would want, and if you happen to hit on something that you can't find, I highly recommend doing a Kick Starter search before concluding that "that miniature doesn't exist," because much of the time you'll find a KS for it ... it may never get finished, but at least there is a mention of a KS for it.  So it isn't like the 1980's when we might be making miniatures because the ones we need to not exist.  We can get professionally made miniatures and terrain of whatever we want, all we need to do is paint them.  So why do we do the stuff that is covered on this blog?

I then got really reflective and thought back to the art appreciation courses I took when I was a wee lad in college and it sort of hit me.  And I came to this conclusion.  I think that one of the main reasons those of us who do this whole miniature construction and painting thing is out of individual artistic expression.  These pieces are art to us, not just purely functioning objects to use in a game.  Sure, that's part of it, but the amount of blood, sweat and tears that we put into these little fellows far exceeds any benefit provided by creating a functional gaming piece.  And again, all those gaming pieces already exist, sculpted by professionals.  All we have to do is paint them.  And yet, we continue to do this "art."

So the next obvious question is "okay, but what kind of art?"

I'm starting to think that one could classify what we are doing as "folk art."  Here is dictionary.com's definition of "folk art":

"Artistic works, as paintings, sculpture, basketry, and utensils, produced typically in cultural isolation by untrained often anonymous artists or by artisans of varying degrees of skill and marked by such attributes as highly decorative design, bright bold colors, flattened perspective, strong forms in simple arrangements, and immediacy of meaning."

Wow, that definition seems to hit on a bunch of things that appear to be true for the artistic process covered on this blog.

1.  Produced typically in cultural isolation:  Seems certainly to be true.

2.  By untrained often anonymous artists or by artisans of varying degrees of skill:  Check.

3.  Marked by such simple attributes as highly decorative design, bright colors, flattened perspective, strong forms in simple arrangements, and immediacy of meaning:  CHECK!!!

It seems to me that one could consider these little wooden warriors that we are making to be a type of folk art.  

Others agree?  Disagree?  Could care less, I just want to see more little wooden guys? 

Thursday, March 8, 2018

Sarcophagi

I do enjoy making scenery pieces for the table top, so I decided to do some simple sarcophagi.  Can't have too many of those.  Nothing fancy, just some nice scenery pieces I can throw on the table top.  I did get fancy with the one in the middle and had a skeletal hand grasping the edge, begging the question of "what's inside?!"
They are all basically made the same way.  Two 1 inch cubes glued together with a 2.25" x 1.5"
"sign" precut wooden part from a craft store for a lid.  I then added some thin craft foam pieces to some of the tops, some of the sides, and for the blue one I used the same small round thin precut pieces I use for shields to the front for decoration.  The red one has a small split bead on the top as well, and the skeletal hand is just made out of time spacers.  The skull on the dark brown one is just a split bead for the skull with a smaller split bead for the open mouth.  I glued it so that the split side is facing up to create the "mouth."

Very quick, very easy, and definitely something I would be happy to put on my game table.

Wednesday, January 10, 2018

Trees

Finally got around to painting the trees I bought at Michael's a while ago.  Nothing fancy, but I did base them.  Even though each tree has its own built in base piece, I glued each one to a thin round precut 2" piece that comes in a bag of different sized circles.  Especially if I am going to use these in wargaming, I think I need more stability than the built in base provides.

Sunday, April 23, 2017

Completed Balin's Tomb Terrain Layout

I was extra motivated this weekend to get this terrain finished once I decided how I wanted to construct it.  In truth, I still want to make a well, but that will be easy and add little to the look of the overall game board, so I thought I would just go ahead and share pictures of it.

I found a picture for a board layout of Balin's tomb online for the Heroquest game.  I like their boards because they are so symmetrical and pleasing to the eye.  So I decided to use it as the basis for my own game board for my Balin's tomb scenario using the Lord of the Rings Strategy Battle Game rules.  The scenario in the book calls for a 4' x 4' board, but that's just too big for Balin's tomb.  Also, I want to give the goblin players a chance to actually win this scenario, and the only way that is going to happen is if they can swarm the Fellowship relatively quickly, so a large game board is the goblin player's enemy.  So I went with a game board that is in between the 4' x 4' monster called for in the book, and the tiny 15" x 18" or so board that some scenarios call for (that's actually too small for the number of figures, goblins specifically, that I want in the game).

Of course I wanted to stage the pics of the board with the miniatures so that you can really see how it will look when I run the actual game.  So that's what I did, choosing to represent a moment early in the scene in the movie where Sam comes face to face with the cave troll.

There is the entirety of the board.  It measures about 26" wide and 40" deep.

More of a close up shot of the action and some of the scenery.  Balin's tomb I've talked about before, but putting Gimili on top of it with goblins rushing him just looks cool.  Each corner of the board is a craft box made out of cardboard I got from Michael's on sale for I think $1.49 each.  I just removed the lid, painted them black, and then painted the gray all around on the walls, leaving the tops black.  The pillars of course are different than the ones I did before.  I decided to go with square ones, and these are just wooden blocks glued on top of each other (I believe they are 1.5" cubes) with precut thin wood circles and squares glued to the front side to create visual interest.  The walls (on the front and rear of the tomb) are made from thick craft foam with wooden squares glued to one side flush with the bottom so that the wall will stand up and not tip over easily.  I decided not to do an actual door and just leave the "doorway" open so that the miniatures can easily move through the space.  I might change my mind and do an open doorway, we'll see.  The two sides are made entirely from thick craft foam.  The walkway is 2 inches wide, 24 inches long.  The stairs are just the same thick foam cut of the appropriate length to make a stair step on each side of four stairs each.  In the middle I stacked and glued four pieces of the thick foam to support the middle of the walkway to keep it from sagging in the middle.  I decided not to put a "back wall" up against the back part of the walkway on each side of the room even though one is there in reality.  I think that by not putting in a wall, it will make it easier for players to move the figures for the game without banging into a large structure with their hands, like the walkway, and causing problems during play.  I hope that using the paint shade going from light gray on the front edge of the walkway to complete black for the part of the walkway that is against the wall will at least give the visual illusion that the walkway ends there in a "wall."

Sam bravely confronts the cave troll!

Boromir and Aragorn fend off a horde of goblins!

"Let them come!  There is yet one dwarf in Moria who still draws breath!"

Gandalf and the "wee ones" defend themselves!

Another wide shot of the action, this time from the other side.

I think the club game schedule is pretty full, so it will probably be June before I can run this game for the members, but I'm looking forward to it.  I'll offer it at Barrage in September/October (whenever the convention falls this year) as well.  In all cases when I run it, I'll post a battle report here with pics (assuming I remember to take them in the heat of the game!).


Thursday, April 20, 2017

Dungeon Terrain for Balin's Tomb

I've been away from Craftees for a while now, instead repainting a boat load of Mage Knight figures for my biweekly D&D game.  But this week I returned to doing Craftees at least for a little while to get the terrain done for the Balin's Tomb game I hope to run in my club probably in June.  I'm still working on how to do the walls Craftee style, but here are some pictures of Balin's actual tomb, as well as four very large pillars that I will probably use (depends on how I decide to do the walls).  If the walls are more than just a flat surface, then I probably won't need the pillars.  But if they are just a flat surface, I'll need something in the room to provide cover, block line of sight, etc. to make the game interesting.

Here are the four pillars and Balin's tomb with the Aragorn figure included for scale.  You can really see how large the pillars really are scale wise.
Here is Aragorn with the pillars more up close.
And here is Aragorn next to Balin's tomb.
Pillar construction was simple.  Just a very large spool from a craft store with the larger circular thin wooden disc glued to the top (it comes in a pack with small, medium, and large discs all together), with the small discs from the same pack glued around the middle of the pillar to provide some visual interest.

Balin's tomb is a thin 2" x 3" wooden base with the top and bottom "slabs" of the tomb made from 1 1/2" x 2 1/4" thicker pieces of wood that come together in a pack of I believe three or four at Michael's.  The pieces in between the two slabs are six small cubes (1/2" I believe) arranged 2 x 3.

Painting was the same for each.  Base coat of black.  Then I used dark gray to lay out the basic "marbling" appearance.  Then on top of the gray a slightly lighter shade leaving some of the darker gray showing throw.

That's about it.  Next up will be the walls of the tomb itself, hopefully with a door like in the movie.  We'll see what I'm able to put together.


Friday, September 16, 2016

Wooden Trees

First off, let me acknowledge that it has been a long time since I posted to this blog. I had abandoned miniature gaming in favor of PC gaming for more than three years. I did pick up a paintbrush and my wooden soldiers every so often, but honestly I had lost the inspiration. There are a number of things I could blame – the disintegration of the local gaming group, three separate local hobby shops going out of business – but the reality is that PC gaming is easy (little to no preparation or cleanup), visually pleasing, and you can usually find a game at any hour day or night. Hopefully this post is a sign that I have found my way back to miniature gaming, or at the very least, making more of my wooden warriors.

The one issue I am constantly faced with is appropriate terrain for my wooden warriors. Given that they are an odd scale (somewhere around 42mm, foot to eye), you are unlikely to find commercially available terrain. Furthermore, all of the "realistic" terrain seems at odds with the "whimsical" nature of my wooden warriors.

One day while strolling through Hobby Lobby in the wood crafts section and I spied these wooden trees on the bottom shelf. They are easy to miss, but look for them. There are usually three different sizes, the smallest being 4" tall and $1.99 each, the middle being about 5" tall and $2.99 each, and the tallest being about 6" tall and $3.99 each. You can see the three tree sizes below, alongside my wooden warriors for comparison. They look great and fit the part.


I feel like these trees are a bit on the expensive side, but I have not found a good source for them elsewhere. I found some 2 3/4" trees on Amazon, five for $13.20. (These would be great for DM Matt's 25mm scale fantasy craftees or his historical craftees, which are the same scale.) American Woodcrafters Supply has 2" trees for an incredibly low price of $4.95 for a bag of 12. It gets even cheaper if you buy in larger quantities. (Yes, this is the kind of markup you are paying for when you buy from Hobby Lobby or Michaels.) Woodworks Ltd. has 2 3/4" trees, 25 for $18.00. Woodworks, however, will make custom items, so I should contact them and get a price for 4', 5", and 6" trees.

Of course, you can always find a Chinese manufacturer on Alibaba and deal direct, but the minimum orders may surprise you. I found the 2 3/4" tall trees for $0.50 a piece, but the minimum order was 10,000 pieces. Even I am not that crazy to place an order like that! (By the way, the trees at Hobby Lobby are all manufactured in China, so it is not like going direct is all that different than what they are doing.) But no 4" or taller trees. Guess I am stuck with Hobby Lobby for now. I buy a couple every week or two and my collection grows.

At first I painted mine with cheap craft paints, but as always, it takes so many coats. Later I found that some of my unused, bought-cheap-at-a-sale Flames of War paints not only covered in 1 to 1 1/2 coats, but they looked nice too. Always nice to mix up the colors.

One final note: these trees are clearly not manufactured by machines, but by hand. There are a lot of variations in height and width. I even have one where the base was cut crooked so the tree leans. (That was a selling point.) Although I wish I could find a cheaper source, I think these trees perfectly fit the style of the figures. What do you think?

Sunday, January 20, 2013

Wooden Trees

Welcome

First, let me start by welcoming new reader jimduncan779. I hope you enjoy the articles. Know that posting comments is welcome, as is suggesting future topics.

Simple Trees

I posted on the Wargaming on a Budget forum on Yahoo a link to a tutorial (scroll down) where a guy was making alien trees for his science fiction games with wooden shaker pegs and hot glue. I decided to give it a try, but with a little twist. I did not want to use the plastic flora from Michael's, but rather to use some wooden shapes that you can also buy cheaply from Michael's, called Woodsies 330ct Teardrops, Ovals, and Circles Pack by Loew-Cornell.
Let me apologize in advance for any blurriness in the photos. My workshop/man cave is unheated at the moment and we are hitting below freezing weather here in Arizona. I guess my shivering was causing more of a problem than I suspected!
I started off with a shaker peg (3"+ long), a 1 ½" disc for the base, and some of the shapes that come in the package.


Generally the pack comes with three sizes of teardrop, ovals, and circles. I started by hot gluing a ring of medium-sized teardrops to the top of shaker peg.


After that I used a series of small teardrops, ovals, and circles to cover the gaps on the top. I added a second layer of medium teardrops under the first to flesh out the foliage.


Once everything is in place, I squirt a lot of hot glue into the underside of the model to bind everything together and give the whole model strength.


As for cost, the greatest expense is the shaker peg in the center. I bought a two-pack for $2.00 off of the shelf of Lowes (a DIY hardware store, for those from other countries), which is hardly the cheap route. You can get them as cheaply as $0.16 in bulk (500; $0.20 each for 100) from craft parts wholesalers on the web. If you plan on making a lot in one go, this could be pretty cheap. More to the point (for me), is that it has that "craftee" look that goes so well with my soldiers.


Contributors

Followers

Blog Archive

Popular Posts

Labels I Use in Posts