
<dusting off the keyboard> Well, well, it's been a while. Almost a year. How time flies! I haven't been doing much in terms of wooden figures this part year, mostly spent my time painting up a complete Heroquest game, but with Barrage coming up I need to do a wooden figures game.
So, as usual I am trying to get a game together for the Barrage convention this year. I had almost given up this time, if I am completely honest. I couldn't get motivated for a particular project which I have found is very important to me in terms of getting things done. I need to have the "I need to see this game on the table top with little wooden warriors" in my head or I don't finish the project.
I thought about doing a superhero game with Batman and Robin and some traditional villains. I still want to do that, but the prospect of making a table full of buildings and not really knowing how I want to do them was just too daunting.
I thought about a second Conan game, in particular the "rescue" (abduction!?) of the princess from Thulsa Doom's tower basement, so that I could do two games in a row as a "campaign" (the rescue, then the one I did last year the final battle). But again the though of how I would do the large multi-level room where the heroes steal her from was just too much to do in a couple of months. If you haven't noticed a trend already, I enjoy doing figures ... I don't really enjoy doing terrain.
Then I thought I would just do the Lord of the Rings game again and just remake the Fellowship in the same style that I do figures now. It's a fun game, the folks who have played them have really enjoyed them, and I love LotR. But the idea of "remaking" figures was not that appealing to me.
As I was killing time one Sunday afternoon before my weekly evening rpg, "Return of the Jedi" was on. I love that movie, it's my favorite of the original trilogy films. As I was making my way through the attempted rescue of Han at Jabba's place (sorry for the spoilers! :-)) when they got to the execution scene at the sarlacc pit it hit me ... like a ton of sand ... what a great convention game this would make! You know how much I love co-op convention games so the players would play the heroes and droids and I would play the henchman and Boba Fett (bonus!). With figures like the ones I do trying to make the figures look individual while using basically the same body, head, arms, and feet construction is a real challenge but is honestly the fun of it. Jabba's henchman are all very distinctive from one another, and obviously the heroes look quite different from one another. Plus ... no f-ing terrain to speak of except for the sarlacc pit which is really more of another figure than it is a terrain piece! Yes!
So my 2022 Barrage Convention Game was born! The Battle of the Great Pit of Carkoon! And, to quote Pippin, "where are we going?" In other words, where to start?
Breaking down the game it has the following requirements as I see them:
1) 2 Skiffs (small ships) each has a collection of henchman and one of them has all the heroes on it minus Leia and the droids.
2) Sarlacc pit - a terrain piece but I will treat it like a figure. I actually think this will be fun for me.
3) Jabba's Barge - henchman, Boba Fett, plus Leia and the droids. It also has a couple of medium-sized guns on it. I really I don't need to do the interior of this thing for the game. All the fighting will occur on the outside deck. Might not need to put those iconic "sails" (protection from the suns, really) on it either as they will just get in the way of playing but I might, we'll see. But the issue is it is HUGE and is going to be a real challenge.
4) The Sands of Tatooine - fabric from Jo-anne's, no problem!
4) Rules - I looked at some commercial rules but they all end up being too complicated for my taste for a convention game. I'll just rewrite my normal fast and fun skirmish convention rules and give them a Star Wars feel. Piece of cake.
I can do this in 2 months! I know I can!
So off to the internet I went and found some great pages with pictures of everything I would need, including the crew for each craft.
Part 1: Enemy Skiff & Crew
Making the skiff I thought was going to be a nightmare, but it really turned out not to be bad once I focused on making them player/play friendly instead of trying to make them look exactly like they are in the movie. I knew that for most of the parts of the skiff, I could use thick and thin craft foam and that turned out to be true. The only things that are not craft foam on these skiffs is the control panel for piloting the vehicle (they are made from two wooden craft blocks, 3/4" one and then a smaller one that I'm guessing is 3/8" but I could be wrong) glued with the smaller one on top of the larger, and the kabob skewers that make up the rods of the tail fins. Everything else is craft foam.
I had years ago made a trireme for a never-to-happen Greek and Persian Battle of Salamis game that I never did, so I knew from making the test trireme that I could use a similar construction process for the skiffs. And it worked well I think. Thick craft foam cut to shape and glued on top of each other gives the craft the height in places that it needs. Then I used thin craft foam for the railings, cutting it as needed. You can't really see it in these pictures but there is two layers of thick foam on the bottom as well first because the skiffs in the movie have a very shallow "hull" so that's what this craft foam on the bottom represents, but also these two layers on the bottom gave me something to use to literally sink the basing system I was going to use into the bottom of the skiff. The tails of the fins and the circular pieces on the fins are also made of craft foam, the thin kind this time just like the railings. Everything was glued with regular white glue or for the railings hot glue was used.
Constructing them did not take too long. Painting them took forever. To date, I have this one done with it's crew and the other one is 3/4 done but coming along well. Here are some pictures of it with the crew figures on it with the fabric that will be used for the sands of Tatooine.
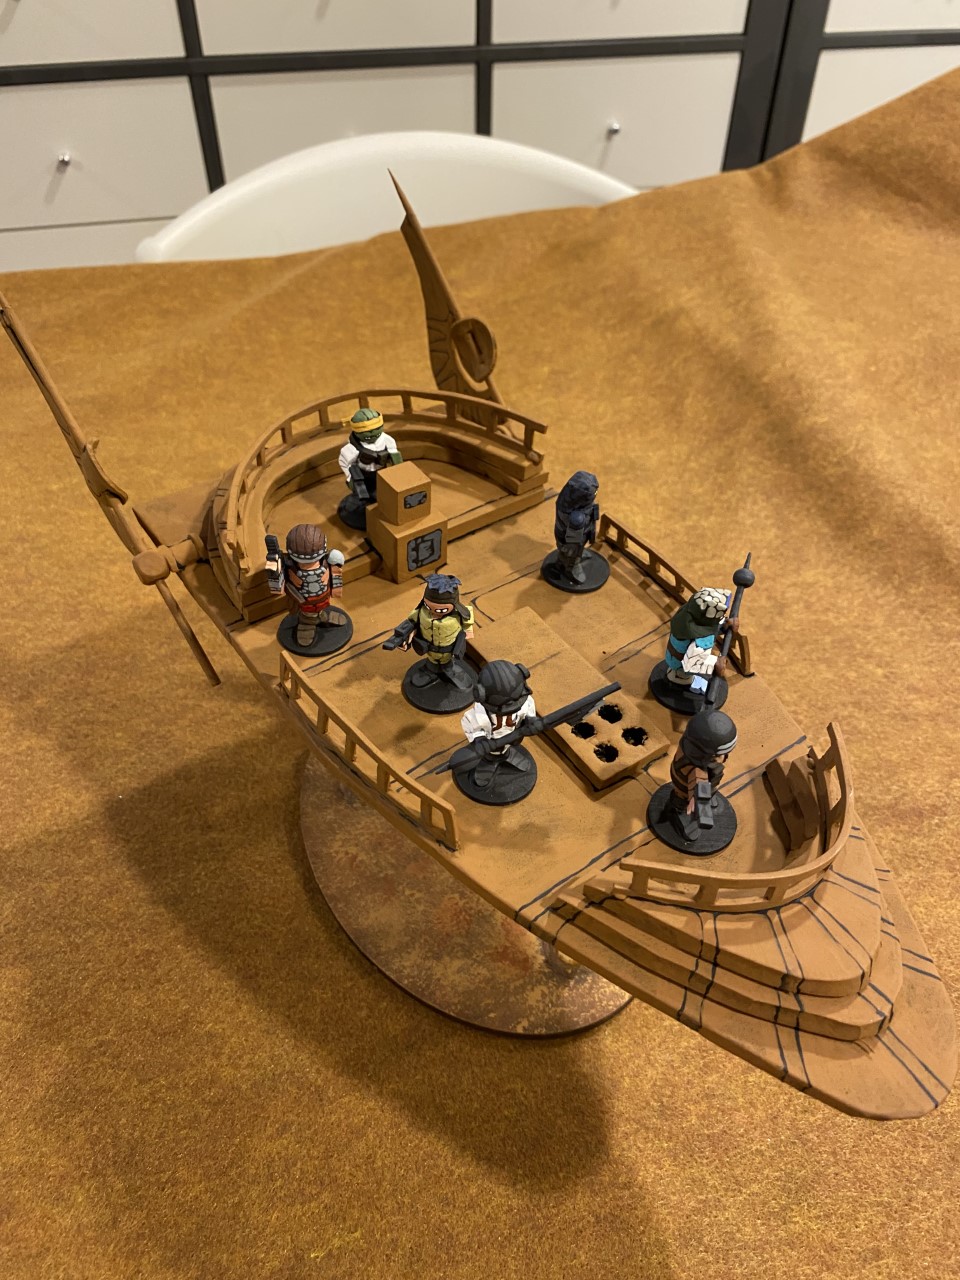
One of the trickier parts was how to attach the tail fins. I didn't want to do it permanently because I knew in transit they would break off at some point. So instead I used split spools glued flat side down to the floor piece of the skiff in the rear of the craft with squared off beads glued to the ends of each split spool sticking out from the side of the body of the skiff with the hole in the bead pointing in the right direction. This allows me to slide the tail fins out and off the craft for transport, and they stay in place because of gravity, but makes it really easy to set them up once I need to do so for the game.
I took some liberties with its dimensions just to make the skiff more playable in the game. The deck is about twice as wide as it really was relative to the size of the figure bases. If I didn't make it wider, though, it would greatly limit movement for the figures and make for not a very fun game. I also needed to tilt the tail fins differently than they are on the skiff in the movie so that the fins were less vertical and more flat. If I didn't do that, you know that ever turn at least one player or me is going to bump a tail fin as they are moving figures and knock the whole thing over. But the length and the relative size of the front and back angled parts of the skiff are consistent with the skiff in the movie, at least as best as I can tell from photographs and some schematics I found online ... without any actual measurements in them, they were just drawings. But helpful nonetheless!

You can see the base here a bit better. This was another challenge, and I didn't want to purchase an aerial base from a company. In the spirit of crafted figures, I wanted to make them using craft type supplies. Michael's has greatly reduced their wooden craft supply section, much to my disappointment, but they do still have these thick wooden pre-cut pieces that are great for bases for the skiffs because they are so thick and heavy relative to the craft, not to mention being the perfect size. How to get the craft to "fly"? Again, I wanted to use existing craft stuff for the clear poles used to make the vehicle fly and thick glue sticks for a hot glue gun are perfect for this. First, they are more or less clear. Second, they are flexible. This is really important because I know that I am not going to be perfect when cutting the holes in the first layer of foam that makes up the bottom hull of the skiff into which these glue sticks will be inserted to "hold" the skiff onto the base. A little flexibility in the posts is not just ideal but it is going to be a requirement due to human error.
To make the base all I did was first use the glue stick as a guide for the hole size, I literally pushed it into the foam piece before it was glued to the bottom of the skiff which left an indentation for where the hole should be and how big) and then just cut out the holes out of the foam with a hobby knife. So when this bottom hull piece is glued onto the next bottom hull piece the glue sticks will "slide" a ways into the bottom of the skiff itself. Then after the holes were cut I put the foam piece on top of the wooden base and traced where the holes were on the base. After that I glued the foam piece to the bottom of the skiff and then off to the hot glue gun which I used to attach the glue sticks to the wooden base putting them over the circles that I just traced from the foam piece template. All that's left after that was painting the base which was easy. I used a dark brown, burn sienna, milk chocolate brown, and a yellow ocher layered with a stipple brush and then removed any paint from the glue sticks (the acrylic pain did NOT like sticking to the glue sticks so this was easy). Done!

Painting them was a nightmare and I wanted to do it freehand. Painting them this way fits with the "folk art" style of the figures, so I'm glad I did it, but it took ... forever. Painting the brown, then going back with black and repainting the lines to get them as crisp as I can freehand, etc. But I am happy with the skiff. It looks cool and is still playable as a mini game piece. Onto the crew ...
This is the "escort" skiff, not the one that has the heroes on it originally (that will be my next update most likely). So this skiff at the start of the game just has bad guys on it. I eliminated one of them (honestly because I don't like how he looks as an alien!) but the rest of these guys are made to represent the henchman on this craft that were on it in the movie. They of course eventually all die but not until Luke makes his way over to this second skiff craft.

They all have names, I'm not enough of a Star Wars fan to know or remember them, but these three humans are some of my favorites from this skiff. The front guy with the diving helmet and the white jump suit is awesome. The dude in the yellow-green jump suit is also cool (has great head wear), but my favorite hands down on this skiff is the human in the back with the sci-fi helmet and the ancient period torso armor. I love how his pose came out. I love how his paint job came out. And he is just my favorite collection of armor, clothes, and weapons of all the guys on this skiff.

I am also a fan of the alien that is towards the back holding the gun down at his side. His dark color scheme is hard to see in this picture, but he turned out cool. The guys with the melee weapons (either a vibro-axe or a vibro-spear like this alien closest to us in this picture had) were not tough to do. Just a collection of toothpicks, small beads, and cut pieces from tile spacers. You can see the other human armed with the blaster at the front of the skiff in this picture. He's the one who gets kicked by Luke in the face during the movie.
I hope you like them! I am very happy with how things are going so far. I think the hardest thing I have to do is going to be Jabba's barge just because it is so big, so I am saving it for last. Next up, the skiff with the henchman and heroes on it, complete with a plank for Luke to be forced to walk.


