Sunday, May 30, 2010

Making Feet Faster

In a previous blog entry I went over the process of making feet for the infantry man and one of the last steps is putting on the modeling material to give the feet mass. Currently I am making a batch of 20 infantry man and it was while putting on the modeling material that I struck upon a slightly easier method.

One of the items I noted was using a sculpting tool to shape the blob, but I also use an X-Acto hobby knife to remove excess material. I've since found that it is easier to shape the blob, but not cut off the excess right away. I let it harden a bit - say waiting at least an hour - and then come back with the knife and cut off the excess. This does two things:

  1. Makes more of a cut, rather than a tear, of the material.
  2. Less chance of the whole blob popping off of the wood as it has had some time to adhere to the surface.
A simple tip, I know, but it is actually a time-saver and less frustrating.

Wednesday, May 26, 2010

Infantry Tutorial Continued - The Musket

Making a musket is pretty easy, as it is simply a flat toothpick. In the craft store you can get about 250 for $3. I like them a little better than the kitchen ones as they are wider; just the right size for my 40mm figures.

Start by measuring out 1 3/4", starting from the point. The pointed end will be the bayonet, the other the butt.


You can round out the flat end a little if you think it looks better. I do it just to get rid of the ragged edge from the cut.

Paint all but the pointed end a brown wood color.


Now paint the pointed end a steel metal color. In this case I used Game Workshop's Chainmail.


Now paint the firing mechanism the same steel color. A simple rectangle will do; nothing fancy. This goes on only one side, the right.


Now paint the gun barrel. Paint both sides and the top.


A musket has metal bands that bind the barrel to the stock. To pick these details out a little, paint two black bands all the way around. Some muskets have more, so if you want to be historically accurate, do your research given the type of musket and the period.


I use a brass color for the bands to add contrast to the steel. If you want to be historically accurate, research out the proper color (usually either brass or steel). Paint the color inside the black band, leaving enough black to highlight the detail. Use a smaller brush than you used for the black bands and it should be no trouble.


That's it! Very simple, but effective. No need to get more detailed as we are going for the effect. Gluing the musket to the hand should be sufficient.


As you can see, here they are with a batch of French Fusiliers. I need to photograph them a little better, but that will be next time. The wife is crowding the table where I take pictures, so I can't do it tonight.

Monday, May 24, 2010

Finished a batch of French Legere

I want to get the tutorial up regarding the "little bits" of the figure - musket, sword, epaulettes, and plume - but I needed to push myself and finish a batch of French Legere for when Command & Colors: Napoleonics, by GMT Games, ships. So, here they are:


You can see I have been practicing doing different faces, so they have a bit of character. The officer in the center has a gorget around his neck. This was made just like the brim of the shako (see that tutorial).


Here you can see details like the pointed cuffs, the sword, chin straps, etc.


Here you get a better idea of the different hair colors I used. : ) Also, you can see the detail on the muskets.

I really love these little guys. They are fun to make and paint; I just need to stop obsessing over certain details. On the table they will look great, I think.

I'll try and post the mini-tutorial on the "little bits", then start on a painting tutorial as I do the next batch of figures. I really need to start grinding units if I want to make my deadline for the November 2010 ship date.

Tuesday, May 18, 2010

Infantry Tutorial Continued - The Shako

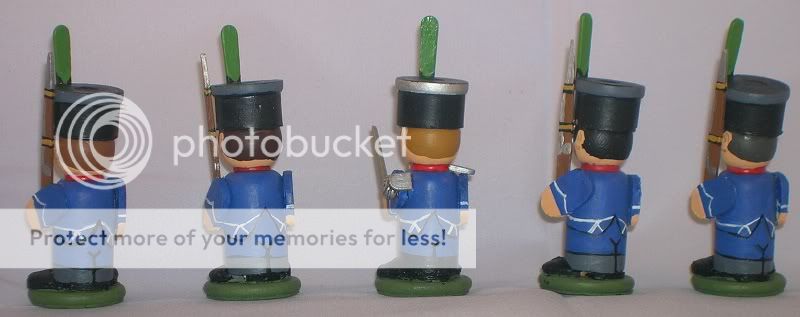
This segment shows you how to make a shako out of a wooden spool. The shako I am going for here is something like a French shako, circa 1812. To recap, I am using a wooden game piece/pawn that is 1 11/16" tall. The ball at the top is the head, which is about 5/8" wide, will be used for fitting the shako.


If you compare the image of a shako on Wikipedia with the wooden spool below you will note that the colored band at the top (which is a reinforcement for the shape of the hat) looks very similar to the "lip" on the spool. The issue, of course, is that there are two lips, one at the top and bottom. The spool I use for these figures are 1" tall by 3/4" wide, so cutting them in half will produce two shakos the right size...


So, that is what you do. Use a fine marker to measure the halfway point and cut with the thinnest saw (i.e. the smallest kerf) you have. Getting it as straight as possible is also highly desirable. : ) By the way, here is what is on my Christmas wish list for just this sort of operation: a mini-miter cut-off saw from Micro-Mark, the hobbyists small tool specialist. (Yeah, I know, that sounded like a plug. That's because it was. It just wasn't a paid plug!)


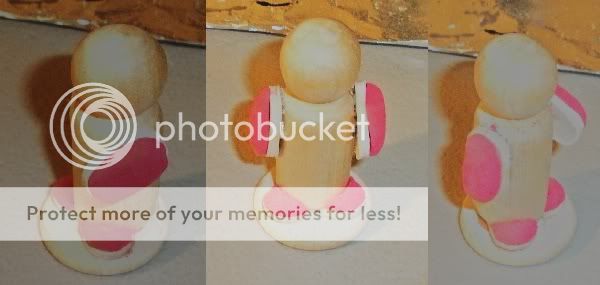
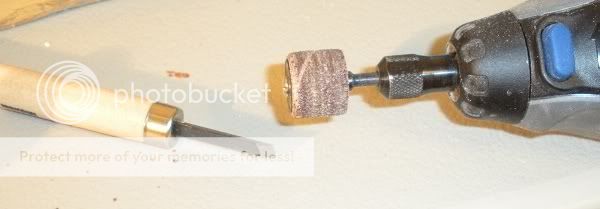
With our spool cut in half, use a sander to smooth out the rough edges. Don't worry about the center or making it level as we are going to hollow out the top anyway so that the hat fits on the head.


The next part, hollowing out the spool, really requires some tools. The good part is that the tools can be real cheap, like a simple U-shaped wood carving tool. I used a structured tooth carbide cutter for my Dremel. It removes material. (God help you if the thing skips and hits your hand though. One day I will buy a chainmail glove.) Once you remove enough material, you can get your sanding drum in and and away. As you do this, keep popping the hat on the figure, looking for a good fit. The hat needs to come down low enough to look right, but keeping in mind that the walls of the spool, once they get too thin, simply break. So if you grind too much, you are only effectively shortening the hat.


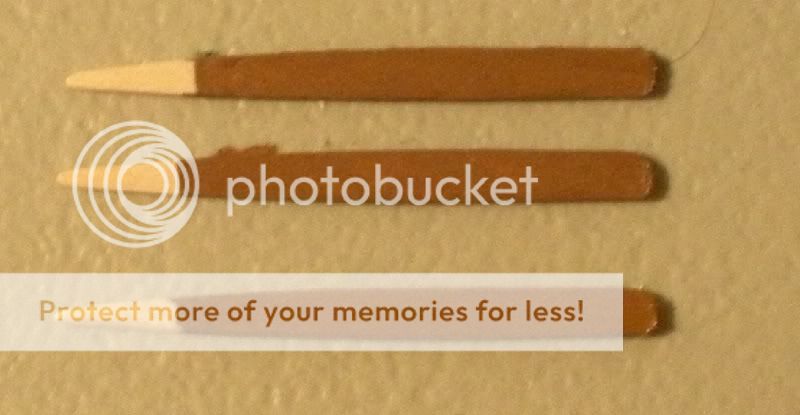
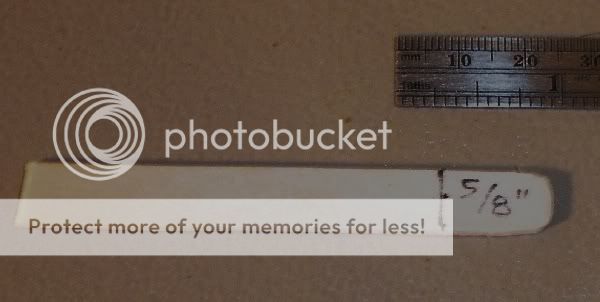
Once you've gotten a good fit it is time to build the brim, or peak, to the shako. You should have plenty of scrap craft stick lying around, so use that. Place the shako bottom on the stick and use a pencil to draw the spool's curve. This will serve as the inside of the peak. A shows you the craft stick with the curve drawn and B shows you after I have used cutters to shorten the stick down to a manageable length. Note that there is a minimal amount of material on the inside of the curve, as that will be cut and sanded away. The outside of the curve has a little more material as it will actually form the peak.


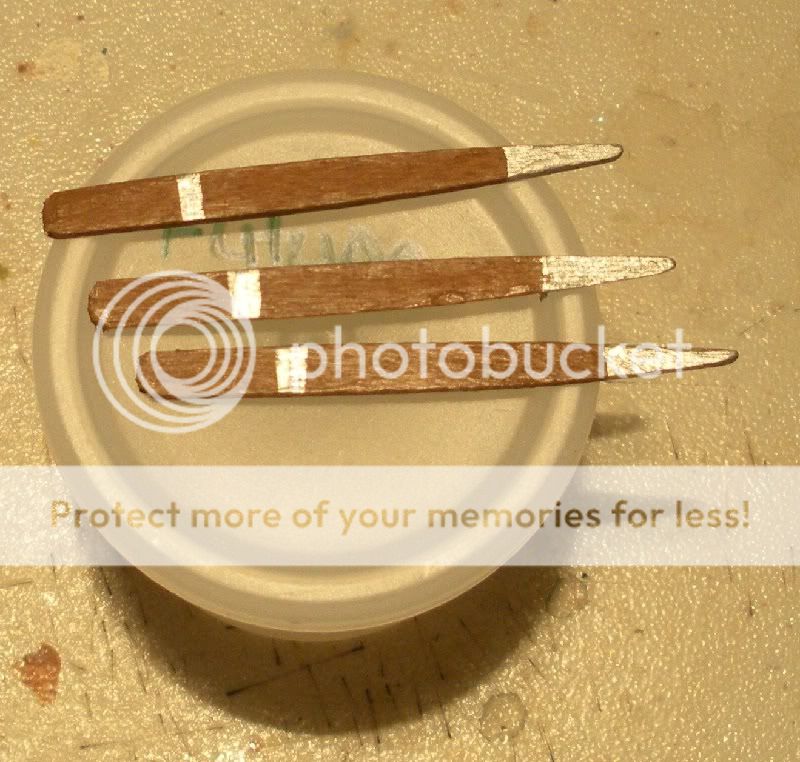
Using the sanding drum on my Dremel, I first sand away the material inside the curve (A) and then carefully sand the material on the outside of the curve (B) so it forms a crescent moon shape.


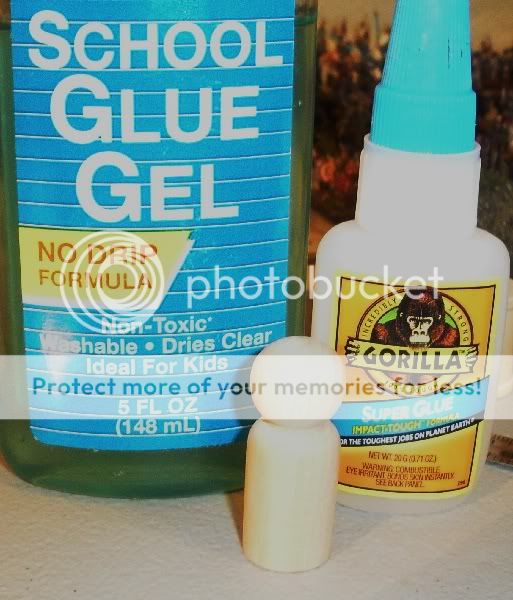
Note that if your glue is strong, such as using the Elmers School Glue Gel and Gorilla Glue super glue combination I have discussed in the past, then you can actually glue the piece on after step A and sand it down to look like B.

Once you have the peak done, glue it to the shako. Using your sanding drum, sand the top down a bit so that the edge attached to the spool is the thickest and the edge not in contact is the thinnest. From the side the peak will look like a little triangle. The following picture shows you what it will look like.


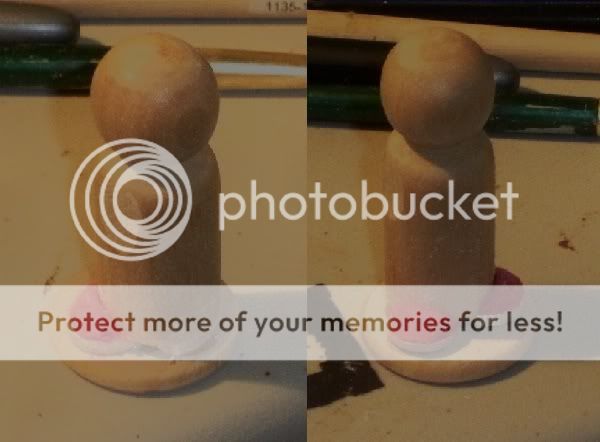
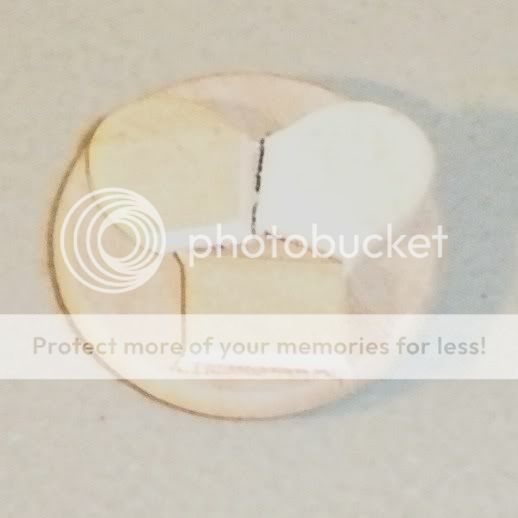
Next up we need to plug the hole in top of the hat. As always, I use my handy Crayola Model Magic Fusion to do that. A generous dollop applied on the inside, and pushed up through the bottom, while putting my thumb over the top makes a pretty flat surface. Not perfect, but good enough for me. (If I wanted perfect, I would use wood filler.)


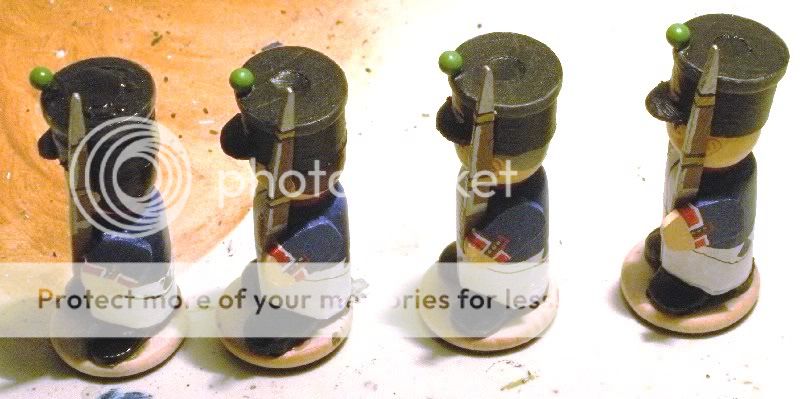
The last touches are the adornments of the shako. For most of them, such as plates, emblems, chinstraps, and cords, I simply paint them on. However, for pom-poms and plumes, you need to attach the appropriate shapes to simulate them. I will show how to make a plume later (I need to take pictures), but for now let's do a pom-pom.

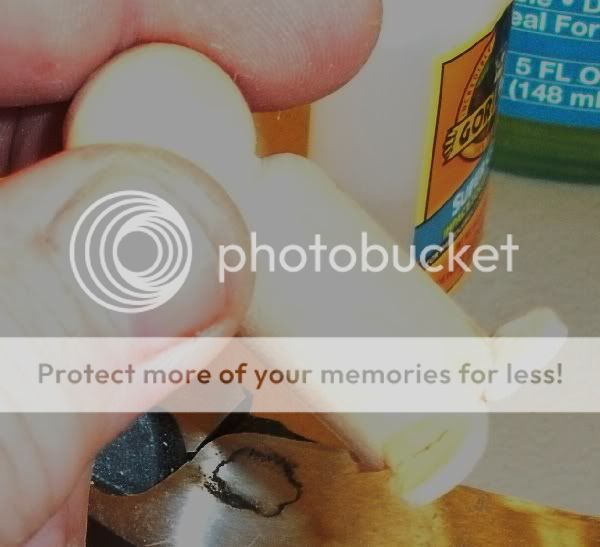
I start by drilling a tiny hole into the edge of the shako. When I drill I do it at a slight angle inwards. The pom-pom itself will be the plastic head of a dressmaker's pin. I cut off most of the pin, leaving a little stub, and glue that into the drilled hole. As I drilled the hole at an angle inward, the pom-pom will extend slightly past the front of the shako, which looks better.


Well, that's all for this time. I still have to show how to make a musket, a shako plume, epaulettes, and shoulder boards. If I ever put backpacks or cartridge boxes on my soldiers, I'll show how I do that too.

One last note about details like that. If you are basing your figures singly, adding details later is generally much easier to do than if they are based with several figures to a stand. Adding a cartridge box later is not much of a problem (although you might end up painting the belt), whereas adding a backpack and blanket might be easy - when it comes to adding the shapes - adding the additional painted details, such as crossbelts, over your current paint job might be something you don't want to put off.

If you have any suggestions for tutorials, let me know by either commenting on a blog entry or sending me email (click on profile, click the email link).

Friday, May 14, 2010

Infantry Tutorial Continued - The Arms (Part II)

So, we finished making the arms and now we need to attach them. Because the pawn is a curved surface and the arms are flat, we need to flatten the pawn where the arms will be attached so we have more surface contact for the glue. Again, using the Dremel with a sanding drum, I create one flat spot one each side.


You don't need to make a large spot, as you can see. The right arm is glued straight down, representing the arm hanging at rest at the side. The left arm is extended out slightly to hold the musket. The butt of the musket will align with the bottom of the arm, where the hand will be painted. Glue the arms to the pawn using the gel glue and super glue combination used before.


At this point, you can consider the basic figure done. I do not glue the musket to the figure at this point as it makes the basic figure harder to paint. better to paint the figure, paint the musket separately, then glue the musket into place. We will show this must farther down the road.

On the Yahoo forum where we discuss building wooden soldiers one idea of late was to add mass to the arms, just like we did with the feet. What follows is optional.

Using Crayola Model Magic Fusion add a dollop to each arm and shape it so that it slopes down to each edge. Here is my first attempt at it.


To be honest, I won't be sure whether I love it or hate it until I paint it up. For now, I'll set that figure aside until we get to the painting section.

Next up: making a Napoleonic shako.

Thursday, May 13, 2010

Infantry Tutorial Continued - The Arms

Now, let's build some arms. I just start with a scrap piece of craft stick and a Dremel with sanding drum. Mark off a 5/8" section and round one end off.


Cut the stick with wire cutters or a saw and make another just like it.


Note that the ends are a little on the square side; this end will be the shoulders. The opposite end will be the hands, so sand them so they are more rounded.


A short tutorial, I know. Real Life™ has taken over. Next we will look at attaching the arms to the pawn, which is essentially a lesson on "how to get good surface contact between a flat and a curve".

By the way, for those of you that don't know, there is a great forum on making wooden warriors (aka craftees, spool warriors, craftee warriors, wooden toy soldiers, etc.). Here I talk about how to do things, step-by-step whereas there we discuss how to develop the techniques I show here. So, if you like this, join the forum too.

Wednesday, May 12, 2010

Infantry Tutorial Continued - The Feet

hen we left off we had glued some rudimentary feet to the pawn, so now we have to fix the protruding heel. You can use either a wood carving knife (left) or a sanding wheel (right).


The carving knives I use are Carving Knives for Beginners by Midwest Products, which I picked up at Ace Hardware for less than $10. (Ironically, the carving knives are not in the product catalog online, despite the prominent display of their web address on the packaging. Also, "Midwest" must mean China, because that is where they are made.) Note: these tools are cheap and the cutting edge won't last, but I only use it for bulk work like this. If I got into wood carving, I would buy a much better set.

I use a 300 series Dremel rotary tool with a 1/2" sanding drum to do the finish work. Here is what the feet now should look like.


The heel should be flush to the back of the pawn, matching the curve. Not only does the heel provide more contact surface for gluing and stability for the pawn on the base, but looking at it from the side, the gap between the front foot piece and the heel gives the impression of the foot's instep.

Now it is time to glue the pawn to the base. I use a 1" x 1/8" beveled disk from Woodworks. This cost me about $0.04 each, when bought in bulk. I used the same gel glue and super glue combination that I used for attaching the feet to the pawn.


In order to give the feet some bulk I add modeling material to the top. I use Crayola Model Magic Fusion. I add a little dollop on top of each foot and round it out. I use clay sculpting tools to smooth and cut off excess materials. The feet should now look something like this.


Don't worry about any gaps; they will be filled in with paint. Now let this dry at least overnight and preferably overnight. I'll pick up with the arms next time. (Sorry about the pun...)

Sunday, May 9, 2010

Tutorial - Making an Infantryman

Here is the first of a series of tutorials on how to make your own wooden soldiers. We'll start with a Napoleonic infantry man. Generally, I mount the figure on a wooden disk as it is easier to paint that way. I also like putting feet on the figure, as it adds character. So, we'll start there.

Take a craft stick and lop off the ends (I use wire cutters). These ends will serve as the feet. You will have to judge how long to make them based on the size of the pawn you are using and how prominent you want to make the feet. Also, cut a small section for the heel. This is required so the figure stands straight on the disk and it actually looks better, like the heels of shoes.


When you place the two ends on the 1" disk you will see that the ends overlap, so you will need to make a cut at and angle so the two feet can butt against one another, as shown below.


Make another cut on the opposite sides of the feet so that the heel can fit on the disk, as shown in the picture below.


I use two glues now: a "school" gel and a super glue gel. The school gel can be found with the white glue. This one is a cheap brand that cost about $1 a bottle. Like white glues it is non-toxic and cleans up pretty easily, but it adds some "shock absorbing" to the set. The super glue is Gorilla Glue brand, which is the best super glue I have used so far. You can get it practically everywhere now. I used to use it by itself, but it is not as strong with woods unless you seal the spot where you are going to glue first.

Using these two glues together provides an interesting synergy. The glue gel sets much quicker and the super glue is more manageable as it is tackier. I generally place a bead of the gel in the center and then put a dot of super glue on top.

Now we are going to glue the components to a pawn, shown in the picture below. Mine are 1 11/16" tall, making a 40mm figure to the eye.


Carefully position the three pieces on the bottom of the pawn without gluing your fingers to everything. (I know, easier said than done.) It should look like the figure below when you are done. Note that the heel extends beyond the pawn; this is not a problem.


Here is a side shot of the feet so you can get an idea of how far they extend out on my figures. I like prominent feet. It looks cartoon-y, but that is the intent.


Here you can see the heel extending out beyond the pawn, and a side shot of the feet.


The next post will show finishing up the feet and adding the arms.

Friday, May 7, 2010

Information on Command & Colors Napoleonics

I am making Napoleonic wooden warriors for a number of different rules, but the primary one is for the upcoming Command & Colors: Napoleonics (CCN) by Richard Borg, published by GMT Games. We play a lot of Richard Borg games at my club, including Memoir '44, Command & Colors: Ancients, and Battlelore, along with an occasional game of Battle Cry. Yes, I am a Richard Borg fan.

We have played Memoir '44 using Flames of War based figures on a 5" hex grid game mat and have talked about doing the same with others. (I played Clash for a Continent, now Hold the Line, using my 15mm AWI miniatures on a hex map and it was quite enjoyable.)

So, the first use for the miniatures were to use them for CCN on a hex mat. As I will be basing each figure singly, I can also use the miniatures for skirmish games like Song of Drum and Shako, which is a nice simple game even if it does have a strange name. Once I've gotten about 12 figures for each unit I'll be able to use a movement base and try out Neil Thomas' Napoleonic Wargaming. Once I get enough figures for that, I may work my way up to building units for Column, Line, and Square or some other big battalion rules.

But, what I started to write before I got side-tracked, is that I got some good intel on the CCN project. Over on the CCN forum at ConsimWorld I got the following information:

Most infantry and cavalry units have 4 blocks but unit strength is asymmetrical in Napoleonics. Some elite/guard units have 5 blocks while weaker units only have 3 blocks.

The first boxed game includes French, English and Portuguese, with the Portuguese doing double duty as the Dutch at Waterloo. Future expansions were reported as one to two armies per box, but as to order of appearance, nothing was revealed.

Different nationalities/different troop types with a nationality might have different numbers of blocks. French are the base 4 blocks for infantry and cavalry and 3 blocks for artillery. Checking an old sheet which had all the nationalities, the ranges are infantry 3-5, cavalry 2-6, artillery 2-4.


So, that helps me prepare a little. I'll post more as I know more. But, that tells me that doing the Russians first is a waste of time. As much as I hate to do it, I need to do the British as the first. (It seems like I am always doing the British...)

Now, should I do Peninsular British or Waterloo British. It seems like Peninsular would give you more mileage, but you don't get some of the fancy British units.

Let me know what you think.

Wednesday, May 5, 2010

My goodies have arrived

My order from Woodworks arrived today and my response was, well ... Have you ever ordered a dessert and they brought out this freakishly large platter and you thought to yourself "what the heck was I thinking when I ordered this?!?" I thought the package would be smaller. Instead, it almost tipped the scale at 18 lbs.

When I get a break I will check the order out to be sure everything is there, but right now, I am a little in shock.

Tuesday, May 4, 2010

Wood Craft Products Supplier

Even though I am trying to monetize my blog : ) this is a free plug. I get my wood craft products from Woodworks Ltd. otherwise known as CraftParts.com. All of the links in this post will take you to the Woodworks site to the parts that I use.

My main component is a pawn called Little People - Boy. This serves as the main body and head. For infantry, simply add feet to the bottom, arms on the side, and glue it to a base and you have a basic human figure.

For the base, given that the figure is 1 11/16" (or about 40mm to the eye), I use a 1 1/2" x 1/8" circle/disc. These have rounded, beveled edges, which are marginally more expensive than the ones without beveled edges. For infantry, you might well be able to use a 1" x 1/8" circle/disc and a larger size for cavalry, but that makes cavalry wider than the infantry. Have a look at my figures in Photobucket and judge for yourself on whether the basing is too tight or too loose for them.

I use a 1" x 3/4" wooden spool for two things: the shakos and the body of the horses. (In the future I may also use them for drums, but I need to experiment with the size.) For the shakos, I will go into more depth on how they are made, but for know just know that each is 1/2 of a spool of this size. I will also go into the steps in making a horse, but I am waiting for a shipment of new wood goodies. For now, know that it is the center body of the horse, between the front and back legs.

The front legs, back legs, and head of the horse are each a Split Robin's Egg 1 5/16" x 7/16". As you need three of these (along with a spool) to make a horse, they come in a handy three-pack unless you buy in bulk (which you should, as the prices go down dramatically).

For the small parts, such as the brim of the shako and the soldier's legs and arms I use simple craft sticks (popsicle sticks). Mine are 3/8" wide, but you can simply use wood strips, such as balsa wood or basswood. You can get 150 pieces from Michael's Crafts for about $3.99.

The plume on shakos and the muskets for the infantry are craft picks (flat toothpicks) that are 3 1/2" long. Again, I purchased them at Michael's Crafts for about $2.99 for 250 pieces.

The lance for the Russian Guard Cossack is a mini dowel, 5/64" x 2 5/8". Michael's Crafts sells them for $2.99 for 250 pieces.

These last three items are branded Woodsies and are by Loew-Cornell. If I find a cheap source, I will be sure to let you know.

Finally, the pom-pom in the fusilier's shako is the round head of a dressing pin. No source there, just look in the local stores with a sewing section and find the right size.

I'll try to get into the building aspect soon, but I am waiting ... patiently ... for my order. When they come in I will have some pristine material where I can show step-by-step from the start.

UPDATE: Corrected the circle/disc sizes.

The Mission

Being a long-time miniatures wargamer, I've tried several mediums for figures: lead, pewter, plastics (hard and soft), resin, and wood. I used most of these mediums to create my own model soldiers, but only had any real success with wood .

I started out making model soldiers in wood for two reasons:

  1. I read an article in the old Dragon magazine about Professor M.A.R. Barker making wood model soldiers for his game world Empire of the Petal Throne.
  2. My mom turned hippie and thus we suddenly become poor and anti-materialistic and all I had to make model soldiers with were scraps of wood and a large pile of wooden beads...
And thus began my journey with wooden model soldiers.

At first, everyone said they looked "cartoon-y" and so they got no respect. When I once scoffed at the idea of a "hair roller army", a friend said "yeah, what about your bead army"? For a long time I forgot about those soldiers. Somewhere in a move they all got thrown into the trash. Pity. They actually had pretty nice paint jobs (they were knights and I had spent some time on the heraldry).

Over time the memories faded and only once had I tried to recapture the fun of the bead knights of yore, but it never grabbed me again. That is, until I received an email from one of the wargaming forums I am on, pointing to another forum on "Craftees". As I knew the person posting the message, and he said you really need to look at these cool figures, I bit. The forum is Wargaming on a Budget, and it is all about making your own model soldiers using wooden craft bits. Looking at the hundreds of pictures from Matt and Neil struck me like a hammer. These were guys who were serious about their wooden warriors. Despite their obviously cartoon-y appearance, they took them to wargaming conventions and they were hits, especially amongst the kids.

I rushed done to Michael's craft store and started browsing the wood section and found some part so I could start trying my hand at it that day. By 6 PM I had finished my first prototype: a 40mm Napoleonics French fusilier. I was hooked.

This blog will serve several purposes:

  • To show what I am working on.
  • To describe the steps on how I build my model soldiers.
  • To document the project(s) using them.
  • To ... someday ... show them used in games. (I have a lot of building to do first.)
My first project is pretty easy. I pre-ordered GMT Games' Command and Colors: Napoleonics by Richard Borg. I am a big fan of his games, so when a Napoleonics variant was announced I knew I had to start collecting miniatures for the game. The goal was to build a hex game mat and figures to replace the game board and wooden stickered blocks.

For a long time I did not know what kind of miniatures to buy for the game. I could buy 15mm and (probably) not be required to make a game mat. I thought about 28mm hard plastics, but rejected that pretty quickly. I started a serious search for 54mm figures, but most are in the UK and many lines were light on artillery and cavalry selection.

Then I found the Craftees (not sure if I like that name or not...) and thought it was possible to use them. Once my trip to Michael's revealed that you can buy "pawns" (also called "game pieces"), which is a dowel turned on a lathe that has a distinguishable head, the remainder being the body, it seemed like exactly what I was looking for. These figures provide a nice 3D look without much distortion of the body. (Well, okay, a lot. But they don't look like spools and shaker pegs, they look like ... pawns.)

I purchased the "Game Piece/Boy" bits, mostly because of the cost and the number I could buy at Michaels at the time (no planning; of course not). These are 1 11/16" tall and make the figures about 40mm to the eye level. For me, these were perfect. The only other size to consider ("Game Piece/Man") was verging on 3", I believe, which would have put it in the 75mm range; a little too big for me.

I'll follow up with pictures of the raw parts, the building process, and some of the finished products I have so far. You'll hear me out on the Yahoo forum also, but there it is like preaching to the choir. This blog serves as my voice as to why you might want to try this process to build your own. I'll try to throw in some other topics every so often, but it will always tie back to wooden warriors. For general wargaming discussions, I have another blog.

Contributors

Followers

Blog Archive

Popular Posts

Labels I Use in Posts