Showing posts with label sci-fi. Show all posts

Sunday, September 25, 2022

Barrage 2022 Battle of the Great Pit of Carkoon!

Got back from Barrage last night after running two games on Friday and one on Saturday.  This was the first year I had made it on a Friday (usually tough for me because of work) and while there were definitely more people there on Saturday, there was still a good crowd on Friday.  My game can hold up to 4 players and I had 2 players for the first game and 4 for the second game on Friday.  Saturday I actually had 5 and being the great gamers that they were they divided up the heroes so that all 5 people could play.  As is often the case with me, I ended up taking no pictures of game 1, some of game 2, and some of game 3.

Game 2:  Outcome = player victory.  2 dead heroes (Chewie and Luke)

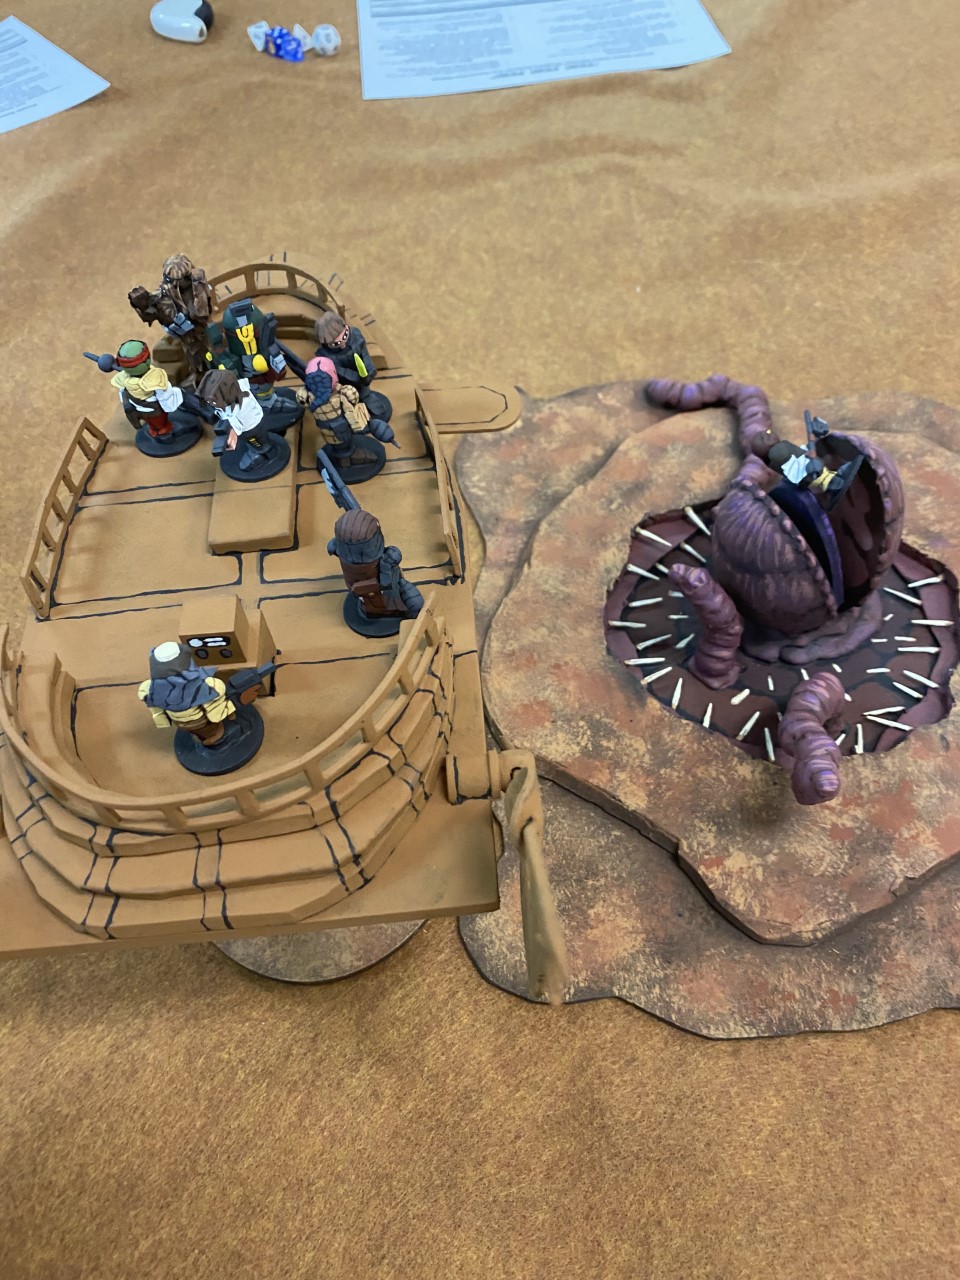
The game starts out the same way each time.  Here is the general layout.

Jabba's barge flanks one side of the playing area.  Leia has already dispatched Jabba at the start of the game and has made her way with the two droids onto the deck of the barge.  Some of Jabba's henchmen are up there, two of which are there to man the two large guns that can be used to damage the skiffs.  The guy closest to the bottom of the picture is the henchman who ends up in the movie shooting Luke in the hand after Luke makes his way onto the deck of Jabba's barge towards the end of the battle.  You can't see him in this photo but Boba Fett is up on the raised rear deck of the barge.

This is Skiff #1 which has Luke, Chewie, Han, and Lando on it along with five of Jabba's henchmen.  In the first game I allowed Luke to start on the skiff rather than on the plank.  In the second and third game I made him start on the plank to reduce his movement options.  The sarlacc waits hungrily below.

Skiff #2, manned just with Jabba's henchmen, begins quite a distance away.  The challenge is it has two melee guys on it but it has 4 shooters, so that is a lot of shots for the heroes to absorb before they can do much about this second skiff.  So having them be far away reduces their shooting die making it less likely for them to hit and to give the heroes a chance.  The pilot of the skiff is not allowed to do anything but a "Move" action which is what is used to drive and stabilize the craft.

You can see that this is well into the game as Boba Fett has made his way down to the deck of Skiff #1 to try and dispatch either Luke or Han.  Lando is in a fight, but you can see one of the henchmen in the mouth of the sarlacc, most likely tossed there by Chewie.  Rather than causing Hits in melee combat Chewie can opt to instead throw one enemy in melee with him into the sarlacc pit.  This is usually the better option for Chewie unless he causes a lot of Hits and could possibly take out several henchman at once.  But an auto-kill is always a good thing!

Skiff #2 has moved closer to Skiff #1 at this point and this takes away the ranged penalty for the shots from these henchman.  Things are getting very serious for the heroes at this point!

By this time Leia has managed to man one of the guns and is putting shots onto Skiff #2.  Brave R2 even though he is not good in combat, changes the henchman manning the other gun ...

... and through an act of the Force (has to be!) manages to win the melee combat and push the henchman back 1".  The henchman is allowed to make a roll to hang on and keep from falling, which he passes, but he is clearly in a bad place!

This is the last picture I have of game 2, but you can see Luke has made his way over to Skiff #2 and is dealing with all the shooters there.  Some shoot at him but some also shoot at Leia, especially now since she won't shoot at their skiff anymore because Luke is on it.

Game 3:  Outcome = player victory (1 dead hero - Han).

Game 3 was a real nail biter because the players lost Han by the third turn I think.  I was very worried.  He is essentially the only consistent shooting that they have, and not having that makes it very difficult to deal with Skiff #2.  Leia and R2 (who can use his anti-fire spray to block LoS for one of the deck guns for 1d4 turns) can pretty well handle the shooters on Jabba's barge.  It's Skiff #2 that is the problem and usually Han is best served to pick them off one at a time.  But with him gone early, and the Luke player having really, really cold dice, it was touch and go for the players in this game.  Turned out that Leia and Chewie were the major players in this one with Lando providing some needed support.
Chewie has already tossed one henchman into the mouth of the sarlacc.  You can see Han fighting against Boba Fett in melee combat here.  Boba Fett gets an incredible roll, Han's player fails his Wound check twice (using a reroll to try and make it) needing only to roll a "3" or more on one of the 1d6 rolls, and he rolled a "1" and a "2".  Ouch.

Chewie and Lando are "clearing the deck" of henchman.  The gold bead indicates that Lando is shaken and will have to rally before doing anything else on his activation.

In the 3rd game, Leia and the Droids were the first to activate and the player brilliantly had her move to and man one of the big guns.  Great decision, and this probably saved the heroes in this game.  The player got a little unlucky in that Leia was able to shoot Skiff #2 regularly, but the GM (me) got incredibly lucky and made almost every armor save for the skiff ... almost every one ...  :-)

You can also see that Boba Fett has now flown back onto the deck of the barge to deal with Luke who used his Force ability to move up here and occupy the henchman who wants to man the other gun.  You can also see that R2 is down.  Got into melee, but lost and became "Frazzled" after failing his wound check.  C3PO would later repair him.


Some of the henchman from Skiff #2 have moved over to Skiff #1 after it got close enough.  No problem though, Lando and Chewie make short work of these guys.
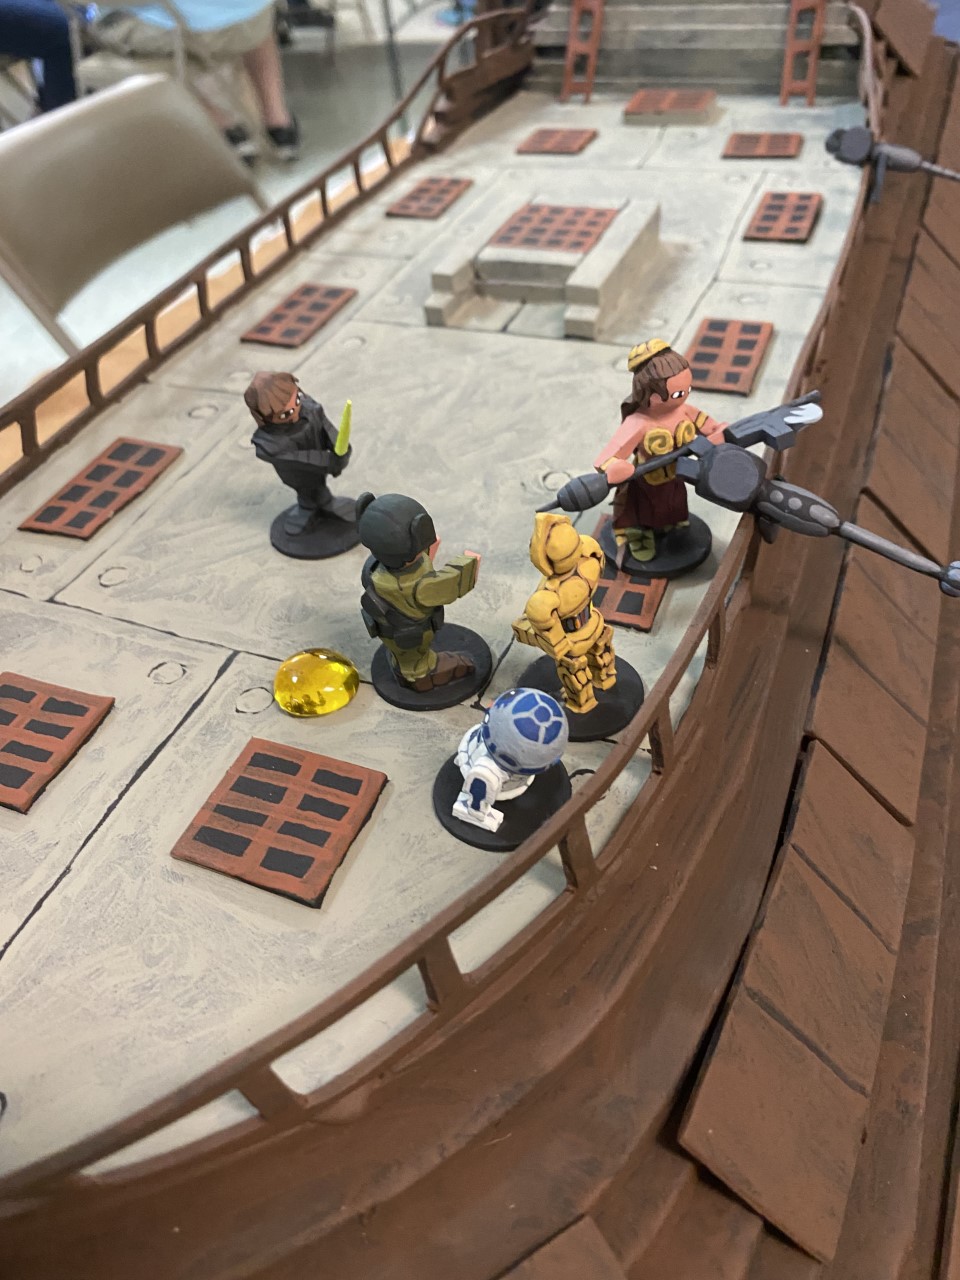

R2 is back and Luke is about to take care of the last, shaken, henchman while Leia blasts Skiff #2 over and over.


When a skiff is hit by a deck gun, the figures on it must make a roll or be knocked down, which forces them to use their next action to try and stand up.  The two gems mean that the skiff has suffered two damaging shots.  One more and it's toast.


Chewie roaring and celebrating, looking down at all the henchman he has thrown into the sarlacc pit!


Leia is finally able to hit Skiff #2 and I failed the armor roll ... destroyed.  The guys on the deck fall to the sand with the craft and are defeated.


As usual, I had a great time at Barrage.  I have a lot of friends there, and I always have a good time when I go.  Already looking forward to next year.

Thursday, August 11, 2022

The Sarlacc Pit!

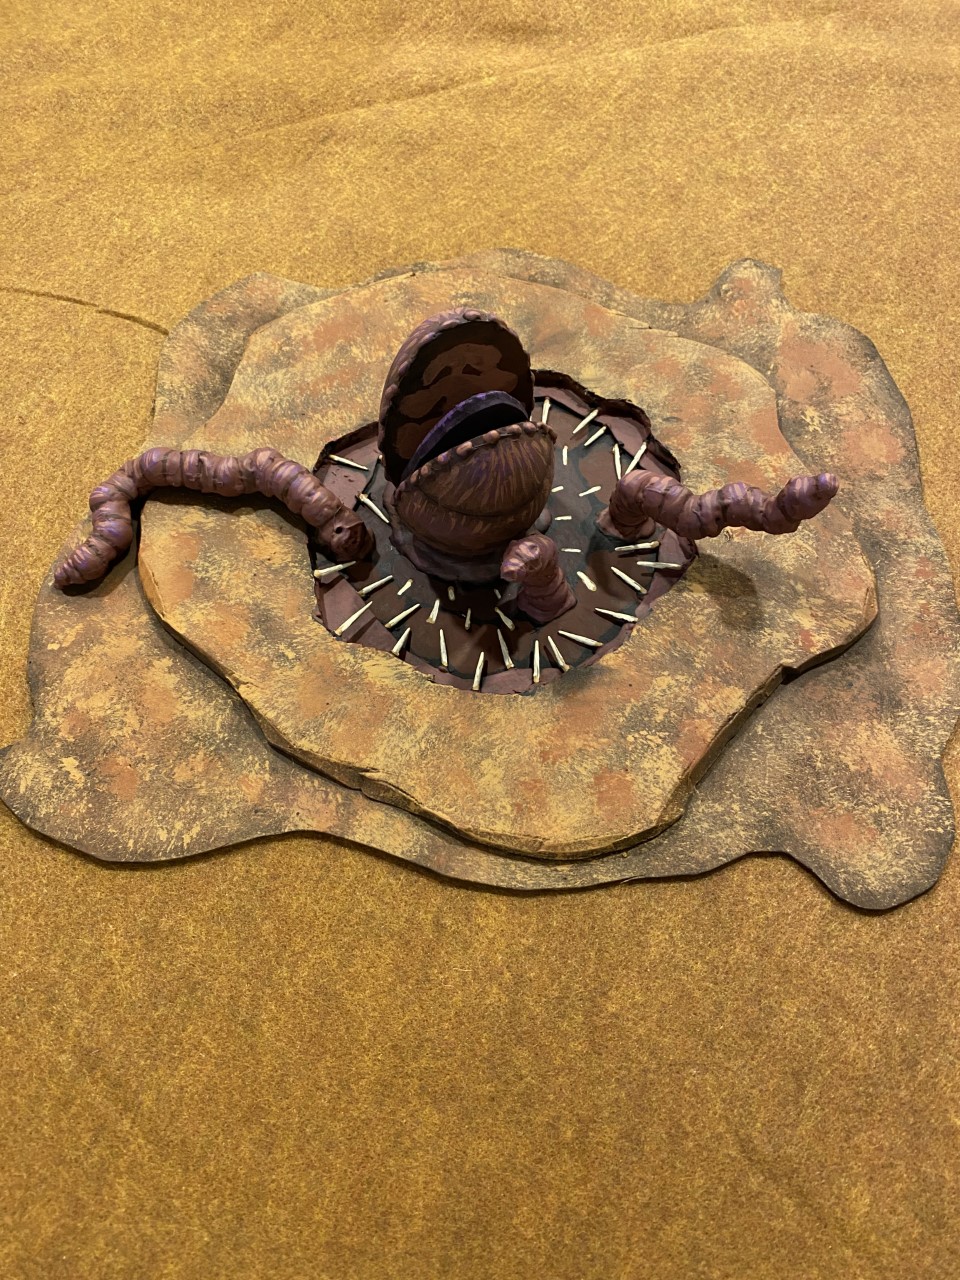
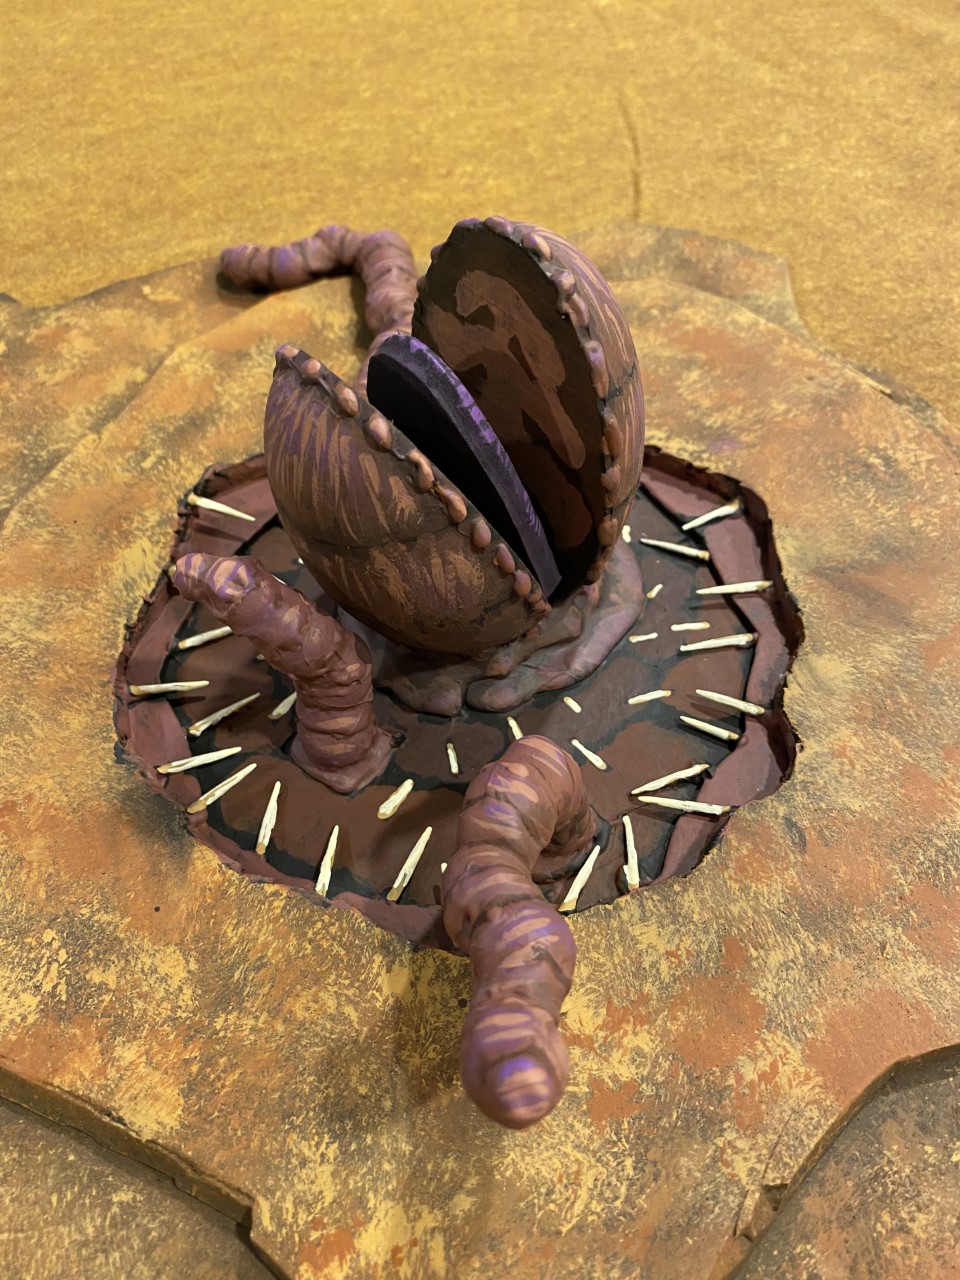
 Finished the sarlacc pit today so I thought I would post some pictures of it.  For the game, it is more of a "terrain piece" since it doesn't move or anything, but I treated it in my mind like a big figure so I would have more fun doing it.

A while ago I did some tentacles for the LotR games I was doing that were coming out of the water so I knew that I could use a similar construction approach with the tentacles of this beast as well.  They are beads hot glued together and then some white glue is put in the joints to increase strength.  After that, I used a hot glue gun again to smooth out some of the joints to make them look less like a beaded necklace and more like a tentacle, which essentially means that I covered up the white glue with more hot glue to make the transitions between the beads less severe.  It takes a lot of hot glue to do this, and some patience, but it's worth it in the end I think.

The head is made from two very large split eggs.  I used hot glue to make beads around its mouth just to give it some visual interest even though the "real" creature from the movies doesn't really have this.  Like the tentacles, the head is glued to a thin wooden pre-cut circle shape I bought at the craft store that I think is 6 inches in diameter.  I then took a large piece of the thin craft foam, cut it in an irregular shape much larger than the wooden circle, and cut an irregular center out of it that is smaller than the wooden circle and then glued that foam to the thin wood circle.  Then I took a smaller piece of the thick craft foam, cut it into an irregular circle shape that is larger than the wooden circle but smaller than the thin craft foam, and then cut the center out in an irregular circle as well but making sure it was a bigger circle than the interior of the thin craft foam.  My hope was that once the thick foam was glued onto the thin foam it would give a bit of 3D dimension and create a "hole" effect.  This seemed to work, especially when I then painted the center as if to appear that it is going down into the throat (?) of the creature.  On the top layer of thin foam closest to the center I added toothpicks with hot glue to give the impression of the spiky things on the inside of the creature's throat (?) and then painted smaller versions on the wooden circle closer to the center as the throat (?) descends into the depths.  The tongue is thick craft foam cut to shape and then I cut the part at the back of the mouth at a 45 degree angle to allow me to really squeeze the tongue down onto the base when gluing it so that it was snug up against the mouth pieces.

Here are some shots of it.

The base is painted with the stipple brush just like I did for the flight bases for the skiffs.  It's hard to see in this picture but the throat (?) of the creature is painted with a darker layer close to the neck of the head, then a lighter layer next to that, and then the lightest layer at the top which is the thin craft foam.  I was hoping that the darker to lighter color variation would create an illusion of depth.  I am not going to lie, it was really fun to build and paint this thing.

More pics.


You can see the toothpicks better here.  Can you tell which ones are painted on and which are actually 3D toothpicks?  Not easy, even in person.

Here is the pic from the movie that I used for inspiration.  How do you think I did?


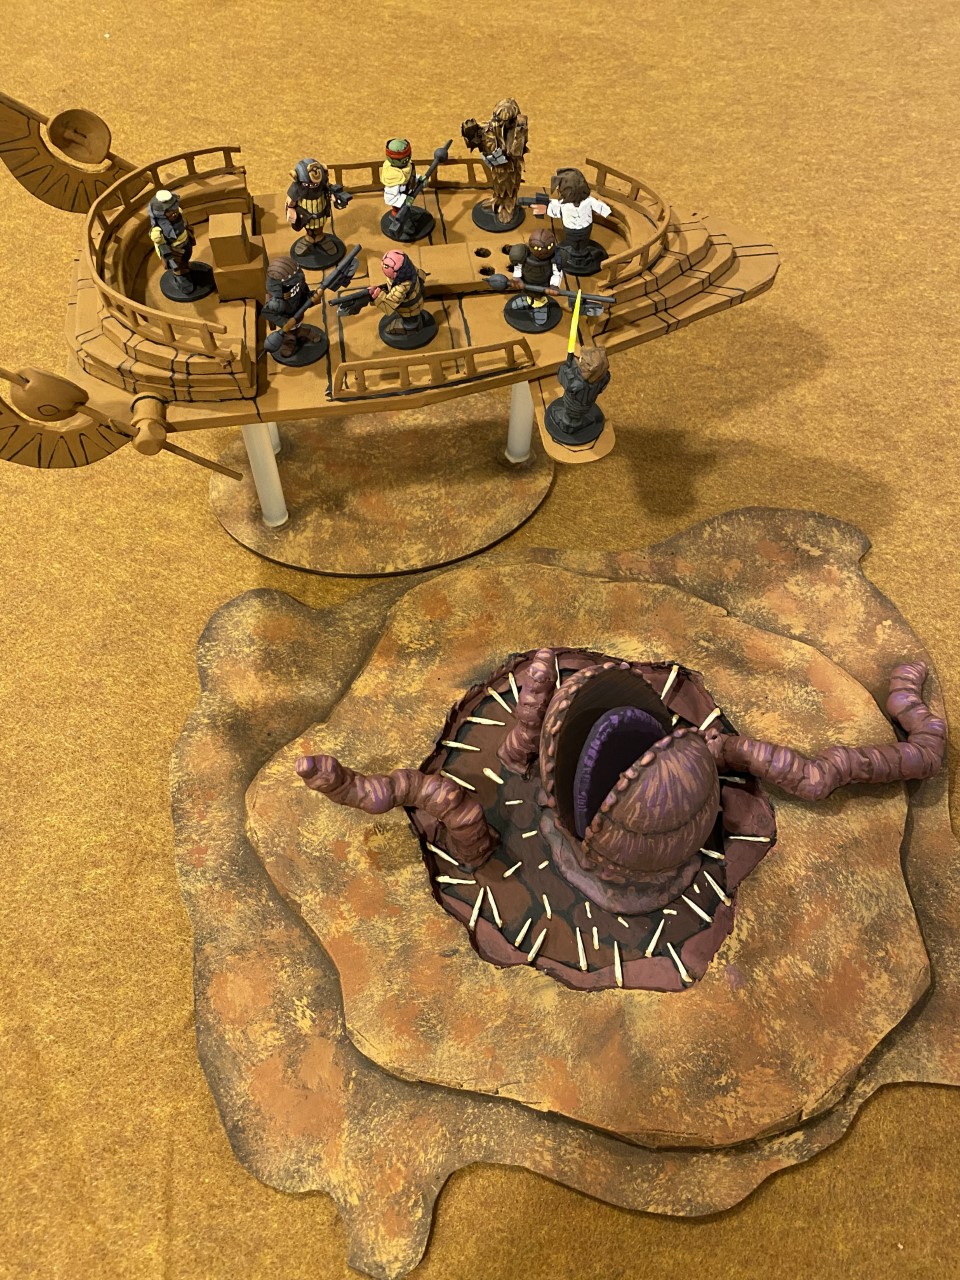
 And finally a pic with the skiff so you can get a better sense of the scale.  Watch out Luke!  Be careful!

I am pretty happy with it, it is large enough to be intimidating on the tabletop, but small enough that transport will not be an issue.

All that's left now are the figures on Jabba's barge, including the droids, Princess Leia, and Boba Fett, and the barge itself which is going to be a nightmare.  But I'm still doing good on time, still more than a month to the convention.


Sunday, August 7, 2022

Vibro-axe Construction

 Dale was asking about the vibro-axes and he is right, I haven't done them before so I thought I would do a more detailed breakdown of their construction.  

They are quite easy, but they do highlight something that has been an important lesson for me to learn about making figures in this style.  The value of the tile spacers, not just because of their shape but also because of the flexibility and easy of cutting of the material they are made out of, cannot be overstated.  I just want to give a shout out to a guy named Neil who used to post way back a decade ago in the yahoo group who was actually the first to my knowledge to use tile spacers for arms.  I totally copied his idea with literally ALL of my figures since then, and have run with using them for as much as I possibly can.  Thank you Neil!

The vibro-axe is made from a toothpick, a tile spacer, and a bead.  The vibro-spear (the TMNT look-alike figure is carrying one of these) is the same material, just turned around (the handle is the tile spacer, whereas for the vibro-axe the blade is the tile spacer).  Princess Leia is going to be wielding a vibro-axe in my figures so I have it done but not yet painted.  So I took a picture of it so you can see it clearly.

That is a small oval bead glued to the left end of the toothpick, the sharp point of the other end of the toothpick was removed, and a tile spacer is cut to match the shape of the "business end" of the vibro-axe.  It's sort of hard to see but the tile spacer as you all know starts as a + shape, I just cut away material I didn't need to produce this shape.  Also, the bladed part is cut at a 45 degree angle to make it thinner.  That's hard to see in the picture.  The tile spacer is then just glued onto the toothpick and that's it, good to go!

Back to painting the sarlacc pit!


Wednesday, August 3, 2022

Barrage 2022: Part II: Skiff #1 with Heroes

 I almost had the second skiff painted when I made the first posting about this game, so all I had to do really was paint the figures.  This is the skiff that has some henchman as well as the heroes minus Leia and the droids on it.  

This skiff is exactly like the first one EXCEPT that I added a thin piece of foam on the bottom in the shape of a staple that once glued to the bottom side of the skiff allows me to slide the "plank" in and have it extend off the side of the skiff.  Since I'm not really sure how I'm going to start the game (Luke on the plank or already off the plank?) I needed to have the plank on the skiff regardless of where Luke starts the game, so I knew I was going to have to figure out a way to mount it.  However, I didn't want it to be permanently attached just so that I can have more flexibility with the skiffs and, like the tail fins, if I mounted the plank permanent I'm sure it would break off during transit.  As is usual when I do something a second or third time, I think I did a better job painting this second skiff than the first having had one "under my belt" already and I could avoid some of the mistakes I made.


I took some close ups of the figures this time as well, so I will talk about them later with their pictures.  But as you can see, this skiff has a plank for Luke.  Again, it's removable.  In all other ways, this is identical to the other skiff.  I used the same templates to cut the pieces of both of the skiffs so they share the same dimensions.  If you are interested, they are about 11.5" long and 5" wide at their widest point.


I really like how the figures came out.  Here are some heroes.


Han and Chewie obviously.  Both came out better than I thought they would.  I was able to pitch Han forward a bit so he is "leaning into" his shot.  His shirt has a flap on the front that is opened and I just constructed the flap with paper.  In all other ways he's standard milk bottle figure construction including the big bangs that I like to put on my figures, and in this case they are appropriate for Captain Solo.  Chewie was tough at first, how to make him tall without being too tall, and he had to be relatively thin.  He's a milk bottle with a barrel bead sideways glued on top, then with the standard tile spacer arms and bead head.  I added a smaller bead for his mouth given his head is sort of gorilla shaped.  The paper was tough for him but once I got started doing it in layers it worked out fine.  Very easy to paint as well.  His belt is just cut tile spacer material glued onto the body and painted to match his standard equipment.

Now we have Lando and Luke.  They are both standard milk bottle figure construction.  Lando was tricky though because I had to paint the fact before adding the mask, and that was very, very tricky.  I love his look, though, just like in the movie I think he has one of the best armor configurations in the movie.  Luke was not too tough, I had done a figure for an rpg that was holding a sword extended like this, so I knew how to get the effect.  You trim the inside of the tile spacer arm, not the outside, so that you can create a "bend" effect and have the hands meet together in front of the figure.  The lightsaber is obviously a toothpick painted with florescent paint.I had to give him a "tunic" top which has small shoulder pads and flaps that extend down below his belt. I just did it with paper.  Same for the high color of the jacket.  

Now onto some bad guys ...


These guys are not my favorite henchmen, I like the guys on the other skiff better, but I do like the guy in the middle.  He's got it out for Luke because Luke killed this guy's pet rancor.  All three of these guys are standard milk bottle figure construction, nothing new really.


Melee guy and the pilot/blaster wielding guy.  They both turned out good, but nothing new construction wise.


Both skiffs together.  Now onto the sarlacc in its pit!


Sunday, July 31, 2022

Barrage 2022 Game Preparation

 <dusting off the keyboard>  Well, well, it's been a while.  Almost a year.  How time flies!  I haven't been doing much in terms of wooden figures this part year, mostly spent my time painting up a complete Heroquest game, but with Barrage coming up I need to do a wooden figures game.

 So, as usual I am trying to get a game together for the Barrage convention this year.  I had almost given up this time, if I am completely honest.  I couldn't get motivated for a particular project which I have found is very important to me in terms of getting things done.  I need to have the "I need to see this game on the table top with little wooden warriors" in my head or I don't finish the project.

I thought about doing a superhero game with Batman and Robin and some traditional villains.  I still want to do that, but the prospect of making a table full of buildings and not really knowing how I want to do them was just too daunting.

I thought about a second Conan game, in particular the "rescue" (abduction!?) of the princess from Thulsa Doom's tower basement, so that I could do two games in a row as a "campaign" (the rescue, then the one I did last year the final battle).  But again the though of how I would do the large multi-level room where the heroes steal her from was just too much to do in a couple of months.  If you haven't noticed a trend already, I enjoy doing figures ... I don't really enjoy doing terrain.

Then I thought I would just do the Lord of the Rings game again and just remake the Fellowship in the same style that I do figures now.  It's a fun game, the folks who have played them have really enjoyed them, and I love LotR.  But the idea of "remaking" figures was not that appealing to me.

As I was killing time one Sunday afternoon before my weekly evening rpg, "Return of the Jedi" was on.  I love that movie, it's my favorite of the original trilogy films.  As I was making my way through the attempted rescue of Han at Jabba's place (sorry for the spoilers!  :-)) when they got to the execution scene at the sarlacc pit it hit me ... like a ton of sand ... what a great convention game this would make!  You know how much I love co-op convention games so the players would play the heroes and droids and I would play the henchman and Boba Fett (bonus!).  With figures like the ones I do trying to make the figures look individual while using basically the same body, head, arms, and feet construction is a real challenge but is honestly the fun of it.  Jabba's henchman are all very distinctive from one another, and obviously the heroes look quite different from one another.  Plus ... no f-ing terrain to speak of except for the sarlacc pit which is really more of another figure than it is a terrain piece!  Yes!

So my 2022 Barrage Convention Game was born!  The Battle of the Great Pit of Carkoon!  And, to quote Pippin, "where are we going?"  In other words, where to start?

Breaking down the game it has the following requirements as I see them:

1)  2 Skiffs (small ships) each has a collection of henchman and one of them has all the heroes on it minus Leia and the droids.

2)  Sarlacc pit - a terrain piece but I will treat it like a figure.  I actually think this will be fun for me.

3)  Jabba's Barge - henchman, Boba Fett, plus Leia and the droids.  It also has a couple of medium-sized guns on it.  I really I don't need to do the interior of this thing for the game.  All the fighting will occur on the outside deck.  Might not need to put those iconic "sails" (protection from the suns, really) on it either as they will just get in the way of playing but I might, we'll see.  But the issue is it is HUGE and is going to be a real challenge.

4)  The Sands of Tatooine - fabric from Jo-anne's, no problem!

4)  Rules - I looked at some commercial rules but they all end up being too complicated for my taste for a convention game.  I'll just rewrite my normal fast and fun skirmish convention rules and give them a Star Wars feel.  Piece of cake.

I can do this in 2 months!  I know I can!

So off to the internet I went and found some great pages with pictures of everything I would need, including the crew for each craft.  

Part 1:  Enemy Skiff & Crew

Making the skiff I thought was going to be a nightmare, but it really turned out not to be bad once I focused on making them player/play friendly instead of trying to make them look exactly like they are in the movie.  I knew that for most of the parts of the skiff, I could use thick and thin craft foam and that turned out to be true.  The only things that are not craft foam on these skiffs is the control panel for piloting the vehicle (they are made from two wooden craft blocks, 3/4" one and then a smaller one that I'm guessing is 3/8" but I could be wrong) glued with the smaller one on top of the larger, and the kabob skewers that make up the rods of the tail fins.  Everything else is craft foam.

I had years ago made a trireme for a never-to-happen Greek and Persian Battle of Salamis game that I never did, so I knew from making the test trireme that I could use a similar construction process for the skiffs.  And it worked well I think.  Thick craft foam cut to shape and glued on top of each other gives the craft the height in places that it needs.  Then I used thin craft foam for the railings, cutting it as needed.  You can't really see it in these pictures but there is two layers of thick foam on the bottom as well first because the skiffs in the movie have a very shallow "hull" so that's what this craft foam on the bottom represents, but also these two layers on the bottom gave me something to use to literally sink the basing system I was going to use into the bottom of the skiff.  The tails of the fins and the circular pieces on the fins are also made of craft foam, the thin kind this time just like the railings.  Everything was glued with regular white glue or for the railings hot glue was used.

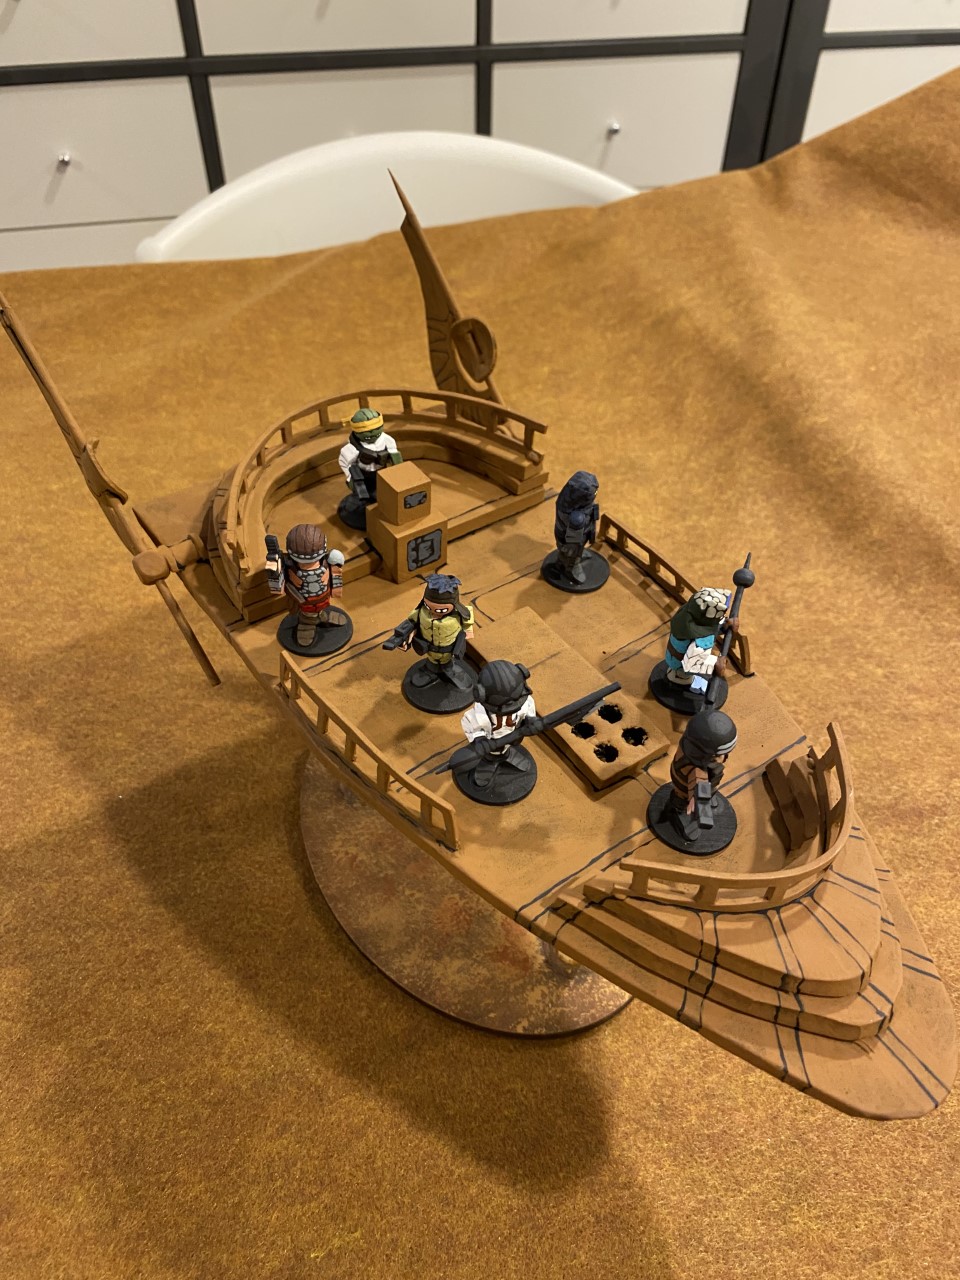
Constructing them did not take too long.  Painting them took forever.  To date, I have this one done with it's crew and the other one is 3/4 done but coming along well.  Here are some pictures of it with the crew figures on it with the fabric that will be used for the sands of Tatooine.

One of the trickier parts was how to attach the tail fins.  I didn't want to do it permanently because I knew in transit they would break off at some point.  So instead I used split spools glued flat side down to the floor piece of the skiff in the rear of the craft with squared off beads glued to the ends of each split spool sticking out from the side of the body of the skiff with the hole in the bead pointing in the right direction.  This allows me to slide the tail fins out and off the craft for transport, and they stay in place because of gravity, but makes it really easy to set them up once I need to do so for the game.

I took some liberties with its dimensions just to make the skiff more playable in the game.  The deck is about twice as wide as it really was relative to the size of the figure bases.  If I didn't make it wider, though, it would greatly limit movement for the figures and make for not a very fun game.  I also needed to tilt the tail fins differently than they are on the skiff in the movie so that the fins were less vertical and more flat.  If  I didn't do that, you know that ever turn at least one player or me is going to bump a tail fin as they are moving figures and knock the whole thing over.  But the length and the relative size of the front and back angled parts of the skiff are consistent with the skiff in the movie, at least as best as I can tell from photographs and some schematics I found online ... without any actual measurements in them, they were just drawings.  But helpful nonetheless!

You can see the base here a bit better.  This was another challenge, and I didn't want to purchase an aerial base from a company.  In the spirit of crafted figures, I wanted to make them using craft type supplies.  Michael's has greatly reduced their wooden craft supply section, much to my disappointment, but they do still have these thick wooden pre-cut pieces that are great for bases for the skiffs because they are so thick and heavy relative to the craft, not to mention being the perfect size.  How to get the craft to "fly"?  Again, I wanted to use existing craft stuff for the clear poles used to make the vehicle fly and thick glue sticks for a hot glue gun are perfect for this.  First, they are more or less clear.  Second, they are flexible.  This is really important because I know that I am not going to be perfect when cutting the holes in the first layer of foam that makes up the bottom hull of the skiff into which these glue sticks will be inserted to "hold" the skiff onto the base.  A little flexibility in the posts is not just ideal but it is going to be a requirement due to human error.

To make the base all I did was first use the glue stick as a guide for the hole size, I literally pushed it into the foam piece before it was glued to the bottom of the skiff which left an indentation for where the hole should be and how big) and then just cut out the holes out of the foam with a hobby knife.  So when this bottom hull piece is glued onto the next bottom hull piece the glue sticks will "slide" a ways into the bottom of the skiff itself.  Then after the holes were cut I put the foam piece on top of the wooden base and traced where the holes were on the base.  After that I glued the foam piece to the bottom of the skiff and then off to the hot glue gun which I used to attach the glue sticks to the wooden base putting them over the circles that I just traced from the foam piece template.  All that's left after that was painting the base which was easy.  I used a dark brown, burn sienna, milk chocolate brown, and a yellow ocher layered with a stipple brush and then removed any paint from the glue sticks (the acrylic pain did NOT like sticking to the glue sticks so this was easy).  Done!

Painting them was a nightmare and I wanted to do it freehand.  Painting them this way fits with the "folk art" style of the figures, so I'm glad I did it, but it took ... forever.  Painting the brown, then going back with black and repainting the lines to get them as crisp as I can freehand, etc.  But I am happy with the skiff.  It looks cool and is still playable as a mini game piece.  Onto the crew ...

This is the "escort" skiff, not the one that has the heroes on it originally (that will be my next update most likely).  So this skiff at the start of the game just has bad guys on it.  I eliminated one of them (honestly because I don't like how he looks as an alien!) but the rest of these guys are made to represent the henchman on this craft that were on it in the movie.  They of course eventually all die but not until Luke makes his way over to this second skiff craft.


They all have names, I'm not enough of a Star Wars fan to know or remember them, but these three humans are some of my favorites from this skiff.  The front guy with the diving helmet and the white jump suit is awesome.  The dude in the yellow-green jump suit is also cool (has great head wear), but my favorite hands down on this skiff is the human in the back with the sci-fi helmet and the ancient period torso armor.  I love how his pose came out.  I love how his paint job came out.  And he is just my favorite collection of armor, clothes, and weapons of all the guys on this skiff.

I am also a fan of the alien that is towards the back holding the gun down at his side.  His dark color scheme is hard to see in this picture, but he turned out cool.  The guys with the melee weapons (either a vibro-axe or a vibro-spear like this alien closest to us in this picture had) were not tough to do.  Just a collection of toothpicks, small beads, and cut pieces from tile spacers.  You can see the other human armed with the blaster at the front of the skiff in this picture.  He's the one who gets kicked by Luke in the face during the movie.

I hope you like them!  I am very happy with how things are going so far.  I think the hardest thing I have to do is going to be Jabba's barge just because it is so big, so I am saving it for last.  Next up, the skiff with the henchman and heroes on it, complete with a plank for Luke to be forced to walk.


Saturday, September 7, 2019

Gamma World New Heroes & Baddies Revisted

Decided I needed to take a better picture of the baddies so that you could see the construction differences.  Here is the new pic.
Ahhh … better.  You can really see the new construction for the bodies on the Morlocks in particular in this photo.  The tapered bead is the chest and shoulders and this is glued on top of a barrel bead, which is then glued on top of a small tapered plug.  Arms, weapons, and feet are tile spacers as usual, and the head is a small round bead as usual.  It's a little tougher to see on the Brain Lasher but the same tapered bead is the chest and shoulders of the figure (although I have armored shoulder plates from a split small bead on top as well).  From the bottom of the chest there is a vertically glued tapered bead that makes up the ribs to the knees.  A small plug is the calves down and the feet are tile spacers as are the arms as usual.

New heroes!  My campaign is heavily influenced by the Terry Brooks Shannara books, I just love them, especially the ones that take place right after the great wars before everything got much more "Lord of the Ringsy" in feel and plot.  Gamma World (toned down a bit) is the perfect rules IMO to use to represent this period of Shannara and although my world is a little different for the game, the influence from Brook's writings is clear.  One of my players is playing an elf who, in my world, are aliens who were a slave race to the alien invaders of earth that created the devastation and ruin of the earth.  They eventually broke free from the invaders and worked with humans to fight back against their former masters.  Another player is playing a Troll who is essentially the same as the Shannara trolls except that in my world Trolls were created through intentional mutation by humans with human volunteers to produce "shock" troops to fight in the war against the invading aliens.  Here are the figures:
The elf is armed with a vibroblade and a hand crossbow on his right wrist (hard to see in this picture).  He is wearing some lighter armor, either leather or maybe plastic depending on what is needed at the time, and has a distinctive "Elric" appearance, which is what this player asked for.  The troll is wearing a Navy peacoat with a blaster pistol on his belt.  He is clearly carrying a huge club, which is what the player asked for.  I thought that when this game takes place there would be enough technological know-how left to be able to strengthen the club with metal plates and spikes at the "business end" of the club, so I made it that way.
Better view of the hand crossbow for the elf.  The elf is standard construction.  The only thing that is new about him is the vibroblade.  I wanted a definite "light sabre" appearance, so I used a toothpick to make it.  Then I painted it white (the "blade" part anyway) and then painted a neon orange color over the white to give it a "glowing" effect.  I'm pretty happy with it I think it looks pretty good.

The troll is a lot of new construction.  His head is made up of a large and medium sized round bead both split in two but what I did differently is I glued the smaller bead half on top of the larger bead half.  This creates a "lizard" looking underbite, because the skull is not as deep as the jaw, which is what I was going for.  His shoulder and chest is a larger tapered bead split in half and glued on top of a larger barrel bead, which is on top of a smaller barrel bead for the lower legs.  His upper arms (hard to see here) are split small barrel beads with hands and lower arms tile spacer and hot glue.  The pistol is tile spacer as are the feet.  The club is a dowel with a small tapered bead glued to one end, then I used hot glue to give it texture and make it smaller towards the handle.  I did a similar procedure before with one of the giants I made who is also holding a club.  I also used hot glue to put the "spikes" on the metal part of the club.
Little easier here to see for the troll the split barrel bead upper arms that then go into a tile spacer lower arm.  You can also see the split tapered bead shoulders better in this picture.  I used the hot glue gun to fill in some of the larger gaps in the figure, creating shoulder pads and such for the coat.  The collar of the peacoat is paper.

Pretty happy with them, I hope the players like them.

Friday, September 6, 2019

Gamma World Baddies 1

First batch of Gamma World baddies, one "Brain Lasher" (which is from the Mutant Future game but is essentially a Mind Flayer) and 6 Morlocks.  I wanted my Morlocks to look like the ones in the classic 1960's "The Time Machine" movie.  These pictures didn't turn out too great, but I'm really happy with how the figures turned out, I just wish you could see them better in the photographs.
Their construction is new.  You can't really see this because of their "skirts" but the body is a elongated bead on its side to make the figure's chest and shoulders glued to a barrel bead which makes up the torso, and then the legs are a small tapered plug.  Feet and arms are tile spacers, weapons are tile spacers or tooth picks, and shields are precut wooden pieces I got in a bag at a craft store.  Hair is paper as are the "skirts."
Morlocks are supposed to be high tech guys so the fellow in the middle has a futuristic "shock spear" and most of the others have guns of some type.  The one with to the right of the Morlock armed with the shock spear has a vibroblade but it's hard to see it in this picture.

 The Brain Lasher is blurry, sorry about that.  His construction is also pretty new.  I used a hot glue gun on his head to give him the wrinkles and I put hot glue over the paper face tentacles as well to give them more "body."  His shoulders and chest are made up of a tapered bead on its side just like the Morlocks glued on top of another tapered bead that is vertical which creates the torso and the upper legs.  On the bottom of the vertical tapered bead is a small tapered plug that gives him the impression of wearing calf-high boots, but you can't really see that in this picture.
Also not a great picture, but there he is.
As the automatic door in front of them slides open, the adventurers stumble upon a Brain Lasher and his Morlock allies in the depths of an abandoned military facility!

Sunday, August 25, 2019

Gamma World Individual Pics

I took some picks of the figures individually.  My thumb got in the way on a few of them, oh well.  It's easier to see the details of the figures in these shots.

Here is the futuristic armored guy.


Here is the Police armor guy.  I forgot that I gave him a flashlight on his belt!


And here is the trench coat old army helmet guy with the medical kit.


The trench coat was a bit of a challenge, I'm sure I'll get better at doing them the more of them I do.  But you gotta start somewhere!

Saturday, August 24, 2019

Gamma World Goodness!

First off, it's good to be back!  My eyes are still somewhat up in the air.  I won't go into detail but I will say just when one of them started to improve after the surgery, the other one started acting up so I had to go back to weekly visits.  Things have been stable now for about 3 weeks and I can see pretty well now.  So I finally got the desire to go back to painting, but I needed a break from the Dark Ages guys I've been doing, and I wasn't ready to start the Battle of the Five Armies project (looks too daunting at this point!).  So luckily one of my rpg groups is having me run a Gamma World game.  They seem to like my wooden fantasy guys that I've been doing so I thought, "I should be able to do some post-apocalyptic sci-fantasy guys for a Gamma World rpg!"

For those of you who may not know, Gamma World came out from TSR (at least the 1st edition) right about the same time as 1st edition AD&D.  The DM's Guide for AD&D even has an appendix dedicated to transferring characters back and forth between AD&D and Gamma World.  GW is a "sci-fantasy" game which to me just means a more "gonzo" type sci-fi game, not a realistic one.  The world has these strange mutants, androids, killer robots, etc., but it essentially plays a lot like AD&D it's just in a sci-fantasy world with radioactive wastes and ruined cities instead of the traditional Dark Ages or Medieval fantasy world common to AD&D games.

Anyway, here are three human survivors for Gamma World.  I wanted a mixture of technology levels so you've got all the way from a trench coat with a WWII army helmet to modern cop outfit to futuristic body armor guys here.


I also wanted to give them a mixture of weapons, so I've got the old army helmet guy with the most advanced blaster pistol, the cop armor guy with a hand made mace type weapon, and the futuristic guy with a laser pistol and hand held scanning device.  Here they are from a top rear view.


Hard to see but the one in the middle, the cop armor guy, has a shield that has the radioactive symbol on it and he also has an AR-15 type assault rifle on his back.  The trench coat guy has a katana, and the futuristic body armor guy has some sort of oxygen tank or something on his back.

They were fun to do, nothing too much new construction wise except for doing the guns which was fun to carve out of the tile spacers.  The futuristic guy does have oversized "goggles" as a part of his mask, but they are just made from one small bead split in half one for each eye.  It's easier to see in the first picture.

Now off to make some enemies!

Sunday, February 25, 2018

The Wau

I have been long thinking about selling some of my older, painted miniatures – along with the pile of unpainted counterparts – which is something I am always reluctant to do. After all, painted miniatures are immediately usable for a game, to try out a new set of rules, or just get in a game of an old favorite when you feel the urge. Despite my last post about minimalism, it still takes time and effort to create those new armies, no matter how minimal you make the process. (If it did not take much time and effort, why do I have a lead pile? 💂)

One of the games I know I will probably never play again is Warhammer 40,000. It is not because I do not like the game, but rather I do not fancy the gaming style that surrounds it. (Plus, I do not like constantly paying for new rule books and army lists, year after year!) All of my games with my 40K figures have been solo efforts, largely using older versions of the rules or other sets.

Many of the miniatures I that have were either painted by commission painters – and usually not very well – or were painted figures I picked up on eBay. Although I know I would not get very much for mine – I got my painted ones on the cheap, after all – they take up a lot of room and can be a bit fragile.

Of course, before I think of dumping any figures on the market I have to ask myself: 1) do I want to maintain a collection of figures of the type I am selling; and 2) if I get rid of these, will I be able to replace them with wooden ones that I make?

Matt showed off his Space Marines and Skinnies, which are really cool and inspirational, so I know that the Space Marines are doable. He has also done Orcs, so Space Orks aren't much of a stretch from there. His Skinnies have a nice Space Elf look, so the Eldar are covered. But, my second army in 40K were the Tau, and because I tend to like shooty armies, I needed to see if I could make a decent version of them. It did not need to be exact. Because it was unlikely I was going to game with these in a public venue, I did not have to worry about scale or being spot on; I just wanted to look at them and say "I can see those as being Tau".

Because they were going to be my creation, I decided to dub them "Wau" for "wooden Tau". Obviously they are pronounced "wow!". 😊 I decided to start off which the standard issue shaker peg.


The top of the figure looks similar to the Tau helmet, which is shaped a bit like a modern bicycle helmet. I wanted to more clearly define the legs of the figure, so I sanded out a hollow at the bottom of the figure.


I can tell you straightaway this was a mistake. Not only did it add time to the build, which is already lengthy as it is, but it greatly reduced the surface area at the bottom, where I needed to secure it to a base. This figure was hard to glue and to keep secured to its base. I will more than likely break one or more times through the course of gaming. Don't do this!


Here is the finished figure, in this case the squad leader (indicated by his long-range antenna on his helmet. The shoulder pad are the ends of rounded-end, wooden coffee stirrers, the pulse rifle is the middle part of the wooden coffee stirrer, and the antenna a bit of small wooden dowel. The arms and hands, along with the faceplate on the helmet, were made with dimensional paint, which I increasingly use for details, especially on smaller figures (these are almost exactly true 25mm).

Here is the whole fire team:


Squads are 12 soldiers with two drones, which are split into two fire teams of six soldiers and one drone.


The drone is basically a mushroom (button) plug with a small rod used to raise it off the ground and two coffee stirrers for its weaponry. I used from fuzzy pom-poms to simulate it blowing up dust and small rocks, in addition to hiding the support rod, but I am not sure I like it.


This is just another trooper (who is going to be reprimanded for losing his arm bracers!). What is different is that I soaked the whole figure and base matte varnish. It still has a little shine on top, but the little alien foliage is better glued down to the base because of it. It seems like it makes the foliage a little less fuzzy, but it definitely makes it harder.


The last figure is covered in Future Floor Wax, which really brings out the shine and makes the colors pop. I definitely do not like it for the ground – unless you are using in on a pavement color and going for a "just rained on" look – but I am not sure for about the figure. As Matt commented regarding the gloss on Stephen Beat's toy soldier guardsman (see my last post), it really looks good for that genre (toy soldier, nutcracker, Britain and Marx soldiers, etc.) but looks a little too ... visible for a future warrior. I'll have to ponder this.

In summary, my question was whether a decent version of the Tau could be created was answered. Wau!

Contributors

Followers

Blog Archive

Popular Posts

Labels I Use in Posts