Showing posts with label battle report. Show all posts

Sunday, September 25, 2022

Barrage 2022 Battle of the Great Pit of Carkoon!

Got back from Barrage last night after running two games on Friday and one on Saturday.  This was the first year I had made it on a Friday (usually tough for me because of work) and while there were definitely more people there on Saturday, there was still a good crowd on Friday.  My game can hold up to 4 players and I had 2 players for the first game and 4 for the second game on Friday.  Saturday I actually had 5 and being the great gamers that they were they divided up the heroes so that all 5 people could play.  As is often the case with me, I ended up taking no pictures of game 1, some of game 2, and some of game 3.

Game 2:  Outcome = player victory.  2 dead heroes (Chewie and Luke)

The game starts out the same way each time.  Here is the general layout.

Jabba's barge flanks one side of the playing area.  Leia has already dispatched Jabba at the start of the game and has made her way with the two droids onto the deck of the barge.  Some of Jabba's henchmen are up there, two of which are there to man the two large guns that can be used to damage the skiffs.  The guy closest to the bottom of the picture is the henchman who ends up in the movie shooting Luke in the hand after Luke makes his way onto the deck of Jabba's barge towards the end of the battle.  You can't see him in this photo but Boba Fett is up on the raised rear deck of the barge.

This is Skiff #1 which has Luke, Chewie, Han, and Lando on it along with five of Jabba's henchmen.  In the first game I allowed Luke to start on the skiff rather than on the plank.  In the second and third game I made him start on the plank to reduce his movement options.  The sarlacc waits hungrily below.

Skiff #2, manned just with Jabba's henchmen, begins quite a distance away.  The challenge is it has two melee guys on it but it has 4 shooters, so that is a lot of shots for the heroes to absorb before they can do much about this second skiff.  So having them be far away reduces their shooting die making it less likely for them to hit and to give the heroes a chance.  The pilot of the skiff is not allowed to do anything but a "Move" action which is what is used to drive and stabilize the craft.

You can see that this is well into the game as Boba Fett has made his way down to the deck of Skiff #1 to try and dispatch either Luke or Han.  Lando is in a fight, but you can see one of the henchmen in the mouth of the sarlacc, most likely tossed there by Chewie.  Rather than causing Hits in melee combat Chewie can opt to instead throw one enemy in melee with him into the sarlacc pit.  This is usually the better option for Chewie unless he causes a lot of Hits and could possibly take out several henchman at once.  But an auto-kill is always a good thing!

Skiff #2 has moved closer to Skiff #1 at this point and this takes away the ranged penalty for the shots from these henchman.  Things are getting very serious for the heroes at this point!

By this time Leia has managed to man one of the guns and is putting shots onto Skiff #2.  Brave R2 even though he is not good in combat, changes the henchman manning the other gun ...

... and through an act of the Force (has to be!) manages to win the melee combat and push the henchman back 1".  The henchman is allowed to make a roll to hang on and keep from falling, which he passes, but he is clearly in a bad place!

This is the last picture I have of game 2, but you can see Luke has made his way over to Skiff #2 and is dealing with all the shooters there.  Some shoot at him but some also shoot at Leia, especially now since she won't shoot at their skiff anymore because Luke is on it.

Game 3:  Outcome = player victory (1 dead hero - Han).

Game 3 was a real nail biter because the players lost Han by the third turn I think.  I was very worried.  He is essentially the only consistent shooting that they have, and not having that makes it very difficult to deal with Skiff #2.  Leia and R2 (who can use his anti-fire spray to block LoS for one of the deck guns for 1d4 turns) can pretty well handle the shooters on Jabba's barge.  It's Skiff #2 that is the problem and usually Han is best served to pick them off one at a time.  But with him gone early, and the Luke player having really, really cold dice, it was touch and go for the players in this game.  Turned out that Leia and Chewie were the major players in this one with Lando providing some needed support.
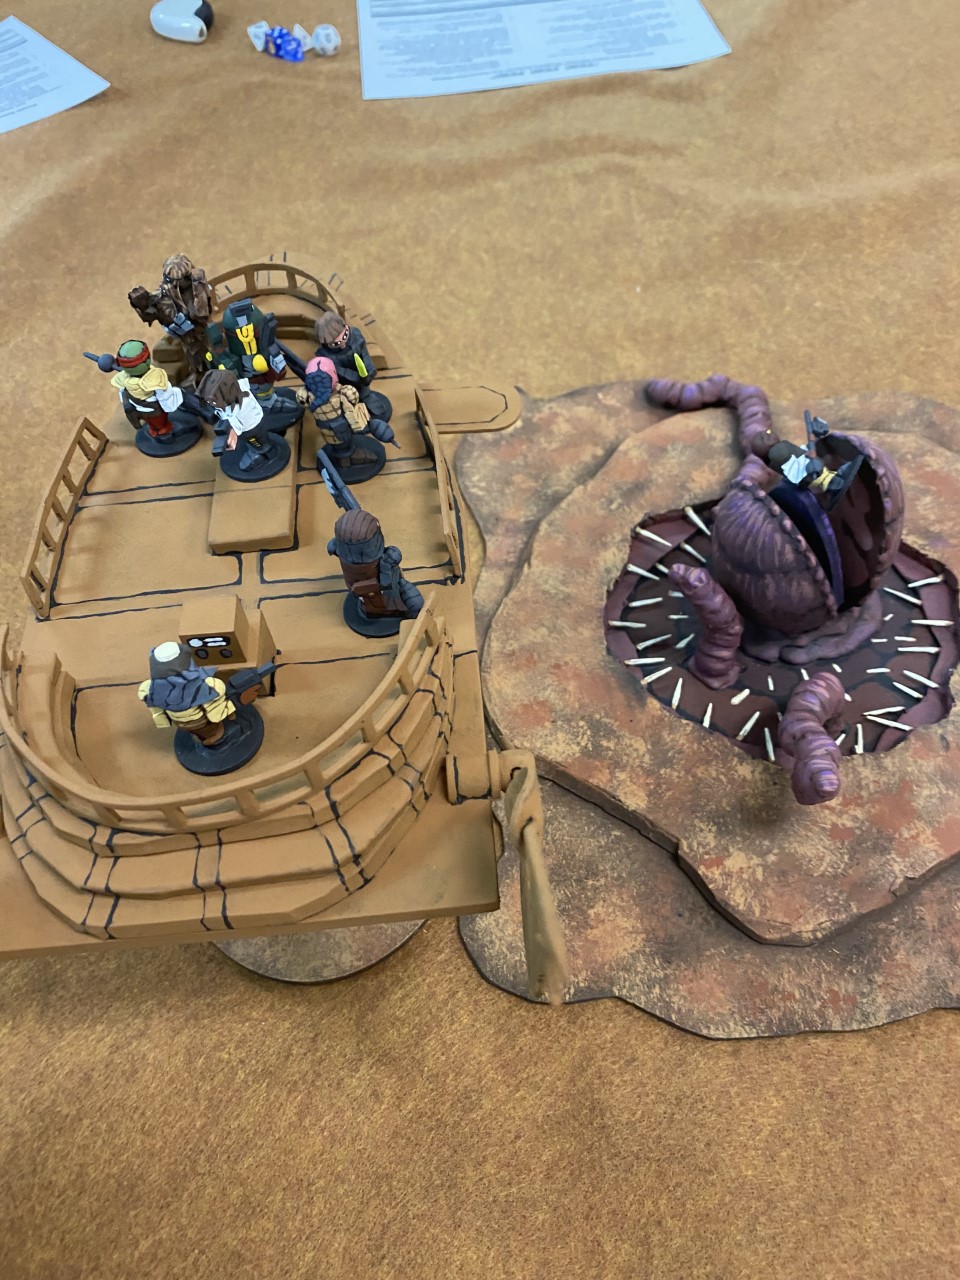
Chewie has already tossed one henchman into the mouth of the sarlacc.  You can see Han fighting against Boba Fett in melee combat here.  Boba Fett gets an incredible roll, Han's player fails his Wound check twice (using a reroll to try and make it) needing only to roll a "3" or more on one of the 1d6 rolls, and he rolled a "1" and a "2".  Ouch.

Chewie and Lando are "clearing the deck" of henchman.  The gold bead indicates that Lando is shaken and will have to rally before doing anything else on his activation.

In the 3rd game, Leia and the Droids were the first to activate and the player brilliantly had her move to and man one of the big guns.  Great decision, and this probably saved the heroes in this game.  The player got a little unlucky in that Leia was able to shoot Skiff #2 regularly, but the GM (me) got incredibly lucky and made almost every armor save for the skiff ... almost every one ...  :-)

You can also see that Boba Fett has now flown back onto the deck of the barge to deal with Luke who used his Force ability to move up here and occupy the henchman who wants to man the other gun.  You can also see that R2 is down.  Got into melee, but lost and became "Frazzled" after failing his wound check.  C3PO would later repair him.


Some of the henchman from Skiff #2 have moved over to Skiff #1 after it got close enough.  No problem though, Lando and Chewie make short work of these guys.
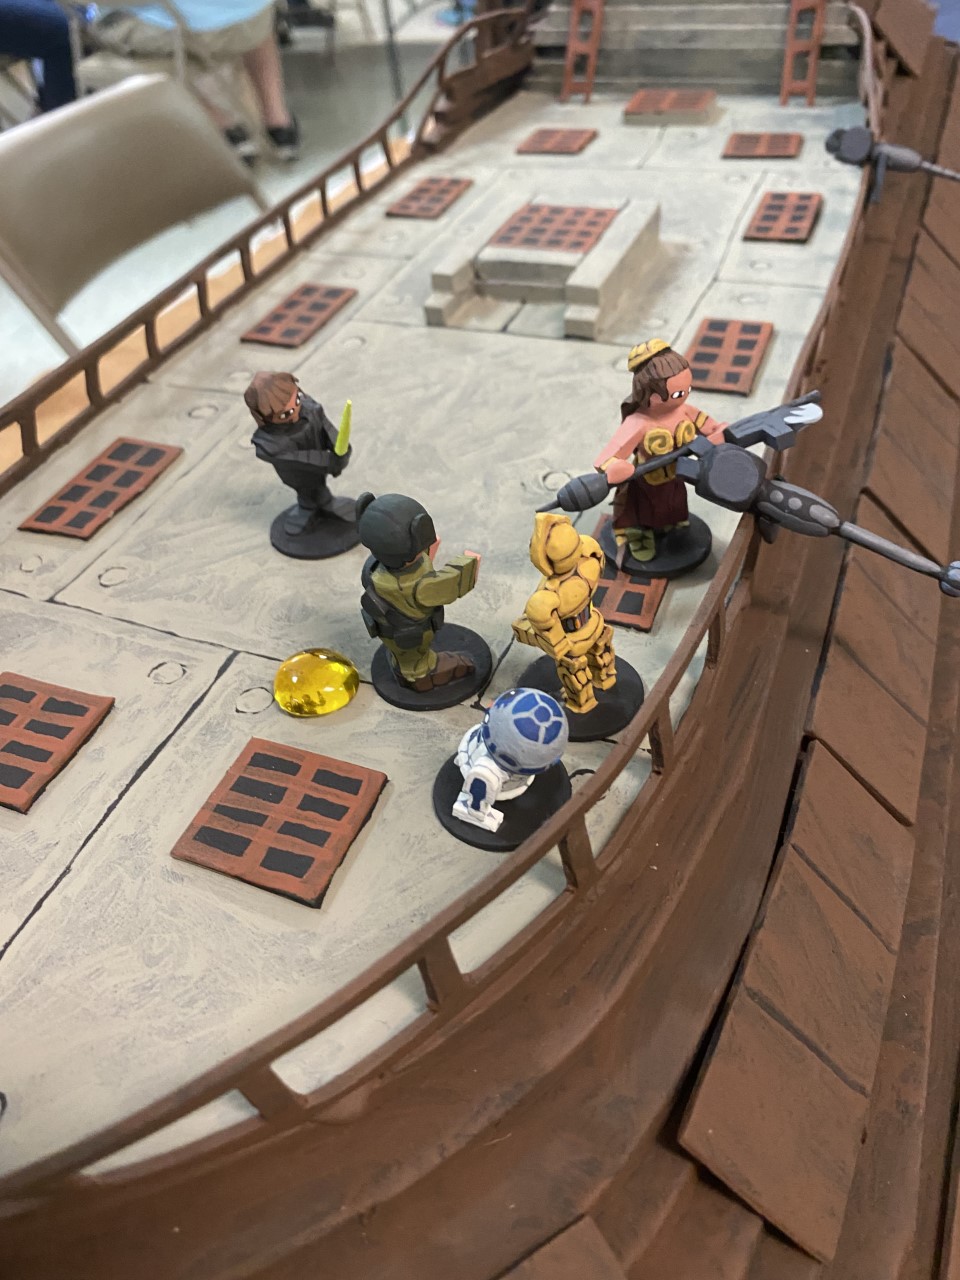

R2 is back and Luke is about to take care of the last, shaken, henchman while Leia blasts Skiff #2 over and over.


When a skiff is hit by a deck gun, the figures on it must make a roll or be knocked down, which forces them to use their next action to try and stand up.  The two gems mean that the skiff has suffered two damaging shots.  One more and it's toast.


Chewie roaring and celebrating, looking down at all the henchman he has thrown into the sarlacc pit!


Leia is finally able to hit Skiff #2 and I failed the armor roll ... destroyed.  The guys on the deck fall to the sand with the craft and are defeated.


As usual, I had a great time at Barrage.  I have a lot of friends there, and I always have a good time when I go.  Already looking forward to next year.

Sunday, September 29, 2019

Barrage 2019 Games - Two Lord of the Rings Affairs!

I got back from Barrage 2019 late last night, too tired to post about it.  24 hours later, I'm still tired, feeling very much the "old man," but am going to post some pics of the games I ran at the convention.

First off, it continues to be one of my favorite minis gaming conventions.  It is a little on the small side, but the Hawks, who host the convention, are very professional and organized in putting together a local, but still two-day convention that attracts enough gamers to make it fun and interesting.  I have been to probably six of the last eight Barrage conventions, and have had a good time at each one.  Now for the games I ran.

My plan after last year was to get my Dark Ages game done and run that.  Didn't happen.  But Buck, one of the Hawks and one of the main organizers of the convention, contacted me and asked me to run a game or two, even if it was a rehash of my old games.  He told me that the games with my little wooden miniatures have become somewhat of a "standard" at Barrage in terms of there always being a game or two with them offered at Barrage, and I was too flattered not to put on a game or two after being asked so nicely.  So I decided that the easiest thing to do was to do a Balin's Tomb game with my 2nd generation LotR figures (since I had already done one for my club over a year ago), and I would also do a Bridge of Khazad-Dum game, since that would force me to get off my duff and finish the balrog … a figure that has been unpainted in my basement for … I can't believe it … more than a year!  So I committed to Buck that I would run these two games.

Before I get to the games, here is a shot of the finished Balrog miniature.  I made a lot of additions to him, besides the paint, since the last pictures of him that I posted on this blog over a year ago.

I am very pleased with how he turned out.  I changed his feet, I put him on a different base, and I used the hot glue gun to fill in a bunch of the areas that used to be open space, such as around his "elbows" and this turned out to be a great decision.  I also used the hot glue gun to make the "ridges" on his horns and face as well as to create a mouth opening.  His teeth are tile spacers.  The fire coming out of his back behind his head is just paper with hot glue all over it to give it strength.  I painted the areas on him that were going to be fire white and then used the neon craft paints (orange and yellow colors) to create the fire effect.  Then I painted the dark brown over the fire to create the look like what is on his shoulders.  There are other pictures of him in the second game report below, but above is a close up of him.  I can't tell you how happy I am to finally have him finished!  I think he turned out really good!

Game 1 - Balin's Tomb
The first game was the old stand by the skirmish in Balin's Tomb.  I used different terrain for this game than the last time, so I'll spend more time talking about it.  The main difference is I used a oil painting canvas as a "board."  This turned out to be a good decision because it made it easy to move the "tomb" floor plan around and all I had to do was paint it black and then do some lighter to darker tones starting with the middle of the room going to the edges.  The corners are black cardboard boxes I got at a craft store.  The "doors" are just wooden craft shapes that I glued together and painted to look like the doors.  This is the beginning of the game before the goblins rush in, but the doors have been broken open.

Here is a shot after the battle has been joined.  Aragorn, Gimli, and Boromir have rushed to the front to stop the onslaught of goblins pouring through the doorway.  Legolas provides supportive bow fire from behind and the hobbits and Gandalf provide moral support from the rear.  The gold gem on Aragorn means that he is shaken because he lost a melee combat with that goblin, but he wasn't wounded.  He would rapidly recover from the shock and fight on!

In game shot … I accidentally got a shot of Zeb Cook's hand in the shot.  As you can see Merry has moved up on the goblin's left, getting ready to join the fray.
Here is a shot right before the end of the game.  The dreaded cave troll has entered the room, striking fear in the hearts of the Fellowship.  Lucky for them Zeb was playing Legolas, who before this point in the game hadn't hit anything with his bow, and he got two shots into the cave troll as it entered the room before it could get into melee with anyone and I rolled a "1" on the death check … "www-UUUUhhhhhh …" went the cave troll as it fell face-first onto the floor of the tomb, dead.  You can see that Sam has moved up to help out Gimli, and that goblin in the upper right of the picture was Shaken for three turns I think, never recovering, and spent the entire battle cowering back on that corner <laugh>!
It was a pretty easy victory for the Fellowship.  Killing the cave troll so quickly certainly helped, but I didn't put enough goblins in the fight.  Next time, more goblins.

Game 2 - The Bridge of Khazad-Dum
Probably my favorite scene in the first LotR movie is the Fellowships flight to and across the Bridge of Khazad-Dum.  Seeing the Balrog, Gandalf falling, all highly dramatic stuff, and something that I wanted to try and capture in a minis game using my little wooden fellows.

I had a great group of players in this game, all very experienced minis game players and this really helped out a lot, because they had a very bad shock of bad luck within the first few turns of the game.

The Fellowship has about three or four turns to try and get as far from the door, and to the bridge, as possible before the Balrog makes an appearance.  The problem is there are goblins coming in from the sides to try and serve a speed bumps to slow them up so that the Balrog can get them.

Here is a close up of the Fellowship running through the doorway in the mountainside on their way to the bridge, with Balrog and goblins in hot pursuit!

And here is amore distant shot.  The mountain wall was made with thick craft foam cut into the shapes and layered together to give the impression of a thick rock formation.
Here is a shot of the game right before the Balrog arrives.  You can see that the Fellowship is making progress, with Gandalf leading the way, but the goblins are closing in and causing some problems for them.
Tense times for the Fellowship.  Boromir is about to have 4 goblins on him, Frodo is under attack (they lose the game if Frodo is killed), and Gimli is being held up close to the door by a lone goblin.

But they do manage to start making some progress thanks in large part to Boromir blowing the Horn of Gondor and causing 6 goblins to become shaken, allowing the Fellowship to run past them without getting stuck in melee with them.  You can see the edge of the bridge in this shot (it is also made out of craft foam) and the blackness over the edge is just black felt that the two canvases that serve as the two boards (one on each side of the bridge) are painted more or less the same way as they were for the Balin's Tomb game.  And then … the Balrog came through the door!  And you'll note that … wait … where's Gandalf!?  He fell!  Gandalf fell!  No way for the Fellowship to hold back the Balrog now!  And they can't destroy the bridge anymore either!  Oh no!  The poor guy playing Gandalf rolled a "1" on the first Death check, the only thing that would kill Gandalf, and Gandalf was removed from play.  This sapped the morale of the players, but like the heroes they were playing, they pushed on!

The Balrog moves at a steady 6 inches each time it is activated, and if it comes into contact with friend or foe it doesn't stop moving … it pushes them forward with it.

I took the backdrop cave wall down because I kept knocking the #@$%! thing over, so it doesn't look as good as in the other pictures, but what can I say.  I got tired of knocking it over.  At this stage you can see Frodo, Pippin, and Sam have rushed across the bridge and are nearly to the other side.  Merry is close behind but there is a goblin next to him (Frodo and Sam knocked the goblin down in the turn before so they could run past him this turn!).  But you can see a goblin closing in from their right ready to attack them in melee once they exit the bridge.  Once any one member of the Fellowship is within an inch of the bridge, the new goblins that come on each turn can come enter on the board that is on the far side of the bridge close to the exit.  Boromir, Aragorn, and Gimli are attempting to hold the Balrog back on the other side of the bridge!  The issue is although they can "win" in combat, they have no way of hurting the creature (only magic can hurt it) so the best they can do is slow it down.  But they were able to fight this thing for several turns as it pushed them across the bridge and they were not miraculously wounded or killed!
The Fellowship got stuck on the other side trying to get out, but the Balrog kept coming!  Without Gandalf, they can't destroy the bridge!
This is the next to last turn.  I think it was this turn that the Fellowship won the melee combat with the Balrog and the lone goblin (you can just see him in between two of the hobbits on the right side of the fray) and they caused two Hits.  The goblin takes one of them, and he died, and the second must be taken by the Balrog.  Normally this would be ignored because only magic can hurt the Balrog but since Frodo, using Sting, was in the melee the Balrog could be wounded.  I rolled … he was wounded, and had to make a death check.  If I rolled a "1" on a D6 he would die ... but I rolled a "5" so he was only wounded, not killed.  Finally the cards (which are used to activate the figures) were kind to the players and the Fellowship all acted before the Balrog which allowed them to flee up the stairs and out of the cavern to safety.  To win the Fellowship had to get Frodo and four other members of the Fellowship out alive, and they were able to get all out except for Gandalf.  Player victory!

I also played in a game at this year's Barrage (I don't always do that) and had a really fun time in the game I played in as well … even though I was soundly defeated!  Another great year at Barrage and I'm already looking forward to next year.

Sunday, August 26, 2018

Dungeon Crawl for Barrage Test Game

Some of my gaming friends and I got together yesterday for a whole day of gaming, 8 hours straight.  It was a lot of fun, but I'm posting about a part of the day which was spent test playing my dungeon crawl game for the upcoming Barrage convention at the end of September.  I'm sure glad I got a chance to test play it.  Most of it went very smoothly, but I did learn a couple of things about better ways to do initiative so that everyone is more engaged in the game, which is a real plus obviously.


Here are some shots of the game in progress.


It started off with a bang!  The first room was occupied by 5 skeletons.  Baptism by fire!


As usual, I was good about taking pictures at the beginning of the game, but not so great later.  The party found a magical pool in this room that provided them with one potion of attack I believe (improved the fighting ability of one of them for one round of combat).  Obviously they are preparing to go through the closed door to the right.


This later on, but I had it so that somewhere in roughly the middle of the dungeon they would come to a "special room."  This particular room is an underground river (very deep) that is home to a Kraken.  Luckily, the first hero into the room made her Observation roll so she could see the Kraken in the water before she had to move into the room (meaning that I placed its head on the tile).  The party had to decide whether to try and move past the Kraken (they could not kill it) or turn back.  The problem with turning back is that they have limited resources in the game (food, water, torches, etc.) so depending on how far they would have to backtrack to get to an unexplored door or opening in a room, they may have to try and cross.  They didn't have to go back very far so they just avoided the Kraken.


You can see here that they went back to the previous room and went through the closed door on the right to eventually end up in this room.  Had to fight a Naga but they did get a scroll as treasure.  The problem is that this room has no exits.  So they had two choices.  Again, backtrack to a previously cleared room that had an unexplored opening or door, or see if there is a secret door in this room.  The way the rules work they get one chance to find it.  The Wizard cast a "Find" spell and was successful.  Secret door located!


They can place the tiles however they like so they decided for ease that the secret door was in the back of the room.  This turning hallway happened to be the next tile.  They found another potion (little white thing on the right in the corner).


This is the final room (actually two tiles, the hallway with the alcoves and the room behind are revealed at the same time).  I won't go into the story but the two statues really matter and that is the troll (hence the name of the place, it's called "Trollstone Catacombs").  The party was successful and at the back of the room there you can see the treasure pile, or 401K as the players like to call it.  They retired and lived long, happy lives after living through the Trollstone Catacombs.


Again, the playtest was very successful.  Took less than 2 hours, played smoothly, and a couple of significant problems were revealed that I can now fix for the Barrage convention game to make it better.

Wednesday, June 28, 2017

Two Games Over the Weekend

I ran two games this past weekend, one was the Balin's Tomb Lord of the Rings miniatures game, and the second was a playtest for a tabletop fantasy role-playing game I've been working on.  Only two pictures of the later I'm sorry to say, but I took quite a few of the Balin's Tomb game.

Balin's Tomb
I used the by the book GW Strategy Battle Game rules for this one, with my Balin's Tomb set up that I already posted pictures of before.  Standard winning conditions for the Good side, last 12 turns without Frodo being killed or any 5 Fellowship members being killed.  The rules, and this scenario, are pretty biased in favor of the Good side, so I thought they would probably win, I just wanted to see if the board I was using was too big for the game.

Turned out that three players showed up to the game store to play so I played the Evil side and each player took a set of heroes to play.  This turned out to be a very good thing and when I run this at a convention I'm going to make sure to play the Evil side and have all the players play the heroes.  It was just more fun for them.  And now the pics of the game.

Starting point for the Fellowship, as close as I could get it out of the movie.

At the start of the first turn of the game.  One unit of goblins with a goblin leader (I used an orc figure so it was easy to tell who the leader was in the chaos of the melee to come) has made its way through the door.  This is the only thing I think I will change.  I gave the Good side priority (initiative) like the rules say to do for the first turn, but I'm going to give the evil side priority next time I run the game.  It will allow the goblins to put more immediate pressure on the heroes, and this is a good thing.

Two goblin units in now, this is the end of the second turn.  You can see that the Fellowship are setting up for a bottle neck to the goblin's left of Balin's tomb to try and limit the rushing advance.  It actually worked pretty well.

Third turn.  All three goblin units on the board at this point.  Basically it's a contest of exchanged missile fire between Legolas and Aragorn shooting arrows and a lot of goblins shooting arrows.  Every now and then Gandalf would cast a spell as well.

The big boy makes his entrance and you can see we've got some melee's going on now.  All forces are on the board at this point.

The cave troll makes a go of moving around the open side of the tomb to get to Gandalf and the hobbits on the other side.

He made the turn and was heading for home but the Fellowship won priority and Gimli moved into melee with the cave troll to stop his advance.  You can see Aragorn and Boromir also fighting in a ferocious melee, greatly outnumbered.


Gimli has managed to keep pinning the cave troll and you can see that the hobbits have made their way to the stairs, with Gandalf and Legolas covering their retreat.


Evil won priority for this turn and the cave troll tried to finish off Gimli with one goblin each charging in to occupy Boromir and Aragorn, with a rush of three getting to Gandalf.  Nail biting time!

But, Gimli killed the cave troll, Gandalf survived, and eventually the Fellowship took out all the goblins.  However, Pippin was killed in the process.  The game was a Good victory!

The cave troll is just not tough enough in the game, I'm giving him another wound next time.  Also, I'm going to put some rubble on the floor which will serve as rough terrain for the Fellowship, but not for the goblins or cave troll, so that should liven the game up as well.  But all in all, it was great fun, I love the rules (and I am not a GW fanboy by any stretch), and am looking forward to running this game again in the future.

Dungeon Crawl RPG Playtest
I've been working on a retro-inspired (not a retro-clone) set of tabletop fantasy rpg rules and wanted to test them out.  I won't go into details about the rules, but here are a couple of pictures of the game.  My plan is to run this dungeon (it's about 15 rooms total) at a convention as a rpg-lite type game.  It is sort of like a cross between Heroquest and old-school theater-of-the-mind D&D in that it is played on the tabletop, but the actions of the characters are not really constrained at all, so they can do whatever their player describes.


I had to put the idol from the cover of the AD&D Players Handbook in the game, didn't I!?  He looks too cool not to include.  The thief in this case is climbing up on the brazier to disarm a trap on it before removing the gem eyes.  If you do not disarm this trap, when you go to pry out the gem eyes the brazier shoots a huge blast of flame straight up burning the would-be tomb raider.  You can see many of the heroes I completed yesterday serving as the PCs for the game.

The cave troll is standing in for a demon in the game (I didn't get the demon figure finished).  The party managed to complete the dungeon with only the barbarian dying, so it was pretty successful.

Sunday, October 2, 2016

Barrage Craftee Dungeon Crawl Game After Report

Hi Everyone,

Fresh off my trip to the Barrage gaming convention yesterday, I thought I would write up a brief after report of the game.  I'll just lead in by saying that I thought the game went extremely well, and it was so much fun that I ended up only remembering to take 3 pictures, even though we played for about 3 hours.

There were a total of 6 players, my maximum, with three of the players being gamers that I already knew pretty well, Chris, Mark, and George.  These three tend to be more inclined for historical miniature gaming, but they are also very adventurous fellows who will play and enjoy pretty much any genre of game.  There were three new players to me, Benjamin, who clearly loves fantasy gaming, and Ellen and her husband whose name I can't remember now, but I believe it was Michael.  These three all seemed to have fun as well as those three I knew already who knew what they were getting into with one of my games.

The players chose the following heroes:  Knight (Chris), Elf Ranger (Mark), Human Wizard (Benjamin), Halfling Burglar (Ellen), Dwarf Engineer (Michael), and Human Warrior Priest (George).  It was a nice mix of melee heroes, arcane heroes, specialists, and a ranged weapon hero (the elf obviously).  As part of the game the heroes begin in the town where they can visit different locations that can provide them with help (if they have a good interaction roll!) on their upcoming quest.  They all had very hot dice at this point and every single hero I believe had a successful visit.  The Knight visited the college and the historians there informed him of the location of a hidden door, the Elf Ranger visited the Hirelings Guild where he pooled the party's remaining funds and purchased the services of a Sell Sword to give some more melee potential to the group, the Human Wizard visited the Wizards Guild and acquired a potion of strength that he immediately gave to the Knight.  The Halfling Burglar visited the Thieves Guild who informed her of the location of a valuable hidden gem in the dungeon.  The Dwarf Engineer went to the Tavern and overheard a rumor about a secret trail that would provide the party safe passage to the dungeon (so they can avoid any nasty surprises on the way!).  And finally the Human Warrior Priest went to the Monastery where they granted him the use of a talisman that would provide the wearer a bonus to one attribute.  Interestingly, I think George forgot about the talisman because it never came into play during the game.

At this point the heroes set out to the dungeon and, because of the information acquired by the Dwarf Engineer, were able to arrive without incident.  The first picture below is of the early stages of the dungeon crawl part of the game.  Everything is randomly generated (as the "guide" in the game, I don't even know what the dungeon is going to look like or what is in each of the locations).  I actually allow the players to put the tiles down as they are revealed (through random card draws) and also put any objects in the room rather than doing it myself (sometimes I will place the objects but not always).  In games that I design, I'm big into providing players with lots of decisions to make, and also increasing as much as possible their physical interaction with the game pieces (figures, dice, and in this case the dungeon environment tiles).

At this point I believe the party was finishing off a small group of goblins in the room on the left in the rear of the picture, but the elf had wandered down the hall into the next room and was searching the the fountain for treasure.  The little halfling dressed in orange hiding behind the table is actually a "cook" who they randomly found hiding out in this room.  He joined the party and proved his worth.  Twice after this during the dungeon crawl the heroes became "hungry" which is a random event that can happen (called an "obstacle" in the game) and because they had a cook in the party, they were able to avoid any ill effects of being hungry. 

I was very pleased with several things during the game.  At this point in play testing the rules, I am just making a semi-educated guess about difficulty.  I want the game to be challenging without being too deadly (those of you who have played the old Warhammer Quest know what I'm talking about in terms of a game being too deadly).  The way the dungeon layout works is that you take the number of players and multiply this number by 4 and this is how many cards make up the dungeon deck.  So for this game there were 24 cards in the dungeon deck, which means possibly 24 different environments (hallways, turns, intersections, and rooms).  Somehwere in the last few cards is the card for the "goal room."  When the players uncover this room if they defeat the monsters in the goal room they have beaten the dungeon.  So they know that they are going to have to explore a lot of the dungeon before getting to the goal room as it is always going to be one of the last few rooms in the dungeon.  But they do not know exactly how many environments that is going to be, and no one, including me, knows what is going to be in those environments when the card is turned over.

For this game, by the time the players had made it to the goal room both the wizard and the priest were out of magical abilities, a couple of heroes had used at least one of their two hero cards, and two heroes were in danger of dying due to low hit points.  So, that's pretty good, a sense of being able to lose the game I think was felt by all, but not to the point of creating a sense of hopelessness about winning, which is not what I'm after (thank you very much Warhammer Quest).  I think I might be able to increase it to 5 cards per hero, which might put it up a little higher in difficulty.  The party is allowed to make a camp once during a dungeon to recover some lost hit points and lost spell points, and this party did not make camp so that would suggest that it may have been a little too easy.  They were getting ready to camp, but stumbled upon the goal room and had to fight it out with the monsters there before camping (you can't camp if there are monsters on the board).  So increasing the difficulty just a little might be good, and increasing the cards from 4 to 5 per hero should do that.  It means having to visit more locations before getting to the goal room and each location has the potential to have a monster, trap, or other nastiness that will cause the heroes to use hero cards, spells, blessings, and hit points.  On the other hand, this particular group of players were very skilled and quite smart about this, so I'm not so sure that they are average in terms of how a typical group would play this game.  For example, they really did very little splitting of the party, which is often death in a game like this.  So 6 cards might be needed to raise the difficulty a little.  But next time I play this, I'll try 5 cards and see what happens.
This was one of those times when the party did split up a little bit, and it was almost disasterous.  The heavier armored heroes, like the Knight and the Warrior Priest, were in the back having to run to catch up to the action (you can see them towards the back there behind the halfling cook in orange).  Luckily for the party the Dwarf Engineer was towards the front and the Sell Sword hireling (he is one square in front of the halfling cook) was also there to provide some melee support.  I also rolled horribly and didn't hit anyone in this entire melee, even the Elf Ranger who is not all that well armored.  The door towards the top of the picture is laying down so that I could actually see what was going on in the square.  The left-most room I just decided was a torture chamber as it had a lot of orcs in it.  They were planning on torturing the halfling cook but he got away and hid in the room to the right of it with the bookcase, fountain, and table.  Lucky for him, the heroes found him before the orcs did!

Unfortunately I took this picture too late.  This was an interesting room in that there was an ogre in it, and there were giant beetles who were hidden monsters.  So the party rushed in to fight the orge, but on the monsters' turn the beetles just appear in the room (coming out of hiding) and attack the heroes with the ogre.  At the beginning of the game the Human Wizard summoned a monster (one of his spells) and happened to get a giant beetle.  We swapped out his giant beetle for a giant rat just so no one would get confused about which beetle was the ally, and of course I got confused anyway.  The monsters off the board are there because they have been killed and I was too lazy to put them back in the box until after the game was over.  The pillars mark the place of an opening that goes into another room, hallway, or turn.  There is no door, it's just an opening.

The funniest part of the game was the end.  The entire party except for the Halfling Burglar stuck together and finally found the goal room.  The Halfling Burglar wandered off to another part of the dungeon that hadn't been explored but contained a room that had three objects in it that had not been searched yet (each object can have a treasure).  While the rest of the heroes battled a group of zombies (half of which were banished to an adjacent room by the Warrior Priest) and a carrion crawler (the boss monster for this dungeon) in the dungeon's goal room, the Halfling Burglar searched the three objects, finding treasure in two of them.  There was also a door in the room that was locked.  Being a Burglar, she picked the lock and opened the door ... revealing a large room with a chest in it (oh goody!) guarded by two very large bugbears (oh @#$%!).  Being smart, she decided to run and, luckily for her, rolled a "6" on one of her movement dice.  In the game when the Halfling Burglar does this the hero is considered to be moving "stealthily" and cannot be seen by monsters, and therefore cannot be targeted or even pursued.  She was able to make her way back to the party safe and sound.  Honestly, halflings move slow in this game and had she not made that roll of a "6" and become stealthy, the bugbears would have seen her and likely caught her eventually.  She could not have stood up to a fight with them.  Chris correctly pointed out how many times in a D&D game that the halfling thief of the party wanders off on his or her own and gets into trouble.  Funny how that happened here too.

The heroes defeated the zombies and the carrion crawler, defeated the dungeon, and because they had the Elf Ranger in the party were able to find safe passage back to the town, so no nastiness occurred on their trip back to the town.

In terms of the reception of my little wooden fellows, I only received positive comments.  I think especially because they are fantasy miniatures, there is less concern about the "realism" of them and this allows people to just appreciate them for what they are, not what they are not.  I have run games at Barrage before with my historical ancients armies, and the nature of this particularly gaming club is very inclusive in every sense of the word, so although many of their members are historical miniature gamers, they always offer fantasy, sci-fi, and other "non-historical" games.  So I also think that this crowd in general is already predisposed to be positive towards these wooden miniatures.  Also, my historical ancients games that I ran at previous Barrage conventions had pictures that made it to the photos page that the convention organizers in the Hawks gaming club (the ones who put the convention on in the first place) put up as a post convention report in the past.  So I'm guessing that pictures of my fantasy guys and game will also show up on their page whenever they get around to doing an after action report.  I've included a link to the Barrage Convention page below so that you can see those pictures if and when they are posted:

https://www.hawks-barrage.org/

-- Matt


Sunday, March 25, 2012

Cold Wars Report (6)

First off, I would like to welcome new reader Kaptain Kolbold. I hope you enjoy the blog.

In case you don't read my other blogs, I went to Cold Wars 2012 and so I am (slowly) writing up the games and sights. My reports that were of a more general wargaming nature appeared on my Dale's Wargames blog (first, second, and fifth reports), while the DBA and HOTT oriented ones appeared on my Dale's DBA blog (third and fourth reports).

This blog has the two games recreating the battle of Zama, using Matt Kirkhart and John Acar's "craftees" – wooden soldiers made from wood craft parts like thread spools, plugs, split eggs, and such. Believe it or not, this was the game that I travelled across the country for. I wanted to see these wooden soldiers for myself, plus play a mass ancients game using Matt's rules, Arrayed for Battle! It was well worth the trip.

First off, a little about the rules. They can be found for free on the Wargaming on a Budget forum on Yahoo in the Files section. They are based on Joe Morschauser's rules with a command and control element similar to DBA. Units have morale, fighting, armor, and movement attributes. Morale and fighting is expressed as a value to be rolled on a D6 or less.

The Scenario


Game One

In the first game I played the Romans, specifically the right flank command consisting of the Numidian cavalry and warriors and one "column" of Romans.
Game Two

Unfortunately, my camera had died before the second game, so there are no pictures. The basic battle went roughly the same. This time, however, I was on the Carthaginian side, on the opposite flank (with the Carthaginian cavalry facing the Roman cavalry).

The biggest change was that the elephant's Rampage rule was put into effect. Initially it sounded like the Rampage rule would be a benefit – of a sort – to the Carthaginian player. That was not so. Basically this rule reflects that the beasts are unmanageable and they automatically rampage at the end of each melee round. The net effect was that once elephants got into melee, they would continue to drain you of Command Points in order to keep them effective.

I will be honest; I don't really know how effective elephants were in combat in the ancient world. Against untrained, superstitious barbarians they probably were. Against the Romans they apparently became less effective as time wore on. By Zama, they appear to have been useless, if the Zama articles in Slingshot and many rules are any indication. (In DBA they are pretty effective in combat, but they are just harder to get them into it, or to maneuver in general.) In hindsight, if we had really wanted to win, we should have pulled our elephants back into reserve and used them at the end of the battle, when things are less ordered. They would have been destructive hitting the flank of a heavy infantry unit.

In the second game, having experience in why the Carthaginians failed in the first game, I encouraged all of the infantry commanders to press forward hard. One difference that came in to play this round was that the Celts lost their 9" charge. This was a bad change, in my opinion, as it allowed the advancing Romans to game their approach and stay just out of 6" range, making the Celts lose their charge bonus. I think this was a factor as to why the Carthaginian infantry battle could not make any real headway and all of the Celts died quickly in the second game.

I, of course, cheated a little and rather than keep the rigid "column" formation had peeled off the elephants and the third line Veterans to support my cavalry attack on the flank. It worked, to some extent, but while my missile dice were hot as the Romans, my melee dice were not as the Carthaginians. The cavalry melee came down to two units on two units, equally matched. One of my units broke first, but his first broke quickly afterwards. The cavalry continued to grind until both sides had simply to kill one base of the other side, and then it to fail its morale check, and it would be all over. After some tense die rolling, it was the Romans that cracked, and the Carthaginians victorious!

One change that had made a difference in the second game was to rate the elephants as Expendable. This allowed the Carthaginians to lose those five units and not have them count against the army morale. This was a good rule change but it was count-balanced by making the elephants Command Point drains. (I actually cheered when my damn elephant died!) Seems like the rules need to be tweaked more there.

The Carthaginians again lost the left flank, which like the elephant losses, was inevitable. The Roman-Numidian player did much as I did and wrapped the flank firing at the infantry, and using one to harras us in the rear. With time running out, Carthaginians units falling faster than Romans the game was called at about 11 PM in favor of the Romans. The Carthaginians had not won – not by a long shot – but it had made a better showing than in the first game. Given that the rules changes might have been net negative to the Carthaginians, I think that was a good result for us. Can't have Hannibal winning, now can we?

Rules Review

I like the rules Arrayed for Battle, and would gladly play them again. I would like to run my own game of them to see where the hole might be, but they played well and allowed the Player-General to focus on tactics and not on the fiddly bits of unit maintenance. The key to games these rules are the special rules themselves. Get them right and the scenario goes well. I think that, for the most part, the special rules were right.

As for the core rules I think the only part lacking is the inability of a unit to turn to flank or rear after combat has started. I think that if a unit is unengaged to the front, and after it has fought one round of combat against the unit to flank or rear, the unit can elect to take a Disorder marker and face the opponent.


Another area that caused some heartburn is the contact rule. This was cleaned up for the second game, but I can see some problems coming up in complex melees. Basically the rule, as I understood it, was to center each unit's front edge on the edge that it struck, after the initial round of combat. The figure below shows an example.


Note that the dashed green circle shows the "anchor point" (for want of a better term). As the red unit is attacked on two edges it is essentially anchored and the other units around it must shift. At the beginning of the melee on turn two, the shifts are as follows:

  1. The blue unit in contact with the front of the anchored red unit shifts to the left so its front is centered on the front of the enemy.
  2. The blue unit in contact with the flank of the anchored red unit shifts up so its front is centered on the flank of the enemy.
  3. The unanchored red unit shifts back and to the right in order to center its front on the blue unit's flank.
This brings to mind a few questions though.

  • If this shifting occurs at the beginning of the second melee round, but only for units that have gone through a melee round, what happens with units that have just entered the melee this round? (Multi-round melees are very common.)
  • How do you pick the anchor unit (the unit that will not move?
  • What happens when a unit is shifted out of multiple contacts into a single contact?

Like every good rules, special cases will have to be worked out but just with my own thought exercises I think the shifting of units should occur at the end of the first melee round rather than the beginning of the second melee round. This solves a number of problems about who can and cannot shift, and who should shift in the case of conflict shifts.

Figure Review

As this is the Wooden Warriors blog and not Dale's Wargames it only seems appropriate that I review the figures. John's Carthaginians included five elephant units, each consisting of an elephant figure and two stands of supporting light infantry.


The infantry are micro shaker pegs and tile spacers for the arms. The elephant consists of three split robin's eggs, a heart, and a spool. John seemed to think that the spool he used was too long, not giving the elephant enough of a belly. I think it looked great. The eyes were great as some were scowling.

The Celts were a very beefy figure, as shown below. They were distinctly larger figures and easily identifiable on the field (which is a good thing).


These figures were simple constructions in that the majority of the figure is a candle cup (upside down). Either a round head plug or a button plug served as the figure's head, while tile spacers made up the arms. Shields were decorated with custom inkjet printed shield designs. Very effective!

The Carthaginian citizen units also received the printer treatment for their shields, with each unit having a different (uniform) device (primarily to sort which stands belonged to which units, if I understood correctly). Clothing was not uniform, however, which made for a nice effect.


Again, the figures are micro shaker pegs and tile spacers for the arms. Very simple construction that looks great on the table.


The Veteran infantry is constructed a little differently, largely to show that they wear more army and to make them distinctive on the table. Their body is a spool with a button plug serving as the head and helmet. Again, tile spacer arms and printed shields make these units look great on the table.


The Carthaginian horse was constructed very similarly to the Veterans. They are spool and button plug with the horses being three split wren's eggs and a spool. Tile spacers serve as the arms and legs of the figures.


Note that because the bottom of the thread spool was not cut off (and I don't blame John as cutting round spools is a bear of a task), it makes the cavalry a hit taller than normal. But, then again, what is "normal" with a craftee?!?


The Numidian light horse are micro shaker pegs on horses of three split wren's eggs and a spool. Very effective paint jobs. Also, now that I have seen the pipe cleaner manes I think they are very effective. If I were to get more into the 25mm scale (as these are), and I could find the appropriate chenille pipe cleaners, I would use them too.


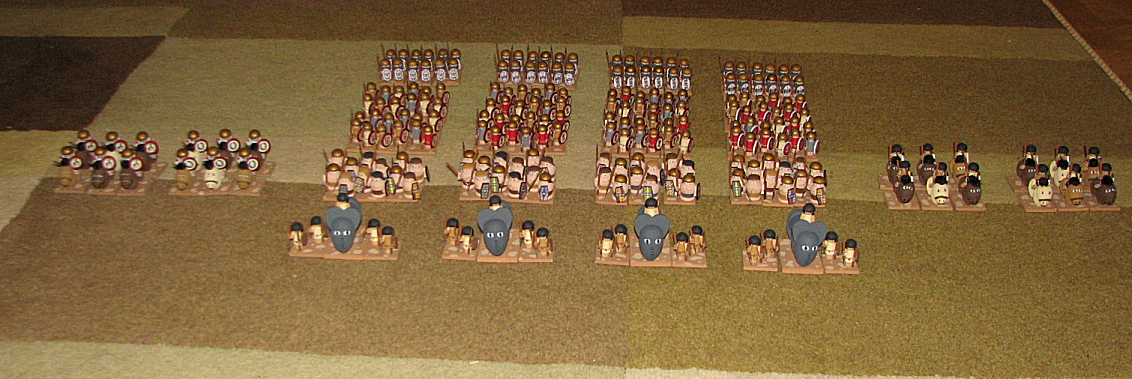
This is what the Carthaginian army looks like arrayed for battle.

Matt's pictures for the Roman army can be found on the Wargaming on a Budget forum on Yahoo. I cannot link to the photos there as they will only be visible if you are a member. And if you are a member, well you can just view them over there!

Contributors

Followers

Blog Archive

Popular Posts

Labels I Use in Posts