Sunday, March 27, 2011

Armenian Warriors

The Armenian army list in DBA consists of four Auxilia elements. Looking at Armies and Enemies of Imperial Rome I found that these are unarmored warriors with spear, sword, and shield. Very little information is provided about them, although they do mention a unique headdress they wear, but don't really show it. I decided to forego that and make most bareheaded (but with long hair), with a few caps and maybe a helmet or two.

Here is the first element. The central figure is the leader of the bunch, with a sword (top of flat toothpick) and almond-shaped shield (from a pack of various wooden shapes). He wears a sheepskin cap on his head (a flat-headed plug) which I painted gray and used a pen to make the 'texture'.

The second figure has an oval shield (also from the pack of wooden shapes) and spear (dowel with a sanded point).

The final figure has a crescent shield (half of an oval shield from the pack of wooden shapes, sanded to get the inner curve) and a spear.

My these boys look angry!


As you can see from the side pictures, I added some trim to the basic colors by drawing a white line with the Elmer's acrylic white paint marker, then adding dots of color using the Sharpie marker pens. Simple, but effective.


The rear picture shows some more detail of the markers to add trim. I went to town on some figures (not shown).


What differs from these figures and previous ones in the Armenian army is that I gave up on the tile spacers for arms. They make great bows, but for arms they are (currently) too much trouble. I instead used wooden craft sticks the size of coffee stirrers and shaped them with a sander. I drilled a hole through the arms and clear through the heart peg body, then stuck a dowel through to secure the arms.

The army is coming along nicely. Next should be the archers (Psiloi), then hopefully the last post will be the entire army painted and mounted on proper sized Litko bases.

Friday, March 25, 2011

Armenian Horse Archers

The Armenian army list has four Light Horse elements in it, which is one of the reasons I chose this list to oppose the Seleucids, and I have photos of the first two elements. Again, they are not based yet as I still have not received my order from Litko Aero for the 60mm x 40mm bases necessary for DBA.

As with the cataphracts yesterday, the core parts for the riders are a micro shaker plug/heart plug, with the tenon cut off so the figure is not so tall, and plastic tile spacers for the arms, legs, and on these figures, the bows. The horses are the new design of split wren's eggs-and-wooden spool, but with a flat head plug for the neck. I used wood filler to fill out the gaps in the neck.


These figures have a lot of metallic ink pen, permanent marker pen, and paint marker work. I painted the figures Cocoa for the flesh, then added the black hair. As you can see, I sanded and shaped the head of the heart plug so the size was not so exaggerated, making it look like they have long flowing hair. Then I painted a solid, bright color with paint.


With the paint dried, I went back with an Elmer's acrylic white paint marker and drew lines of white in various places, to act as edging and trim. Finally, I added slashes, lines, dots, and squares using various color permanent markers. I tried both the Sharpie and Bic brands and did not really notice any difference between the two other than then Sharpie black is much glossier than all of the other colors.

The bridles on the horses were mostly the Office @ Work metallic ink pens, with dots of gold, brass, and silver for the metal work. All of that was with the Office @ Work and Sharpie metallic ink markers. As with the metallic armor on the cataphracts, using these pens really made short work of this task.


Although it may sound funny, using a black pen to define the 'butt cheeks' of the horses really adds dimensionality to the figure. Simple to do, but strong effect. I went back and did it with my cataphracts.

As with the cataphracts, I really like these figures. Also I am still struggling with the plastic tile spacers (I have since determined that they probably have a mold release agent on them that makes gluing and painting problematic), the last versions of these used wooden dowels to pin the arms and legs in place. This is much more secure and stable than the dressing pins I used on the cataphracts.

I am putting the finishing touches on the other four horse archers, and starting to get into the core work of the infantry (four Auxilia elements and two Psiloi elements).

Thursday, March 24, 2011

Armenian Cataphracts

Well, my "12 elements in 12 days" experiment did not work out. Although I will probably end up finishing them in (about) 12 days, they won't be consecutive days. Gaming got in the way too many times. Considering that is what I am doing this for, maybe that is not so bad, but I did want to finish these quickly in order to show it could be done. Oh well.

The first two elements in the army are the cataphracts, one being the General. There was no way to fit four of these fat figures onto a 60mm frontage, so I had to settle for 1x3Kn(Gen) and 1x3Kn. (By the way these bases are temporary; my Litko Aero order has not arrived yet. These bases are 3" x 1 1/2", not the 60mm x 40mm required.) The base on the right - with the gold armor - is the General's base.


All of the rider's use the micro shaker peg, or heart peg, that I discussed in the last blog entry. By sanding down the head appropriately, I got a reasonable body size and head-to-body ratio. :^D The horses are standard (wren) split egg-and-spool design, but with the improvements of a flat head plug added for the neck and wood filler to fill in the gaps. I like it better than the previous design.


As you can see, I did not use anything for the tails other than paint. I started with some yarn, but it was not working out, so I need to experiment first. I can always come back to these later and add tails if I want. All of the tails are bobbed and the bits of color represent the ribbons used to tie them so that annoying infantry does not try to grab then when attempting to hamstring the horse.


Not only was this an experiment in making 28mm figures, in using this peg as the core, in changing the horse design, and to me using tile spacers for arms and legs, but this was a huge experiment in using paint markers and metallic ink pens. I painted the armor a base color in paint (either mustard yellow or light or dark gray) and then used metallic inks to paint on the dots, scales, plates, and bands. It made for a quick and easy method to represent the various sorts of armor. I rather like the effect, but I now know that some of the shine and color can rub off with handling, so you have to varnish these figures.


The horse archers are up next. Fun with tile spacers...

Sunday, March 20, 2011

Stock of the Trade - Micro Shaker Peg

Shaker pegs are shaped wooden dowels that you usually see used for towel racks. The picture on the left, below, shows the various ones available from the American Woodcrafters Supply Company. The micro shaker peg is the one to the far right. In the picture on the right, below, is the micro shaker peg from Woodworks, Ltd., called a Heart Peg.


Note that the two pegs , from different companies, have a slightly different shape, with the American Woodcrafters' peg having a flatter head. These are the style that I found at Michael's Crafts. Unfortunately, simply ordering like named parts does not result in exactly the same parts. As I tend to buy a pack or two from Michael's in order to experiment, then purchase in bulk from Woodworks, this can sometimes throw me a curve ball as the techniques I develop for one no longer work with the other.

In this case, however, I found the Woodworks heart plug rather interesting. The peg is 1 1/8" tall, making it right for a slender 28mm figure. The head is 7/16" diameter and the tenon 1/4" diameter.

The figure to the right shows you how you can turn this into a basic figure. I usually add a small piece of craft stick to the bottom to represent feet, and to give the figure more height in the leg area.

To make a rider, simply cut off the tenon (leg area) and affix the peg straight to the horse figure. I find it easy to drill a hole in the bottom of the peg and into the horse figure, then use a small dowel to pin the two together. I'll show that in a later blog entry.

The real problem with this figure is the head. If you treat the rounded top of the figure as the top of the head, you get a figure with a head all out of proportion. That is a really big head. This is the area that has to be trimmed the most. Without any modification your figures all start looking like the Toad, from Mario Kart!


The figure to the right shows some of the ways I have modified the heart plug. The figure on the left is the original shape.

The center figure is a side view  and the 'back' of the head is heavily sanded, as are the sides (which cannot be seen in this view), with the front sanded down on the top, to lessen the rounding. This produces a medieval knight's bascinet, or even a guy with a big nose (like a Mayan).

The figure on the right is what I typically do. I sand heavily on the front, to flatten out the 'face' area, and then either do the same on the sides and back, as shown in the figure, or slope the sides and back giving the shape of long hair. Also, by flattening the top of the head you can add a flat or round-headed plug for a hat or helmet.

As I am basing my 28mm DBA army on this core figure, I should be able to come up with some examples of variations soon. For now, back to painting!

Thursday, March 17, 2011

What's Next

Of late I have not been blogging much on any of the three blogs I run, as I am working feverishly on what I am calling "Scratch Build and Paint 12 DBA Elements in 12 Nights". Yes, that is right, I am building a 28mm ancients army to face off against a buddy's 28mm metal Seleucid army. I will have a fight between commercial metal figures and my homemade wooden warriors so I can post the pictures of what a "normal" army looks like in battle with our little beauties. It should be fun.

To try an swing things in my favor, I have selected an Armenian army, which contain 1xKn(Gen), 1xKn, 4xLH, 4xAx, and 2xPs. These are some of my favorite troops types (LH and Ax/Ps), and I tend to do well with them in my other games, so we will see how it all turns out.

No pictures yet (well, actually I do, but I am not releasing them in order to build anticipation - LOL), but the cavalry are basic spool-and-split egg construction with micro pegs for both the light horse archers and the cataphracts. The infantry will all be micro pegs, so the army will have a fair amount of consistency in look.

Also, I am making a lot of use of permanent metallic (ink) markers (not the paint markers). I have been very impressed with the Sharpie Silver Metallic marker and the @ the Office metallic markers from Wal-Mart. I really cannot recommend the two enough. Once you see the results, maybe that will be all the convincing you need.

So, that's the teaser. I am hoping to have the figures done this weekend - assuming not too many things get in the way (like gaming) - but if I finish early next week I will still be ahead of schedule.

Monday, March 14, 2011

Stock of the Trade - Clothespins

There are three types of clothespins that you might use. Here are some:


The item on the left is the traditional spring clothespin. I have seen them used, but I have avoided them because I haven't figured out what to do with the spring, so I don't want to pay the extra price for it (being cheap and all).

The second two items are flat clothespins, which I will focus on in this blog entry. The final one is called a doll clothespin and is fully round. As they are similar in size to the pawns that I use, are are also round, I generally do not buy the round clothespins. Maybe someday.

So, there are two sizes of flat clothespins, large and small (left and right, respectively, in the figure below).

The large figure is 3 3/4" tall, 3/8" thick, and 1/2" wide (at its widest part). The part is divided into three sections, from top to bottom: head, torso, legs, and excess. The head is about 5/16" tall and it flat on the top, making it easy to add extra material on top for a hat. The torso section is 9/16" tall and has weak shoulders and 'love handles'. :^D The leg section is 11/16" tall. The last section is what makes this a clothespin, and is usually cut off as excess. (Note that it is the part that I used for the legs in my clockwork soldier that I am working on, so even though it is excess for most projects using a clothespin, don't throw it away. You never know when it will come in handy and get used.)


The small figure is 2 1/2" tall, 1/4" thick, and 7/16" wide (at its widest part). The part is divided into three sections, from top to bottom: head, torso, legs, and excess. The head is about 5/16" tall, but a little more rounded on top, so if you are going to make a hat you may end up cutting some of this area off. The torso section is 1/2" tall and also has weak shoulders and love handles. The leg section is 1/2" tall. As with the large figure, the excess at the bottom (section outlined in red, in the figure below) is usually cut off and can be used for something else.


So, from these basic parts you can easily make two different sorts of figures from each size clothespin: tall and stocky or short and stocky. The first is tall and stocky, and consists of cutting off the excess sections (all but the red area, shown in the figure below). The large clothespin will yield a figure 1 9/16" tall while the small clothespin will measure in at 1 5/16" tall. Note that this is not much different in the height (1/4"), but the small figure is 1/8" thinner and less wide by only 1/16", so the proportions on these figures are very different.

The figures below show the head area (outlined in light blue) and the leg area (outlined in light green), with the remainder being the torso area.


With this style you have only one cut, but it often looks better to glue craft sticks or a heart shape to the bottom to represent feet, so this is a little more work.

Another way of using the clothespins is for a very small and simple figure, a bit stocky and big-headed, but simple to use as you simply make one cut and you have a ready-to-paint figure (assuming you are going to paint on the arms). As shown in the figure below, simply cut off and use the red area shown. This is about 1/16" below the notch in the torso area. The light blue outline shows the head - still the same size as with the other figure. The 1/16" area below the notch serves as the "feet", leaving the middle section to represent the torso, hips, and legs. This makes the large clothespin about 15/16" tall by 1/2" wide by 3/8" thick - a very stocky figure!


The small clothespin, on the other hand, will be about 7/8" tall by 7/16" wide by 1/4" thick. Still very stocky, but with a more pleasing shape.

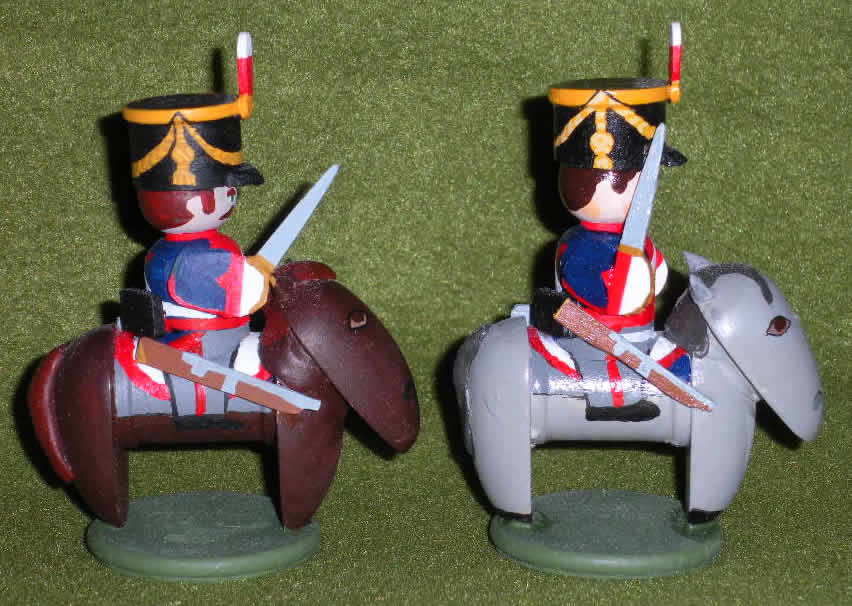
I am sure you can see other shapes in these parts. By cutting below the "leg" section I indicated and into the "excess", you can attach feet and it will appear like you have legs with a gap in the middle. Kenneth van Pelt has used this very successfully to make cavalry figures that use the gap to mount the horse models and to be pulled off an mounted onto stands to the figure is used for both mounted and dismounted duty. You can see that in this picture on his blog, the Penny Whistle.

Well, I received a new load of wood goodies from Woodworks, Ltd., so I hope to have another episode of this where I use spools, barrel beads, doll pins, and bee hives... See you next time!

Friday, March 11, 2011

Improving on the Split Egg and Spool Horse

When I first saw Matt Kirkhart's cavalry on the Wargaming on a Budget forum I thought "well that's clever!" Matt had taken two wooden "split eggs" and a spool, along with a little pipe cleaner and paint, and turned it into a horse. My first cavalry figures used the same shapes, albeit larger versions, as I was working in 42mm.

Over time I started experimenting with changing the head, mostly by positioning the head to look in different directions, but also posing it so that the horse is rearing on its hind legs. The one thing I was unsatisfied with, however, was the neck. I put putty between the join of the split egg representing the head and that representing the chest and front legs, and it looked better, but I was still unsatisfied. As I was mostly doing work on infantry, however, I set the problem aside.

Well, a buddy of mine has purchased a fully painted 28mm Seleucid (lead) army, mounted for DBA, and he asked me if I had thought about getting into 28mm ancients; after all he would have an army to fight it. I cast about looking at the enemies of the Seleucids and came up with something different - the Armenians. As I started looking at figures I hearkened back to a question I asked on the forum whether anyone had pitted their wooden warriors against a traditional lead or plastic army; no one had. It was always wood on both sides. So, with that in mind I decided to try and build a wooden 28mm army to face off against some heavy metal foes.

The Armenians have 2 cataphract elements (Knights), 4 llight horse, 4 light-medium infantry (Auxilia), and two light infantry (Psiloi). The cataphracts are supposed to be 4 figures on a 60mm frontage, and I wasn't really sure I could so that, but I would see. The main thing is: half of the army is cavalry, so it was time to address the horse issue I had set aside.

So, how to represent a neck? The easiest thing to do was add a flat head plug between the two split eggs. The plug against the split egg for the head would be an easy join as both surfaces are flat. The plug to the second split eggs would be flat to curve, so hearkening back to my old tutorial, I would first sand the spot on the split egg flat to increase the surface area for contact. Second, I would drill a hole into the two split eggs, and through the plug, then insert a dowel to acts as a pin for the whole assembly.

You can see the results below.


One thing I did different from previously is that I raised the spool higher, allowing the shape of the "lip" of the spool to act as the front and back of the saddle.

So, is it perfect? No. I will probably put a gentle sand on the plug to make a slight curve, rather than flattening a spot on the egg. What I do like, however, is that I can position the neck and head in a number of positions (up, down, straight, left, right) and also sand the plug at an angle to tilt the head up or down in relation to the neck. I can definitely see the possibilities for having more variation in the horse.

Finally, the plug gives me a shape to glue yarn, hair, or fur to to act as a mane. All in all, I think I like it. Let me know what you think.

Wednesday, March 9, 2011

Steampunk Clockwork Soldier - WIP

I'm building up steam on my Steampunk Clockwork Soldier (sorry, could not help it). As you can see in the figures below, I have added a 'neck' and the 'head' for the unit, in this case looking down presumably to smash some meat bag in front of it.


The legs are now glued in position so that the feet could lie flat on a base. I articulated the right foot by sanding a notch in a wooden oval, soaking the wooden piece, and then bending the oval at the notch and letting it dry in the new position.

The neck was created by using a flat plug, 1/4" in this case, the same as the 'eyes'. To make it all work I drilled a hole through the face, the neck, and into the shoulders, then ran a dowel through it all to strengthen the glue. This is now a technique I am pretty much doing for almost everything.


I forgot to mention that I used the dowel pinning process for the torso. I drilled a hole through the top of the heart shape, down all the way through the bottom, then made holes in the top and bottom spools. Unfortunately, drilling a hole all the way through the heart made it fragile, and it broke in half. Next time I will only drill a hole in the top and the bottom of the heart shape and simply use two pins. (It would help if I also found some thinner dowels or started using metal pins.)

All that really remains are the arms. I know I want a close combat weapon attached to one arm and a ranged weapon attached to the other, but I haven't really figured out what. Traditional close combat weapons are typically smashing types, given these machines fight each other, and cutting weapons are generally ineffective against their armored bodies. That makes it easier to design.

For the ranged weapon, unless electricity is being used as a weapon, it would have to be a breech-loader with an automatic feed mechanism. I may think about electrical weapons. Maybe look at some Tesla coils...

Saturday, March 5, 2011

Steampunk Clockwork Soldier - WIP

If you are thinking Warmachine, well so be it, but I am not making a copy of some copyrighted intellectual property of Privateer Press, but my own version of a clockwork soldier from a steampunk genre. (By the way, I collected figures from the Protectorate of Menoth...)

The first inspiration was not so much Warmachine itself, but a fellow wooden soldier builder, James (a.k.a. frater_corvus on the Wargaming on a Budget forum). He wanted to make some figures for the game and I really liked his first effort at a warjack. (You have to be a member of the Wargaming on a forum to see his photos.)

I knew I wanted my figures to be big ... towering ... compared to the 25mm figures I would make to go with these. The picture below shows the basic shoulders, torso, and hips. I wanted the design to be broad-shouldered, more so than the hips, so I used a wider and thicker spool for the shoulders. The heart just serves as a basic shape to attach other elements, but I liked the way that the heart outline conveys a rib cage reducing to a waist.


I knew I wanted a smokestack and I knew just the scrap piece of wood laying around to use, but because it had a flat base and was a rather hard piece of wood I decided to add a base below it. This is a simple 5/8" dowel of softer wood that I sanded to meet the curve of the spool. I drilled a hole through the dowel into the spool allowing me to pin the two parts, and later the smokestack, into a nice line.


If you look at the second picture in the section The Cannon Barrel of my artillery tutorial, you will see where the smokestack came from. It is the bottom piece of the spindle that I cut off for the cannon barrel. Lesson: never throw away any neat looking wood scraps!


As noted in the picture, the smokestack is probably too tall and needs to be cut.

Next are the legs, which are another interesting wood scrap from another project. If you saw my experiment with the Greek in the Trojan War figure, you will note that I started with a clothespin. However, I did not show the original clothespin, but you can see it in a woodcrafter's catalog as MCP400. If you look at the 'legs' of the clothespin you will notice the same shape in the legs below, only turned upside down and reversed.


While waiting for things to dry, I started looking about for a 'head' for my creation. The figure below shows you you can use simple parts and shapes to make the head. A small slice of dowel with some wire mesh or screen glued over will serve as a vox receptacle (mouth), if I can find a piece. Otherwise I will simply paint a grid.


Looking at the legs, I just did not like them stiff and straight.I looked at putting a 1/4" flat plug on the sides to represent a knew joint, but that would not solve that it was straight legged. So, I cut the legs in half and sanded my own knee joint. To be honest, this is the kind of artistic work that I love doing (just not in mass production).


The torso was looking a little spare, so I found another scrap, this time the top of the head of the pawns. I started cutting off the tops so that I could glue the shako to the flat top and get a better join (in addition to avoiding 'scooping out' the spool, like I used to do).

The split sphere gives the torso more body, and the armored belly can hold the clockwork guts of my construct.


The figure below shows you the figure so far, along with a simple 25mm soldier made from a micro-peg and a flat plug. It will definitely tower over the battlefield.


As you can see, I have also shortened the smokestack; I think it looks better. (And no, I did not throw away the top of the smokestack that I cut off...)

French Porte-Aigle of the Ligne - WIP

To the right is a picture of a Third Porte-Aigle of a French Ligne regiment, from Funcken's L'uniforme et les Armes des Soldats du Premier Empire, Volume 1. In terms of the game Songs of Drums and Shakos (SDS), a Standard Bearer confers special abilities on the player's squad. Rather than create an Eagle Bearer, which would not typically go out on a skirmish patrol, much less bring the regimental eagle along, I decided to use a little more interesting figure that had less historical implications, should the standard be lost in the skirmish.

The port-aigle is a part of the color guard. The first port-aigle bears the eagle, the second guards to the right, and the third guards to the left. As shown in the Funcken image, the third carries a halberd with a pennant attached. Not only would using this figure fit for a SDS Standard Bearer, as it has a flag that would be visible to others, but he has an interesting weapon to use and to model.

In the game the figure would be equipped with a halberd and two pistols, in addition to having the attribute Standard Bearer. Although the figure is also equipped with a sword, it seems a bit redundant. (No reason to waste points...)

Finally, this figure will nicely round out the cast of specialty figures that I already have for the French ligne unit.

The first thing I needed to do was develop a pose. I could have done the pose used in the picture; it is basically the same as the marching pose I use with most of my soldiers. But for this figure I wanted more of an 'on guard' position, so I moved the arms to thrust outward, so the halberd could be carried across the chest.

In order to get this sort of pose right you have to drill holes into the figure's hands at an angle, so the dowel slides through smoothly. Once the pole is in place, you can glue the arms into position.


To make the head of the halberd I cut a slice of 5/8" dowel, then drew on a basic shape. Although this halberd is much larger and heavier than that in the Funcken drawing, I think it will look okay, given the 'chunkier' style of the figure. Also, it needs to stay thick in order to drill a hole through it to insert the halberd's shaft.


Using a Dremel tool and various sanding bits, I sand away to get the basic shape. When that is complete, I sand a 'V' edge on the front and back. You can see the basic halberd below.


I will glue a simple pennant to the shaft, below the head. I will probably make that out of aluminum foil, or a heavier metal sheet, so the pennant keeps its shape, which will be slightly furled.

Thursday, March 3, 2011

British 1st Regt. King's German Legion Light Dragoons

I was going through my various pictures of my figures and I could not believe that the only shot I had of the 1st KGL LD was in my game at MAG-Con II. I looked back at the blog entries and I saw that I had an entry on building them, but nothing on painting them, or the final product.

So, without further ado, the 1st Regt. of King's German Legion Light Dragoons:


The guys are a little dusty there. As you can see I painted the eyes a very light brown rather than white.


I like how the braid on the shako cords, and the fitting on the scabbard turned out. Simple painting, but effective.

And finally, a cheesy action shot of the two troopers charging the brave French Chasseur. Will he survive?

British 87th (Prince of Wales of Irish) Regiment

I finally finished the second batch of British line infantry, for my Napoleonic skirmish games (using Ganesha Games' Song of Drums and Shakos).


With 12 infantry figures (and 2 cavalry) I can now have a better scenario than previously, where I only had 6 infantry and 1 cavalry. You can see the Corporal on the end, to the right.


I should still do an Officer. As these troops are in the Belgic shako, I will probably do the same for him, rather than putting him in the older bicorne, as used in the Peninsular War.


It will probably be quite some time before I create any specialty figures for this squad. When I do it will surely be a drummer, standard bearer, and sapper. Eventually I will also need to paint up a rifleman - in the 95th Rifles, of course!

Wednesday, March 2, 2011

Another method of making "Craftees"

In this blog entry, guest blogger John Acar shows us how he makes his Craftees (wooden warriors, in my parlance). Take it away John!

Hello. My name is John Acar. Welcome to my craftee tutorial. This is a documentary of building my very first craftees. I modeled my boys after Matt Kirkhart’s Hoplite figures. [-ed See the Wargaming on a Budget forum for more of Matt's or others' work.] After giving his work a good study, I got under way. I did not look back as I felt I would be more creative just making up anything I needed to add.

Part 1: First I primered everything gray. There is a definite choice to be made here. White brightens colors. Black makes them dull. Gray does something in between. I chose gray because it is most forgiving about coverage for color and dulls them a bit.

Part 2: I started by blocking everything except the linen armor. The flesh was base coated with cocoa. The tunic hem and sleeves are a blood red color. The entire head is base coated in cocoa as well. I found that the craft paint gold looked better over brown. The test figure had gold painted over gray and then I switched to brown and then gold.


Part 3: Next I did the linen armor. I painted everything white from the neck down to the top of the tunic line. Then I added the pteruges (the dangly things) that linen armor has, which cover the red leaving red lines showing. [EDIT] Also, I did not paint the strap shapes, but rather painted the armor all white and then painted the strap outlines in dark gray.


Part 4:  The flesh and fine details were done next. I painted the eyes first. Then I filled in around the eyes with flesh tone. I left a bit of the cocoa showing to line the eyes and a dot between the eyes to give a hint of a nose. The spear shaft was done with Games Workshop’s Bestial Brown, an expensive way to go but I did not have a craft paint color for the spear shaft. I painted the point black followed by gunmetal leaving a black line at the base of the point.


Part 5: I made a couple of line drawings of some Carthaginian symbols and placed them in a 13mm circle. I printed the circle on heavy card and cut them out. I then base coated a 5/8” washer in blood red.  Finally I glued the cut out on to the washer.


Part 6:  The shield went on last of course! Here are a couple of pictures of the final product. These figures are Carthaginian Hoplites, probably before Hannibal fought the Romans at Cannae. I like the results of the figures themselves. The cut outs look a bit raged. I can probably rectify that next time by using a hobby knife to cut them out instead. [-ed Actually, $10 scrapbooking scissors are the best way to cut small items like this.]


The first figure took about an hour and a half to paint. This was mainly because I did not know exactly what I was doing. The second figure took about a half-hour or more. I could have knocked it out quickly were it not for the drying time.

The paints I used were American Craft Paints. The coverage was pretty good. I did end up having to paint on two coats for most of the colors. The paints themselves are about mid range for craft paint. $1.25 per bottle is what I believe I paid.

I used a 5/8" by 1/2" spool for the body, a 3/8" button plug for the head, 1/2 of a round toothpick for the spear, and a 5/8" diameter washer for the shield. The shield face was printed on 110 lb. card stock and cut to 13mm diameter. You can see in the picture below how it compares in size to a 15mm figure on the left, and a 28mm figure on the right.


I am looking forward to doing more figures in the future. These were pretty fun and surprisingly easy to paint.

Thanks to Dale Hurtt for letting me guest star on his blog. Special thanks to Matt Kirkhart for without his clever idea, none of this would ever happen.

Contributors

Followers

Blog Archive

Popular Posts

Labels I Use in Posts