
The Experiment
I started with a basic figure (below left) and painted the basic colors onto the figure (below center and right).


That white goop on the top of the shoes is Das modeling clay. I found that it does not stick to wood any better than Crayola Modeling Magic Fusion, but is more solid after drying. It is messier, however.
I started with an image of the chest lace, etc. of the British Line, measured the dimensions on the wooden model, then resized the image appropriately. Because the image will wrap around the figure, the image needs to stretch horizontally more than vertically. This distorts the image to some degree, but it creates an exaggerated look that works for these figures. The image, front and back, is shown in the figure below left. I then cut out and tacked the printing to the figure with a small dot of super glue (below center and right).


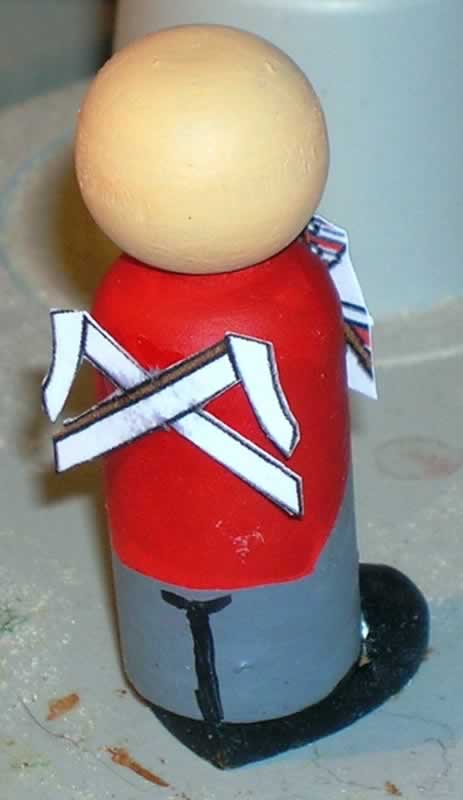
Once the center is down firmly you can glue one side of the printing down with white glue and hold it in place until the glue hardens (which is fairly quickly, due to the heat from your fingers). Once one side is down, glue the other down. You may need to make notches in the paper to remove any wrinkles.


As the front and backs do not touch, you need to add paint for the belts to "meet in the middle". In this case I have to match up the shoulder straps, cross belts, and the canteen strap. While you are at it, you can touch up the edges with paint, cover the glue spots, and so on.


This figure, once assembled, took less than 20 minutes to paint to get to this point. At this point I would add the arms, paint them in basic colors, and then glue a printing of the cuffs and lace on the arm. To attach the arms you sand a flat spot on the sides of the figure to increase the contact surface for gluing, and use the super glue/white glue combination mentioned in previous blog entries.
Assessment
First let me state that the photographs show more detail and color variation than is easily seen with the naked eye viewed from about 3' away. (That's another way of saying it looks worse in the close-ups than in person.) That said, I am please with the result, as it brings the level of detail that I want while being fast. Gluing is a bit fiddly, but the time-savings makes it worth it.
As this was an experiment, I wasn't too concerned about color matching or fuzzy details. Future versions will be more precise.
To summarize, here are some things to think about with this method:
- Make the print area as rectangular as possible, filling in the basic colors in printing, rather than relying on cutting out coat areas precisely.
- Inner cuts makes the print much more fragile (although it is more flexible), especially when wet with glue. Also, cuts have white edges, which need to be painted. The longer the edges, the more precision painting need be done, which defeats the purpose of using prints.
- Try to minimize the painting required for connecting the front to the back.
- Try to match the coat color printed to that painted. This will help camouflage the print and will minimize the desire to overpaint, which will have to be precise.
- Remember that some details will be covered. In the example above the cross belts on the back will be covered by a pack; the left shoulder belt will be partially covered by the cartridge box; the brown strap will be partially covered by the canteen; and so on.
This figure is not done, of course, and the following areas are potential for using prints:
- Shoulder straps. These could be a part of the print above, or a separate one glued on.
- Collar. This has some detail, plus if it is made taller than the neck of the pawn, can stand out more than one painted on.
- Coat turnbacks. A simple detail, but it wraps from front to back on both sides.
- Shako plate. These can have some detail, but more importantly are hard shapes to paint.
- Belgic shako frontispiece. The hard part about the Belgic shako, compared to the French shako, is its shape. At the heart it is a cylinder with a peak on front. However, the frontispiece is thin and taller than the body of the shako, so is an ideal candidate for being printed on paper.
- Face. Interestingly, you could draw up numerous faces and hair color combinations and print out a page of them, then glue them to the head. To get around wrinkles formed by gluing paper to the round head of the pawn you might have to drawn only the "T" of the face (eyebrows, eyes, nose, mouth, and chin), rather than an entire face.
No comments:
Post a Comment