Saturday, December 10, 2016

Dungeon Terrain & a Troll!

Looks like both Dale and I were busy this weekend.  I'm posting too.

First I wanted to show a hallway tile for a cavern instead of a dungeon.  I wanted the "spaces" to be somewhat irregular, but still be "fair" in terms of it being easy to see what spaces are diagonal to and lateral to another space (this is important in some games).  Also I wanted to use a color other than gray so I went with brown.  Nothing earth shattering here, I just wanted to show you all the tile.  I did paint a rat's skull on this one to though.
I am always looking to make more dungeon terrain pieces in terms of things you would find in a room or passageway.  I finished two dungeon braziers this morning and am posting pictures of them.  I wasn't sure how they would turn out, but I have to say I was pleasantly surprised.
The bottom piece is a wooden shape that I think goes over a larger dowel.  As you can see, it tapers from the bottom to the top.  On top of this piece I glued a wooden shape I got from an online wooden craft parts store.  It is flat on one side and slightly curved on the other, almost like it's a shallow bowl.  Once that glue dried I took a hot glue gun and made the fire, then painted it up.  Here it is with one of the Drow in a dungeon room for scale.
And now ... a TROLL!

And I don't mean just any Troll, I mean a classic, 1st Edition AD&D Monster Manual Troll.

I have always been a sucker for these rubbery, bug-eyed, no pupil eyes, regenerating terrors with the "blown back" look hair.  The more I look at this guy, the more I find him oddly terrifying ...

Construction is a tall shaker peg (I can't remember how long, I think something like 1 and 1/4" long maybe?) with a split egg for a head, a tapered rounded plug for hair, and two disk-like beads for his bulging eyes.  The arms are actually large tile spacers that I cut to shape.  The nose, too, is an "arm" of a tile spacer glued to the split egg.

And now, for you old timers, a scene out of D1 or D2, or maybe even certain parts of Q1.  If you don't know what I'm talking about, that's okay, just enjoy the picture.


Austrian Dragoons 1866 and Why Craft?

I have finished another 12mm unit for my Austrian 1866 (Seven Weeks' War) army, this one being Austrian Dragoons. During this period Austrian dragoons had green coats faced red (collar and cuffs).


The build is pretty standard, with the horses being built exactly the same was as previous builds. The rider's body is also the same as previous builds, but the head is a spherical 8mm wooden bead rather than a cylindrical pony bead.


In order to create the comb of the helmet I used Americana's Writer – a thick, "dimensional" acrylic paint – to build up the shape. I am not concerned that the height of my comb is not anywhere near as high as it was historically as I am going for an effect, which I think I have pulled off decently.


Basing is old school solid grass green as I think it works well for these cartoony figures.

My goal is to try and get the models as close to the basic paint job as possible while still being quick about it. Once I have a full Austrian and Prussian army painted, I can go back and add some details. For this unit I want to paint the leather saddle, the bedroll behind the rider, and the hay roll they carried in front of the rider, on the right side. (The first and last details are probably only feasible on the outer figures.

I probably need to find another source for swords. The "silver clubs" don't look as nice, even from a distance. The problem is that they are so small, so handling small bits is really fiddly, especially when trying to glue them into place. Further, with such a small surface area smaller, thinner pieces have a lot less strength after gluing and will often break off. It will take some thought to think of a replacement.

Why Craft Your Own Miniatures?

To those wondering why I do this, why I continue to make figures that are so inexpensive to buy, I guess my answer is because I like constructing the figures. There have been a number of times the last year where I picked up a packet of figures, or looked through a catalog online, and I just could not convince myself to buy those figures. I always thought to myself: I can make that. Granted, it was not going to be the same as the elegant figures I was considering, but unless I send those figures off to a professional painter I am really not going to do them justice. There is something about the simple shapes – spheres, cubes, cones – rather than the complex curves and undercuts of modern figures, that makes it so much easier to paint. It also helps that I like the cartoony painting style of these figures.

Bead figures are especially inexpensive. Each dragoon above uses five beads for the horse and two for each rider. Each bag of 1,000 beads is anywhere from $3 to $5 so that means each figure comes in at about $0.05. I would say that the base the figures rest upon is the single most costly component at $0.17 each. So the base of dragoons comes in somewhere around $0.42 each. You won't get even Baccus 6mm or Irregular 2mm for that cost.


Larger figures like the ones pictured above can get more expensive, especially if you buy in very small quantities at Hobby Lobby or Michael's craft stores, but I bought in quantity some time ago. The basic figure costs about $0.11 each if you buy 500. The hats are made from one-half of a wooden spool, so that adds about $0.04 ($0.08 per spool, which makes two hats). The feet are made from a wooden heart, so that is another $0.08 each, unless you use craft foam where they are about $0.03 each. The wood base costs $0.05 each. Finally, the flat toothpick used for the musket adds about 1/10th of $0.01. All in, about $0.32 each. Try finding a 40mm or 54mm figure for that cost!

Of course, you really have to like crafting. Otherwise this is just another step between purchase and getting the figures on the table that takes up time.

So, why craft? First and foremost: because I enjoy the creativity behind figuring out how to combine shapes and materials to make something resembling a historical soldier. I actually prefer painting details onto figures rather than painting detailed figures. It must be something about "coloring within the lines". The fact that my crossbelt are painted on rather than cast on means that those belts will not be in the exact same spot with each figure, giving my figures in the unit a look of individuality while not looking completely random. They are not a clone army, nor are they like some units of plastic and metal made up of three or four poses so they don't look clones. I would say that multi-part plastic troops are the closest to what I do, as they too have slight variance due to arms and heads being glued in imperfectly. Finally, there is the cost. Starting a new period I know will take far more time than money. I don't feel bad having a large wood pile because I know that while they remain in component form, they can end up as practically any soldier from any period until I put them together and start painting them. My wood pile – although as large as my lead pile – can end up as almost anything when the time comes. And that is a fun thought, in and of itself.

Wednesday, December 7, 2016

Doppleganger & Flesh Golem

Two new classic D&D monsters were added to my monster stable tonight, a Doppleganger, and a Flesh Golem.

I wanted to do a Doppleganger obviously in its "unchanged" form, and there are a lot of takes on this, but I wanted mine to look pretty alien.  So I made his arms longer than they should be and gave him sort of hook-like hands.
Very basic paint job, not fun to paint at all.  I couldn't decide between really wrinkly skin, or totally flat, plastic-like skin.  Given the scale and my painting style, I opted for the flat looking skin.  Either one I think you could see being how this creature's skin would be, with the wrinkled skin indicating that "anything is possible" in terms of the shape it takes, or the flat skin indicating more that the creature is naturally a "blank slate" and anything is possible in terms of the shape it takes.  I'll likely never use this monster in a game, I just wanted to have it in my collection.  I went with dark blue skin instead of gray just because I have so many gray monsters already, I wanted something different.

And now, the Flesh Golem ...
Construction wise, he's just one of my few remaining elongated medium sized eggs (same as I used for the Bugbears), axle cap head, split eggs upper arms, and split spool lower arms (actually the manacles that were used to restrain him until he broke free!), with tile spacers cut in fist shapes and glued on as his hands.  He was an absolute delight to paint.  I used my normal medium and light flesh tones, but added in some gray to make him look more "dead."  The scars were easy, just a redish brown line with a light tan color for the stitches.  I really like the way he turned out.


Tuesday, December 6, 2016

Spanish Troops in Bicorne

If you have read through my blog then you know that one thing I have tried to make in the past, and found to be a pain, was making bicornes.


My last attempt was with the French Napoleonic Officer on Foot and I ended up making it out of balsa wood and Modeling Magic. It was a process that worked fine for a single figure, but not for mass production. As I want to make figures for the Spanish Army of 1808, I need a simpler way to make bicornes. Grinding down blocks of balsa wood won't cut it.

Making a Simple Bicorne

As with most things I did originally in wood ended up not being scalable, I turned to craft foam sheets to see what I could do. I started by cutting and trimming a piece of foam and fitting it to a figure. Once I got the right size and shape, I used it to create a template out of plastic card.


Once you have a template made, it is much easier to make consistent pieces. Trace around the template onto the foam sheet.


Cut out the shapes. One is the front of the bicorne and one is the back.


Cut them out of the foam sheet using scissors. Now tack to the halves together using a dab of hot glue.


Tack only one of the two halves to the head of the pawn applying hot glue to the center of the bicorne half. Do not tack both as it will be very hard to center the hat onto the head if you do so.


Once you have the half centered in place, apply a little hot glue to the open end and glue the two halves together, making sure you keep the hat centered on the head.


If you got it right you should see a very simple, but functional bicorne. The hat will still pop off of the head though as it is only lightly tacked down. As you look under the hat you can see the gaps on the left and the right of the head (or the front and back, depending upon whether the figure is wearing the bicorne side-to-side or front-to-back).


To keep the hat fixed to the head we need to fill those gaps with hot glue. Fill one side and let it cool before filling the other. You do not want the tacked ends come apart.


Now the bicorne sits nicely on the head.

Making a Simple Plume

There are craft scissors that you can buy at the craft stores like Hobby Lobby and Michael's that cut irregular shapes. I have used them on my troglodyte project as for the manes and tails for horses. Now we will use it for a plume. Cut three triangles using the scissors, two smaller than the third.


Now simply hot glue the smaller pieces to the larger piece, one on each side.


Now simply insert the bottom of the plume between the folds of the bicorne and glue it in.

Simple Feet

In the beginning I used the ends of popsicle sticks for feet, but cutting and sanding took more time than it was worth. I switched to gluing wooden hearts to the bottom, which really looked nice. However, there was still the need to sand off the "point". On the positive side, the thickness of the heart looked right for a pair of shoes.

I found some foam hearts, with adhesive backing, at the craft store. I decided to give them a try as they are a lot cheaper and a lot easier to use.


The result is that they look right, from the top, but are a lot thinner than the wood. Maybe some hot glue on the top to give the shoe some body, like I did with the original feet I made. Much easier to mount and trim though.

Making Simple Heavy Lace

The last item I will show is heavy lace, tape or braid for the bicorne. Normally I paint such details on by hand as I get fixated on correcting my work when I paint outside the lines. So I try not to create any artificial lines.

That said, sometimes the braid on a figure is so heavy that it needs some dimensionality to it. A good example would be the gold braid on the edge of a General's bicorne. To make this simply use your bicorne template and cut out a half on thinner foam sheet. (There are generally three thicknesses, with the middle thickness being what I use to make the bicorne itself.)


Carefully cut the edge out of the half and glue it to the bicorne. You can use hot glue to tack the ends down and then white (PVA) glue to glue the entire piece down. Glue one of these to each of the bicorne halves and you have some impressive heavy braid!

Variations

Napoleon's bicorne had the front more prominent, almost starting to become a tricorne.


For this you will have to put a small square of foam on each end, rather than gluing the two halves together. To make the prominent front, pinch the front half to form the shape and put some hot glue on the back side, letting it cool before moving on.

Some bicornes have a higher back than front.


This can be achieved by making two templates – one for the front half and one for the back – or simply carefully cutting down the height of the front half using the common template.

Really exaggerated bicornes, where the sides dip down, would probably be better served by making a template of the appropriate shape. But it is possible to pull down the sides when filling the bottom gap with hot glue and waiting for it to harden. The stretch of the foam should have no problem dealing with distortion and once the glue hardens it will not lose that shape.


Finally, we have the Prussian 1806 bicorne, which was one of the original figures I was looking at making (rather than the 1808 Spanish).


This is very similar to Napoleon's bicorne, above, except you can insert small spherical beads at the left and right ends to represent the pom-poms, and to hold the two halves together.

Well, I hope you have found this instructive. From this I will be able to build Spanish line infantry, line cavalry, dragoons, and artillery. Expect to see those sometime in the future as I find a new opponent for my French to fight using Tin Soldiers in Action. (For more information on the Tin Soldiers in Action rules see my review and battle report. Part One Part Two Postscript

Sunday, December 4, 2016

Air Elemental & Drow

Had a bit of insomnia last night, so I did some late-night painting and got the Air Elemental and six Drow warriors finished.

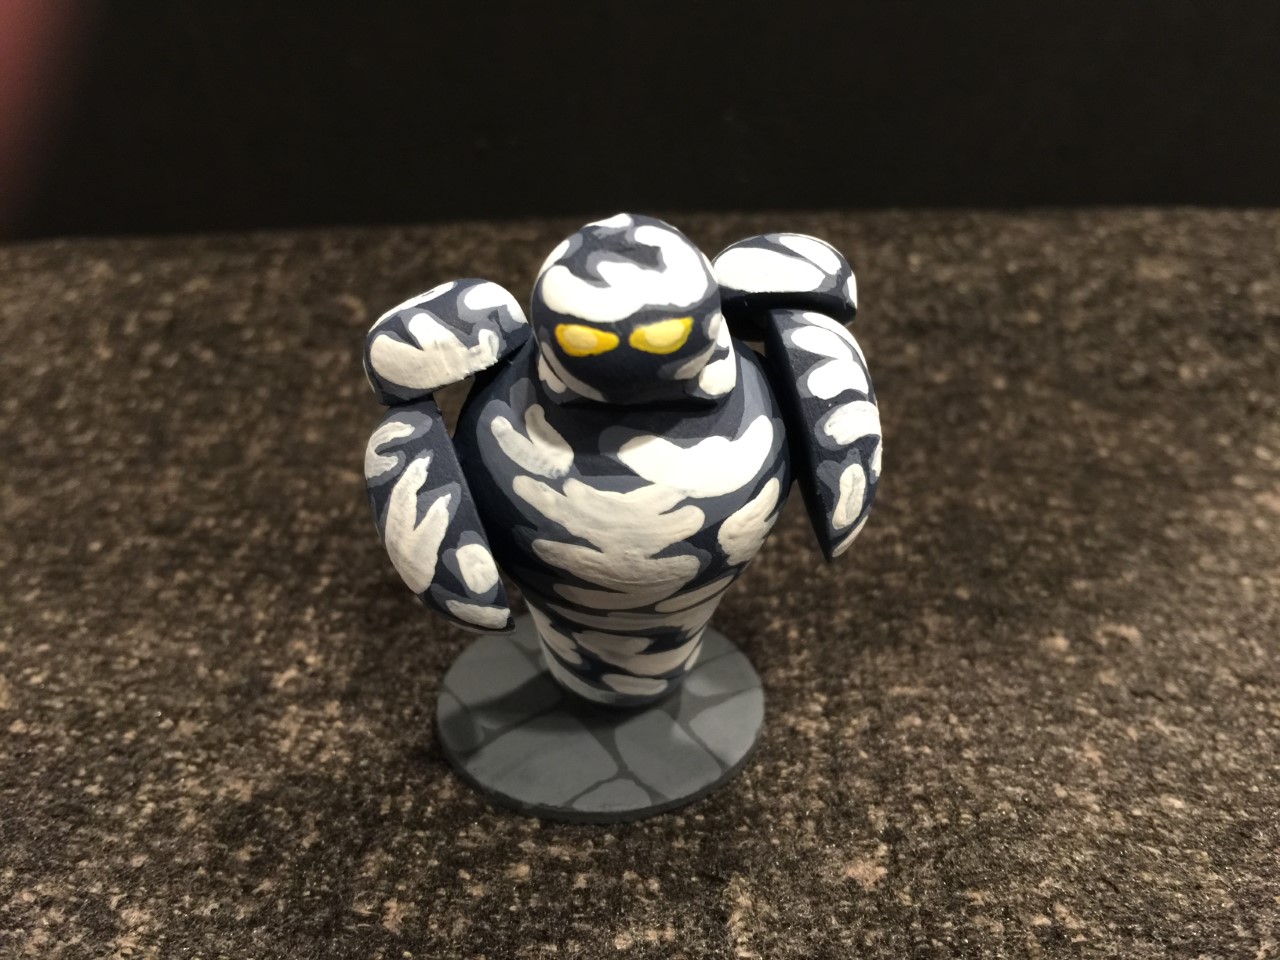
Here is the Air Elemental.

Pretty happy with him.  His body is a pear glued upside down (smaller side down towards the base) to give him the "volume" look to his body that a small twister/tornado should have I think.  His arms and "neck" are split eggs, and his shoulder mini tornadoes are axle caps, as is his head.  Because he is supposed to be a swirling air mass, I wanted lots of round shapes in this construction, but I wanted him to have a recognizable, but noticeably incomplete, humanoid appearance.  Sort of like a non-material plane being "playing" at being a material plane creature and just not quite getting it right.

In terms of painting, I actually did him first with much lighter colors, but it just lacked depth.  I wanted the feeling of a really "dark" and dangerous "inner" part to him, just like a real tornado.  So I went really stark with the colors, a very dark blue base color, a light blue swirl on top of that, and a white swirl on top of that.  All in all, I'm pretty happy with the result.

And now, the Drow ...
Before I start, these guys turned out WAY better than I thought they would.  All I could think of when I was doing them was, "ho-hum, another elf figure ... ugh, how boring."  Well, I was way wrong.

As you can see I made three with short sword and buckler, and three with hand crossbow and buckler.  I'm really happy with the build and the paint job both.  The build was nothing new except I used slightly larger tile spacers for their arms so that I could have more of a "billowing" shirt sleeve look, and also it let me trim them so that the arm and the hand are all one piece, always a good thing for durability purposes.  The hand crossbow I made with only one mistake, so that's pretty good.  I had made bows before, but not crossbows.  Turned out to be very easy to cute one tile spacer to the shape of the crossbow, and glue it on top of the tilespacer arm/hand holding it.  All the details were just done with the paint job.
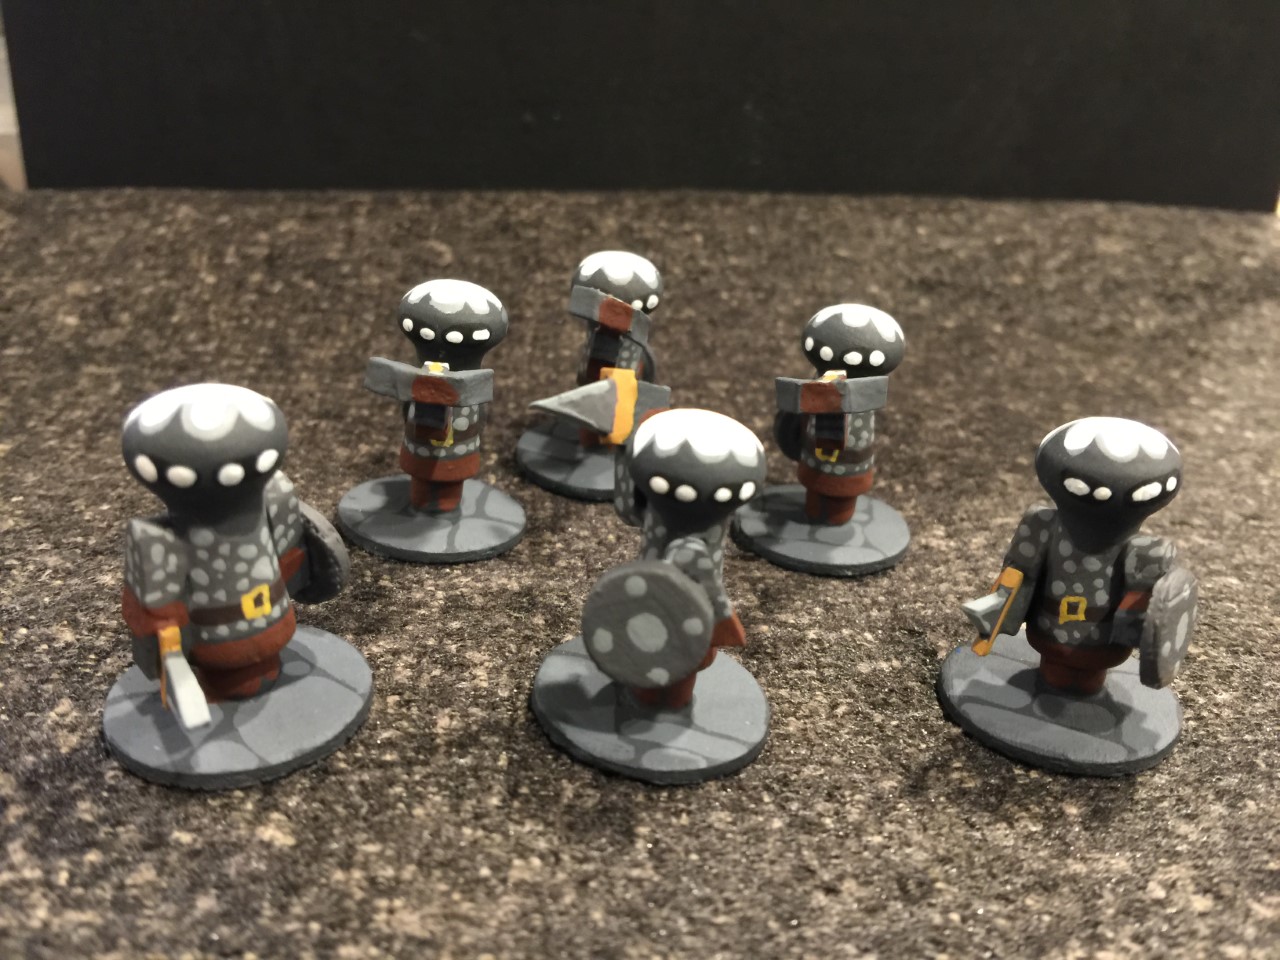
Speaking of the paint job, the dark gray skin tone with the eyes really gives the "evil" appearance I had hoped for.  Like I said, I was dreading doing these guys, and when it was all said and done, they are some of my favorite humanoid figures I've done to day.  The only thing you can't really see in these pictures very well is that for the hair, I first painted on a light gray color for the hair, and then went over it with white, leaving some of the light gray uncovered on the end of the hair shape to give it some depth. 

Painting a Flesh Golem right now, but I have to do some reading for the D&D game I'm running tonight, so I'm not sure if I will get him done until later this week.

--Matt


Saturday, December 3, 2016

Iron Golem & Hallway

Hello Everyone,

Since the game I ran at the Barrage game convention in September I've been needing to do some markers for hallways that are not closed off by a door.  So when the heroes in the game cause a room to be placed on the board (or hallway for that matter) you also place any closed doors in the room, as well as any open hallways so that the players are aware of the non-hidden exits before entering the room/hallway.  I have plenty of doorways.  I had no open hallway markers.  One of my oldest gaming buddies was playing in the game at Barrage and he said, "why don't you just make markers like you have now for the doors, but instead of painting a door on the wooden shape, paint it black to represent an open hallway?"  Brilliant!  And that's what I did.
I messed up a little during construction.  I decided I would glue the side cube walls onto the "door" shape by laying them face down on parchment paper.  Before I would just sort of manage it on the wooden workspace table I had, but I had some stick and it ended up ruining them, so I thought I would try parchment paper.  Good news is that they didn't stick at all.  Bad news is that the glue got smeared onto the parchment paper as it dried and settled (which is why there are those "wavy" textured lines on the side).  But that's fine, these are on the board for only long enough for the heroes to enter the room.  Once they enter the room, the hallway or room that this opening goes to is placed on the board at that point so this marker is removed.  Other than the rippled lines on there, I actually like the way it looks.

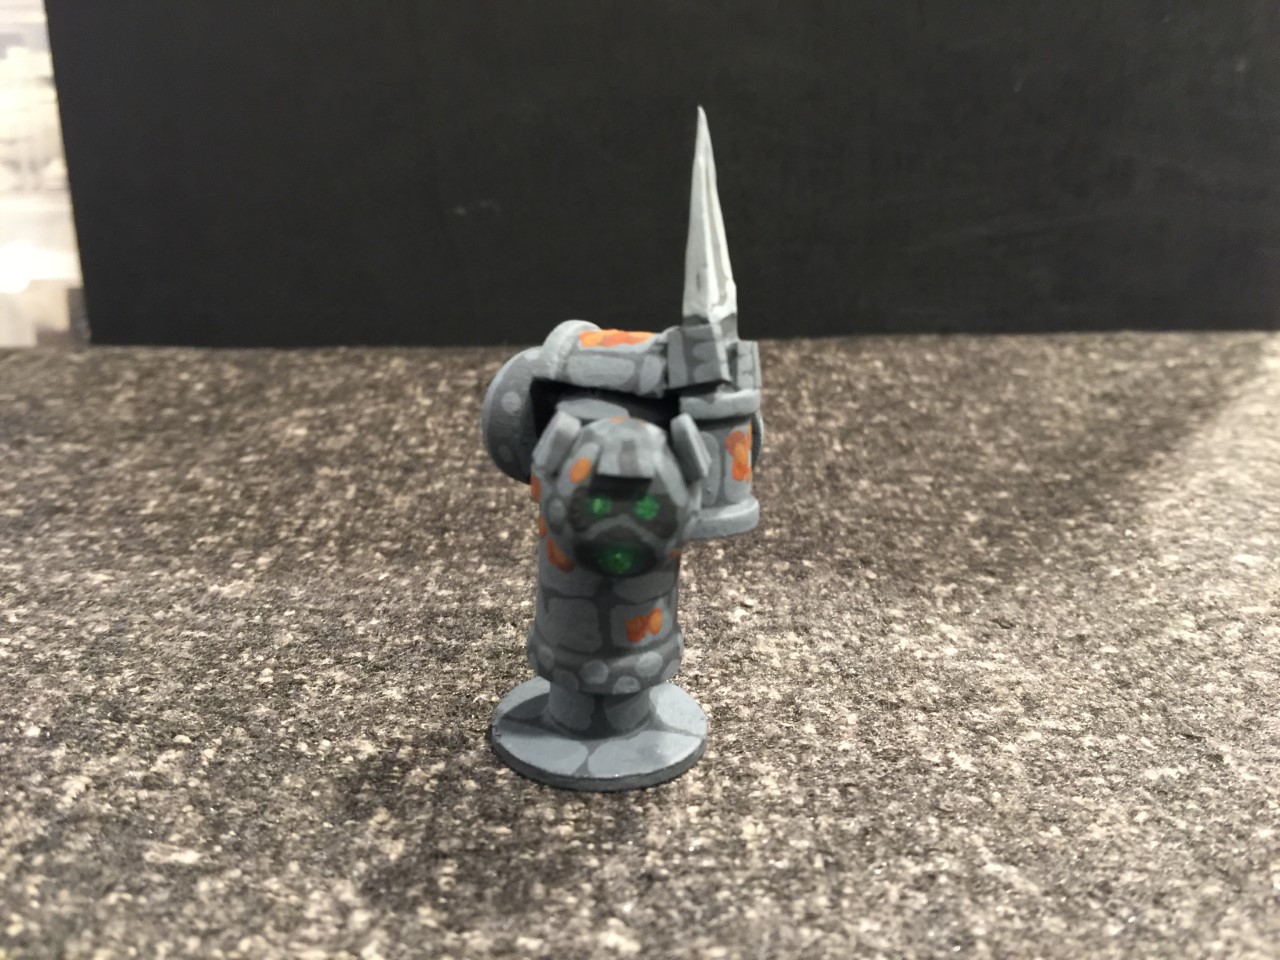
I wanted to do some of the tougher classic D&D monsters, so I thought I would work on some golems and elementals.  I've got several on my painting table right now, but here is the Iron Golem I made.
There is this old Ral Partha (I believe) Fighter miniature that I've always been partial to because he is holding his sword up over his head vertically like this, but his arms are in an impossible position to produce this sword position.  I wanted to mimic that with this figure, and I think I pretty much accomplished it.

The construction is essentially the same as for the various heavily armored fighter and knight figures I've done in the past.  The only difference is the head, which I just used an axle cap for.  I cut three pieces of tile spacer down (thinned down the ends of the spacer essentially) to make helmet decorations (those are the half-circle things glued to the top of his helmet) just to give him some visual interest.  I also wanted my Iron Golem to be a bit rusty, so I painted some rust patterns on him.  His eyes and mouth are dots of florescent green paint.  It took two coats (the red and the orange are bright, the green and the yellow are very thin).  This is the same type of paint I use for the "glass" parts of the Space Marine figures I do.  I wanted it to look hollow inside his helmet/head with the arcane energy glowing inside giving him "life."  The florescent paint tends to be shiny on the figure, and it produces this diffused look just from its natural drying process, where the center is more intense in hue and the color sort of diffuses out from the center.  It actually looks much better in person than in these pictures.

You know me, I can't resist an "eye-candy" shot with some adventurers coming upon a new tunnel marker with an Iron Golem guardian attacking them as they try to enter the passage.
Soon, hopefully, I'll post some pics of an Air Elemental, a Flesh Golem, and some Drow I'm working on.  Stay tuned!
--Matt


Monday, November 28, 2016

Painted Monsters

Hi Everyone,

I finally got around to painting the Mind Flayer and the Otyugh figures I made a while back.  I've been working on a "metal" project lately, but needed a break so I went back to my wooden guys to finish them up. 

First the Mind Flayer.
All fear the Mind Flayer!  I'm pretty happy with him, especially the head/face which I was most worried about.  It looks a little "small" on the naked wooden figure, but it isn't once you get the eyes painted on it.  Here are a couple more shots:
Nothing earth shattering in the painting really.  For the most part it's stuff I've done before except for the eyes.  I wanted to make sure and make them look not at all human.

And now ... the Otyugh!!!

Honestly, I couldn't be happier with it!  As you can see, I did end up gluing on some sharp toothpick ends to give him some spikes.  I'm pleased with the construction and the finished paint job as well.  Doesn't always happen with a first-time construction piece with me.  I did a base for him as well but glued him on at the end, after I painted everything.  Here are some more shots:
Just two colors, a medium brown base coat (two coats for good coverage) and then a mustard yellow color on top for the body coloring.  I tried to keep it simple.  It would have been really easy to get too detailed and complicated for the tentacle pattern.  I wanted to both keep it simple, and paint on a pattern that was consistent with the pieces I used in construction.  The teeth were first given a light gray undercoat and then the teeth were painted on top, leaving some gray showing as usual.  And now, for the view of the Otyugh that an adventurer would see, right before the end ...

Hope you enjoyed these two classic D&D monsters.  I might work on some Drow next.  But for the rest of this week, I need to get some metal monsters done for my D&D game I'm running on Sunday night.  Starting a new campaign, I want to get off on the right foot!


Contributors

Followers

Blog Archive

Popular Posts

Labels I Use in Posts