Sunday, July 30, 2023

Finally Finished!

 I got distracted with some regular 28mm miniature painting, but this weekend I focused on my Conan game and finished everything.  Here is a pick of the set up from the beginning of the game, with our three heroes standing outside the opening of the orgy of the Snake Cult, ready to sneak in and steal back the princess.

This will be the starting point of the game.  The heroes need to sneak in, climb the stairs or the rock walls at the rear of the chamber to get up to the top level where the princess is located.  Right now she is in the chamber with Thulsa Doom.  The merry-makers on the lower level are busy having "fun" and eating their "stew".

A close up of the three heroes:  Subotai in the lead, Valeria behind, and the big man himself Conan brings up the rear.  I can see I need to touch-up the bases a bit!

The cult members party down while their big boy serves up the stew!

Thulsa Doom and the princess hanging out in the royal chamber overlooking their followers.  Two guards stand outside protecting them.  As you can see, I just had to add the mural on the rear wall of the chamber to my set up even though I didn't plan to do it originally.  I love how it turned out!  Very happy I changed my mind and decided to add it!

A famous scene from the movie (who knows if this will happen in the actual game!) as Subotai sneaks up the stairs to dispatch the cult member stirring the stew.

Another famous scene.  Valeria is about to take this guard by surprise and ... well, let's just say she finishes him off.

"You!"  I just had to use this pose, even though a fighting pose might have been more useful in the game.  This is just too iconic of a pose not to use!  I fleshed out his arms to give him "muscles" using cut tile spacers.  Happy with the result!


Thulsa Doom sitting atop his huge cushion with the princess at his feet.  Those two holes in the wall back there?  Couldn't be important, right?


Thulsa Doom begins his transformation into a snake!  Again, too iconic not to have in the game.


Completed his transformation, now retreating through one of the holes to safety!

This game board was a TOUGH build, but I am happy I did it.  It came out way better than I thought it would.  I also have the figures for the retreat, guards and Picts to chase the heroes after they get the princess.  They will have to fight their way past them and exit through the hallway to win the game.  At that point it will move away from the movie scene a bit, but that's okay, it will be a better game having them have to fight their way out.  I am not going to have the two main evil heroes show up in this game like they do in the movie, just lots of guards for the heroes to wade through.

I'm doing a test run of the game in a few weeks at one of my gaming friend's house and I'll try to take lots of pictures and post about it.  Then it's off to Barrage at the end of September where I'll be running three games of this scenario on Saturday.

Sunday, June 4, 2023

Finally an Update on The Snake Cult!

 I ended up not running the Snake Cult game at ScrumCon, it just wasn't right for the convention.  It was too small of a game and didn't take enough time to play.  So I ended up running a Tunnels and Trolls rpg instead using some of my wooden guys for that game.  I don't have great pictures of it though, unfortunately.

However, I have continued to work on the Conan Snake Cult game as I will definitely be running this at Barrage this September and probably at ScrumCon next year if they enlarge their venue and schedule.  Regardless, here is an update!

I finally got the terrain all done, and most of the figures too, but I'll save those for later.  Here is a shot of the entire game board.  The tunnel at the front will come into play as the heroes attempt to flee with the princess in tow.  The rounded raised section is where the orgy is taking place.  The stairs lead up to a top level where Thulsa Doom (before he turns into a snake anyway) and the princess will be located, along with two guards patrolling the walkway in front of the pillars.  The stairway has the iconic "human pea soup" stone cauldron as well.


Now for some close ups.


I bumped it and the snake pillar moved a little so it's off center, but you get the idea.  And yes, just like in the movie, that's the top of a skull floating in the human pea soup, as well as skulls all around the raised circular area.

More later, when I get the figures finished, but I'm happy with the progress and the way it has turned out.  It is probably the most intricate piece I have ever done and I can't wait to see it with the figures on it during play.

Monday, January 23, 2023

New Conan Game for Scrum Con - Swords Against the Cult

 I am doing two Conan games for the upcoming Scrum Con in Silver Spring, MD in April of this year.  One of the games is the Conan game I did at Barrage two years ago.  I wanted to do two different Conan games for Scrum Con, so I picked another famous part of the original 1982 Conan the Barbarian movie.  The other two possibilities to me were the raid on the snake tower to get the gem and kill the giant snake, or the raid to capture the princess.  I went with the later just because I thought the terrain would be easier ... although in hindsight it has taken me three weeks to build this layout and I think I made an wrong calculation about which terrain would be easiest!

I am going to do something I don't normally do with terrain which is post a picture of the layout completely built, but unpainted.  This I hope will give a sense for how "rough" things look until you actually put some paint on them ... the paint to me anyway is the "magic."

Here are some shots of it on my basement floor.  The "board" is 3.5 feet long (a little longer but just a couple of inches) and 18 inches wide.  It's made out of craft foam (the thick 6mm kind), wooden craft pieces, and rubber tubing.  It's more or less finished (I have one more detail to add to the snake pillar but it's just a minor cosmetic part of it).

Here is a view from the front with the cave tunnel entrance to the main hall.  In the movie the orgy is happening around the snake pillar.  The stairs lead up to the upper level where Thulsa Doom and the princess are.  The four little round tables will have gold treasures on them and the two wooden pieces closest to the entrance are actually fountains, so they will have hot glue "water" on them as well, but not until after they are painted.


Here is a closer up view of the place where the orgy is happening.

The beads around the base will be painted as skulls (nice, right!?) and they are glued to the foam at this point so they won't move during play.  The circular raised platform is the top of a very large (13.75" I believe) paper mache box.  The round tubing was hot glued onto the foam.  In the movie, there is a rounded "railing" like feature on the stone, and this tubing was the easiest way to get this effect.  We'll see how it looks painted but I think it will look good. 

Another close up.

You get a better sense for the tubing here.  The smaller wooden pieces on each side of the stairs up are burning light sources for the room.  The styrofoam white piece is the stone bowl that holds the "pea soup" in it in the movie.  It can be moved so if Conan wants to push it over, he can.  The snake pillar in the middle will have another architectural feature under each of the snake heads, but this is more or less what it is going to look like.  It, too, is not glued to the raised circular platform so it can be moved if needed.

Here is a view from the rear of the whole game board.


The top layer is where Thulsa Doom (the figure will be on the circle in the rear of this picture) and the princess are located.  

I have all the figures done as well except for the three heroes, Conan, Subotai, and Valeria.  But I will show the figures like I normally do, after I paint them.


Thursday, January 5, 2023

Normans for My Hastings Project

In my last post I showed the start of my Saxon and Norman forces for gaming out the Battle of Hastings, but apparently I forgot the Normans! This led to Matt asking about "how I was going to do the Norman cavalry", which I interpreted as "how are you going to make those iconic Norman kite shields, which were used by both the Norman cavalry and the infantry. (If it pertained to something else Matt, you need to let me know as I am being a little dense.)

I will be honest, my first attempts were rather simplistic, as shown in the figure below.

Basically I took the rounded end of a flat toothpick and trimmed it to get the kite shield shape. As you can see, I did an inconsistent job on the size between the three examples. It was because of these results that I cast about for another solution.

First, I wanted something simple to shape. As I had been using a hole punch with thin craft foam sheets that seemed a likely candidate to try. All I needed was to get the shape right. I searched on the internet for "Norman shields" and came across numerous images of shield transfers that are commercially available. Most are for 28mm scale figures (given the popularity of the rules Saga) although I knew that there were some for 15mm. That said, both were too large for my figures, so buying commercial transfers was out. What I needed were digital images that I could scale. So I found some.

I first scaled the figures to an appropriate length, top to bottom, and increased the DPI (dots per inch) of the image so it would lose as little fidelity as possible. I then printed the images out using my inkjet printer on the brightest paper I had. I did not use photo quality glossy paper, however.

I took the printout and glued it to brown craft foam sheets and carefully cut the shields out with tiny scissors. Those, in turn, were glued to the figures.

With a close-up shot you can see obvious flaws, but not when the figures are at arm's length. I did not even color the paper edge, nor paint the craft foam; I liked it the way it was.

What do you think?

Saturday, December 31, 2022

Hastings in a Minimalist Style

 If you follow me on my blog Dale's Wargames you will know that I really like the rules Tin Soldiers in Action. One limitation of them is that they only cover 1650 through 1914. I like the core mechanics, but could not use them for other periods. After speaking with the author he indicated that the did expand the range, to include from ancients to futuristic. He sent me the Hastings scenario which has the necessary rules and order of battle to game the battle.

As it happens I have sufficient troops in 15mm metal, but I am actively trying to decide on how to reduce my collection. Although I have decided to keep 15mm as the scale of choice for mass battles, I am considering selling the painted troops I have and replacing them with wooden miniatures. Why? Well I like the creation process for one, and now that I am retired I have more time on my hands. But more to the point, I am concerned that when I pass I will leave my wife with trying to get rid of my collection and trying to recoup some of the money. (If she gives them away it would not be a disaster as she will be well taken care of, but I would probably roll over in my grave.) However, if they are my wooden creations I would neither be upset if they are given away or even thrown away. (Strange, I know.) Besides, I really need to downsize anyway.

With that morbid thought in mind I decided that the Hastings project was a great start to see if I even have the ambition to carry it out.

I decided that I wanted to use the minimalist style that I started some time ago, rather than the larger, more detailed style Matt used for his Hastings project. (I love Matt's stuff, but can't match his paint jobs.)

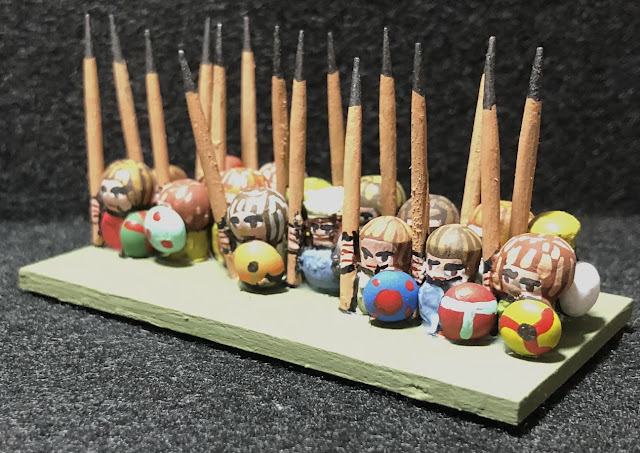
If you follow the first link you can see how I build these figures. They come out about 12mm tall, but about the chunkiness of 15mm. They have a cartoony 'big-headed' (chibi) style where the upper wooden part represents the head and hat and the lower wooden part represents the torso and legs. (This is how you achieve that chibi look in such a small scale.

Saxon Fyrd

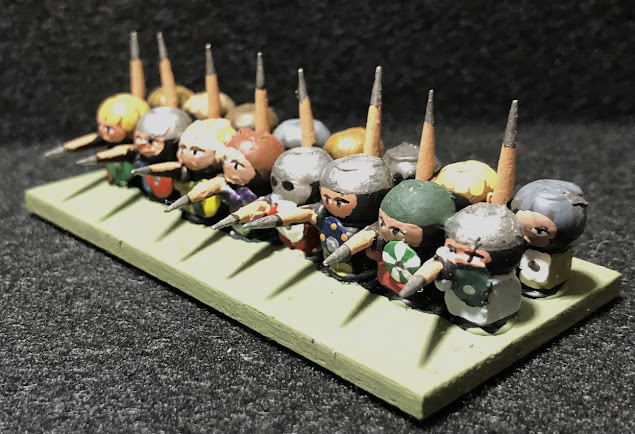
In the image above, I used a mixture of round beads and round head plugs to represent the upper part, and round beads, cylinder, and flat head plugs for the lower part. The shields are ½ a sphere of clear plastic, to represent the shield. As always, spears are made from a standard toothpick.

More Saxon Fyrd

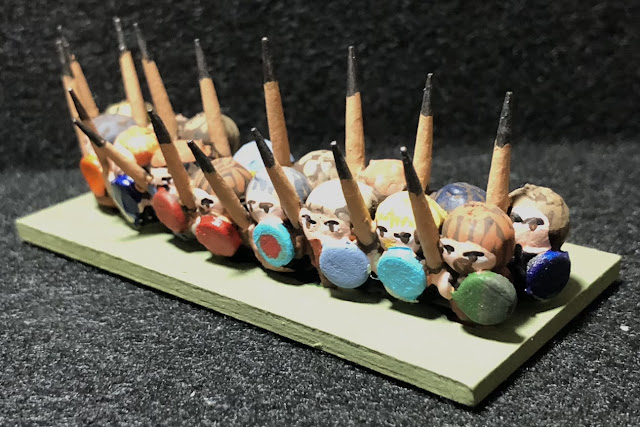
The above are ones that I made and posted about in 2016. (All projects eventually get finished!) They are all round beads for the upper part and square beads for the lower part. Shields are made from thin craft foam using a hole punch.

More Saxon Fyrd

More figures from 2016 that use a small flat 'bead' for the shield. I could never find one the proper size, so I switched to craft foam hole punch shields.

Saxon Huscarls

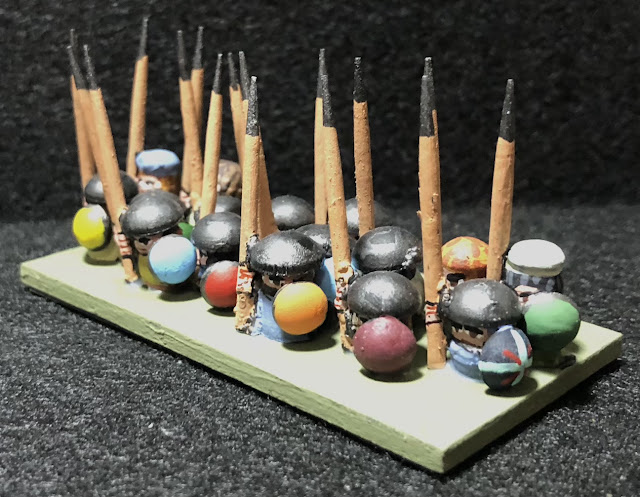
To emphasize the metal helmets, beyond simply painting them a metallic color, I used button (mushroom) plugs. Some figures have a 'Phrygian' cap, like the end figures in the second rank. Here is the look I was going for.

The intent was to use two beads and some filler to simulate it.

The light gray bead is a cylinder. Although mine was square with rounded corners, it would have looked better if it were wider than it was tall. The dark gray was an oval bead, very much wider than tall. Finally, the white represents where I put filler, to try and hide the gap between the two beads at the back of the head, but leave it in the front, in an attempt to give it the 'floppy cap' look. In the end it sort of fails because I always have trouble filling gaps.

As a side note I can see using this same technique to represent a beret, with the open gap to the side and gluing the top bead at a slight angle. I may also have come up with a better gap filler: 'sprue goo'. Sprue Goo is where you take plastic sprue from plastic models, and dissolve it in acetone or plastic cement (acetone and butyl acetate). You can use it like liquid plastic which will harden. I used it in this experiment below to make spear points on the toothpicks. (It worked but was too much trouble.)

Some people ask me: why do you spend all of that time making figures? Isn't it faster to just buy miniatures? My response is always: how long do you think it takes to glue two beads, a toothpick, and a hole-punched piece of foam together? How do you think it compares to removing flash from metal figures or mold lines from plastic ones?

The real time savings comes with painting. Because there is zero detail on the figure – it is all shape – you can add or leave off as much detail as you like. Further, exact placement of details is not necessary and further gives your figures a more realistic look in that everyone is not perfectly uniform, in either detail nor pose.

One factor I did not mention, and is something I have been pondering, is 'block painting' versus 'figure painting' versus sub-assembly painting. What do I mean by those terms?

  • Block: all of the figures are assembled and then glued to the bases before being painted.
  • Figure: all of the figures are assembled, glued to painting strips (typically popsicle strips), and then each figure is painted before being glued to bases.
  • Sub-Assembly: the figures are partially assembled, painting each sub-assembly before assembling them into complete figures and gluing them to bases.

Why would you do any of these particular methods?

Block painting allows you to ignore painting details that can't be seen, i.e. if your paint brush cannot reach it, you generally can't see it either, so why paint it? This saves time, but sacrifices quality. (It also cannot be used if you are mounting the figures individually.) The surest way to make this method look good is to prime everything black so that the unpainted portions look like they are in shadow. The 2016 figures above were all block painted.

Sub-assembly painting is the other extreme. This allows you to easily paint everything producing the fewest mistakes (in terms of your loaded paint brush accidentally hitting an adjacent figure or part). It is very easy to paint details that you do want to appear. Hiding the glue spots after painting will be your hardest task. The figures I consider doing this with the most are the cavalry.

Finally figure painting is the happy compromise. You will still end up painting details that might not be easily seen, but will still have color in those hard to see, but still visible spots. Gluing will be covered with paint. All of the figures painted in the last month used this method.

I am curious what you do (or would do) and does it change with scale of the figure?

Sunday, September 25, 2022

Barrage 2022 Battle of the Great Pit of Carkoon!

Got back from Barrage last night after running two games on Friday and one on Saturday.  This was the first year I had made it on a Friday (usually tough for me because of work) and while there were definitely more people there on Saturday, there was still a good crowd on Friday.  My game can hold up to 4 players and I had 2 players for the first game and 4 for the second game on Friday.  Saturday I actually had 5 and being the great gamers that they were they divided up the heroes so that all 5 people could play.  As is often the case with me, I ended up taking no pictures of game 1, some of game 2, and some of game 3.

Game 2:  Outcome = player victory.  2 dead heroes (Chewie and Luke)

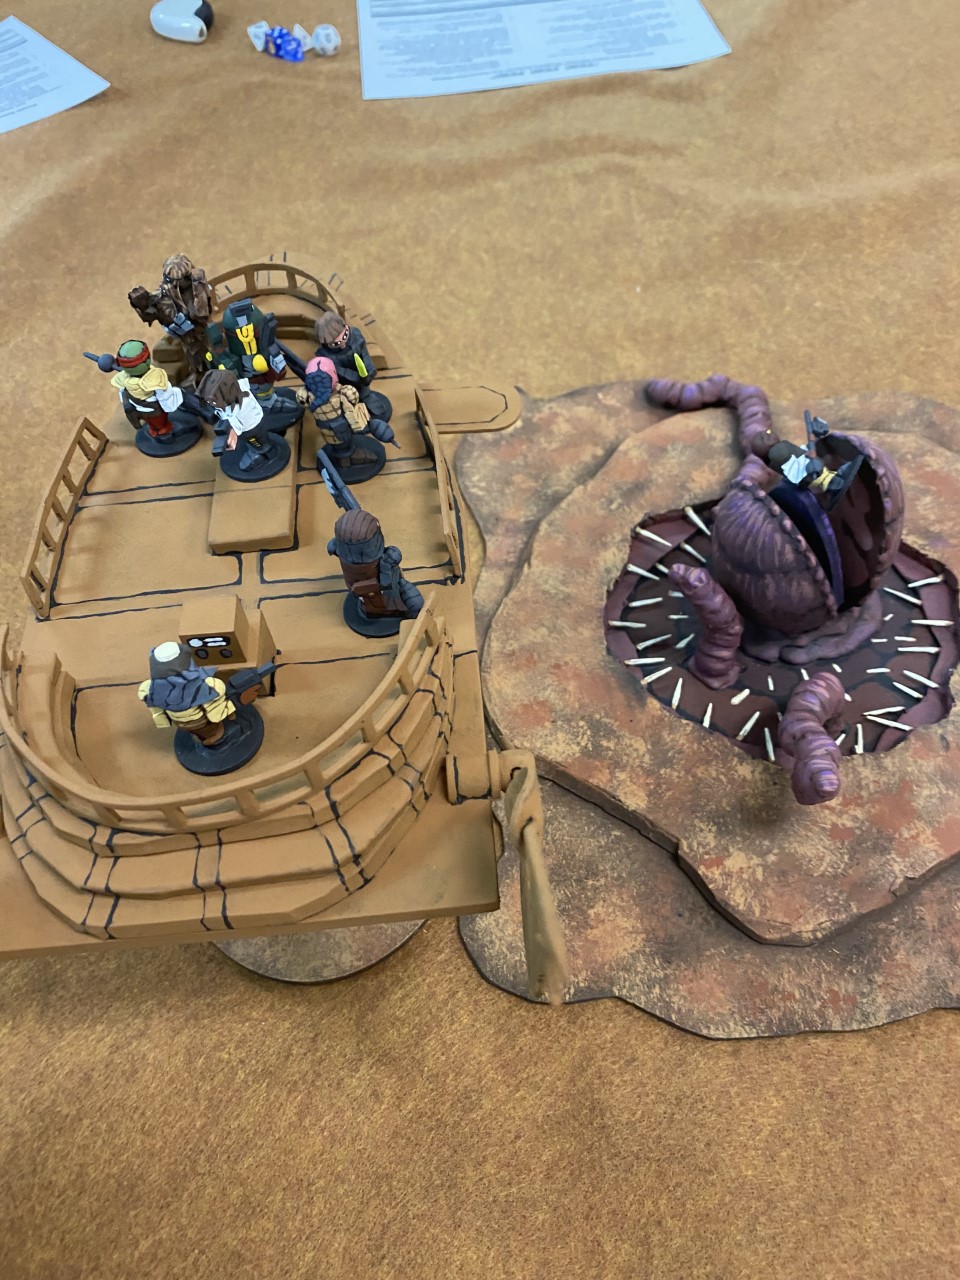
The game starts out the same way each time.  Here is the general layout.

Jabba's barge flanks one side of the playing area.  Leia has already dispatched Jabba at the start of the game and has made her way with the two droids onto the deck of the barge.  Some of Jabba's henchmen are up there, two of which are there to man the two large guns that can be used to damage the skiffs.  The guy closest to the bottom of the picture is the henchman who ends up in the movie shooting Luke in the hand after Luke makes his way onto the deck of Jabba's barge towards the end of the battle.  You can't see him in this photo but Boba Fett is up on the raised rear deck of the barge.

This is Skiff #1 which has Luke, Chewie, Han, and Lando on it along with five of Jabba's henchmen.  In the first game I allowed Luke to start on the skiff rather than on the plank.  In the second and third game I made him start on the plank to reduce his movement options.  The sarlacc waits hungrily below.

Skiff #2, manned just with Jabba's henchmen, begins quite a distance away.  The challenge is it has two melee guys on it but it has 4 shooters, so that is a lot of shots for the heroes to absorb before they can do much about this second skiff.  So having them be far away reduces their shooting die making it less likely for them to hit and to give the heroes a chance.  The pilot of the skiff is not allowed to do anything but a "Move" action which is what is used to drive and stabilize the craft.

You can see that this is well into the game as Boba Fett has made his way down to the deck of Skiff #1 to try and dispatch either Luke or Han.  Lando is in a fight, but you can see one of the henchmen in the mouth of the sarlacc, most likely tossed there by Chewie.  Rather than causing Hits in melee combat Chewie can opt to instead throw one enemy in melee with him into the sarlacc pit.  This is usually the better option for Chewie unless he causes a lot of Hits and could possibly take out several henchman at once.  But an auto-kill is always a good thing!

Skiff #2 has moved closer to Skiff #1 at this point and this takes away the ranged penalty for the shots from these henchman.  Things are getting very serious for the heroes at this point!

By this time Leia has managed to man one of the guns and is putting shots onto Skiff #2.  Brave R2 even though he is not good in combat, changes the henchman manning the other gun ...

... and through an act of the Force (has to be!) manages to win the melee combat and push the henchman back 1".  The henchman is allowed to make a roll to hang on and keep from falling, which he passes, but he is clearly in a bad place!

This is the last picture I have of game 2, but you can see Luke has made his way over to Skiff #2 and is dealing with all the shooters there.  Some shoot at him but some also shoot at Leia, especially now since she won't shoot at their skiff anymore because Luke is on it.

Game 3:  Outcome = player victory (1 dead hero - Han).

Game 3 was a real nail biter because the players lost Han by the third turn I think.  I was very worried.  He is essentially the only consistent shooting that they have, and not having that makes it very difficult to deal with Skiff #2.  Leia and R2 (who can use his anti-fire spray to block LoS for one of the deck guns for 1d4 turns) can pretty well handle the shooters on Jabba's barge.  It's Skiff #2 that is the problem and usually Han is best served to pick them off one at a time.  But with him gone early, and the Luke player having really, really cold dice, it was touch and go for the players in this game.  Turned out that Leia and Chewie were the major players in this one with Lando providing some needed support.

Chewie has already tossed one henchman into the mouth of the sarlacc.  You can see Han fighting against Boba Fett in melee combat here.  Boba Fett gets an incredible roll, Han's player fails his Wound check twice (using a reroll to try and make it) needing only to roll a "3" or more on one of the 1d6 rolls, and he rolled a "1" and a "2".  Ouch.

Chewie and Lando are "clearing the deck" of henchman.  The gold bead indicates that Lando is shaken and will have to rally before doing anything else on his activation.

In the 3rd game, Leia and the Droids were the first to activate and the player brilliantly had her move to and man one of the big guns.  Great decision, and this probably saved the heroes in this game.  The player got a little unlucky in that Leia was able to shoot Skiff #2 regularly, but the GM (me) got incredibly lucky and made almost every armor save for the skiff ... almost every one ...  :-)

You can also see that Boba Fett has now flown back onto the deck of the barge to deal with Luke who used his Force ability to move up here and occupy the henchman who wants to man the other gun.  You can also see that R2 is down.  Got into melee, but lost and became "Frazzled" after failing his wound check.  C3PO would later repair him.


Some of the henchman from Skiff #2 have moved over to Skiff #1 after it got close enough.  No problem though, Lando and Chewie make short work of these guys.


R2 is back and Luke is about to take care of the last, shaken, henchman while Leia blasts Skiff #2 over and over.


When a skiff is hit by a deck gun, the figures on it must make a roll or be knocked down, which forces them to use their next action to try and stand up.  The two gems mean that the skiff has suffered two damaging shots.  One more and it's toast.


Chewie roaring and celebrating, looking down at all the henchman he has thrown into the sarlacc pit!


Leia is finally able to hit Skiff #2 and I failed the armor roll ... destroyed.  The guys on the deck fall to the sand with the craft and are defeated.


As usual, I had a great time at Barrage.  I have a lot of friends there, and I always have a good time when I go.  Already looking forward to next year.

Sunday, September 18, 2022

Jabba's Barge!

 Took a while, but I finally finished Jabba's barge and the figures that go along with it.  I am now ready for the Barrage game next weekend!

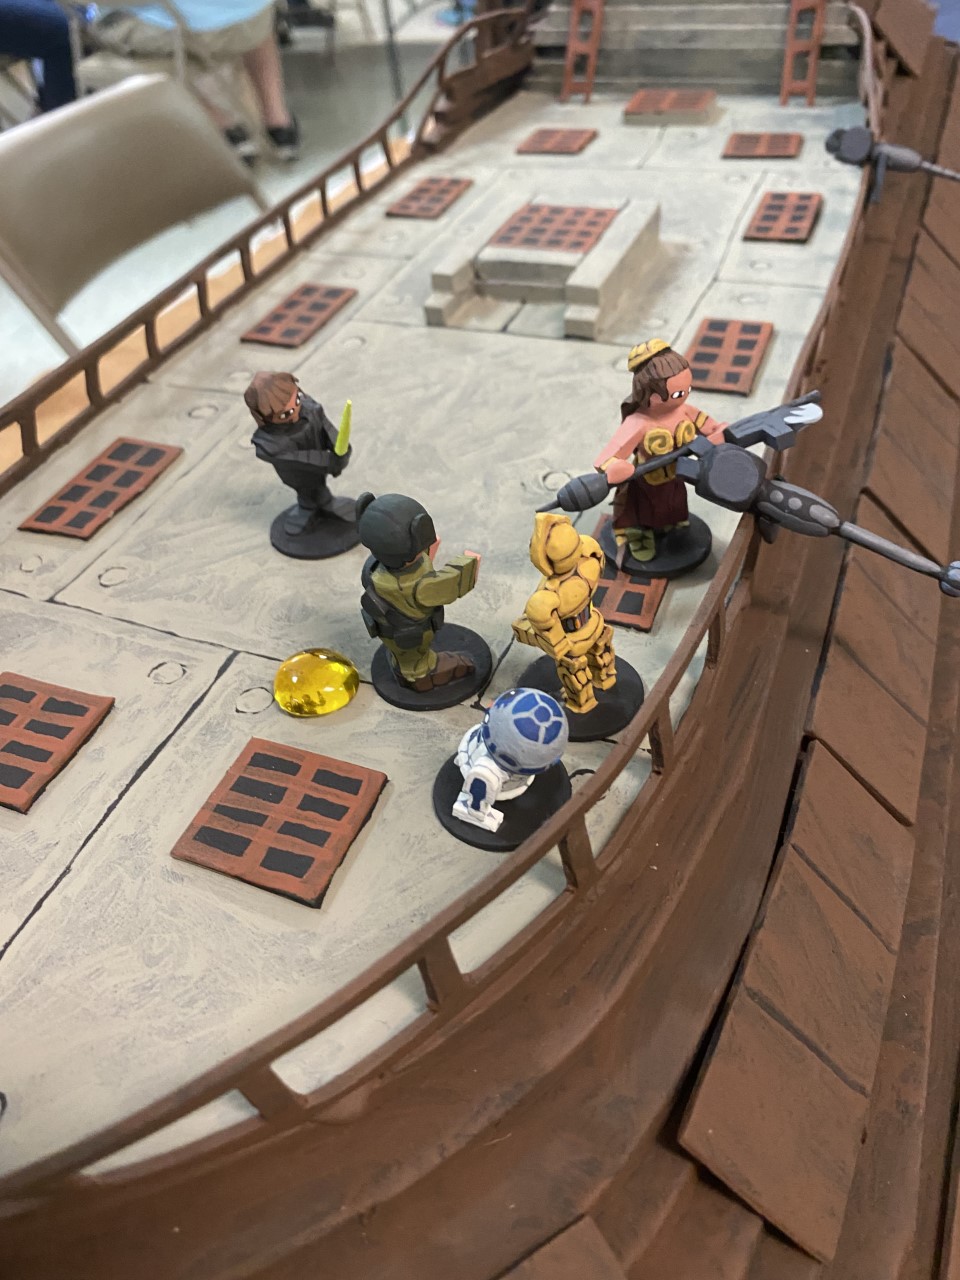
The barge is all foam, thick foam for the body and some of the pieces on the deck, like the entrance in the middle to below decks, and thin foam, like the railings, most of the vent covers, and ladders.  Everything on the barge is foam except for the vertical pieces that hold the fins on the back, and the circles on the outside of the fins (those are all wood).

Here are some pics of the different parts of the deck.  The barge is not hollow, you can only play on the deck surfaces.  The game begins after Leia has killed Jabba and can enter the deck from the center piece on the first turn of the game.


The deck guns are removable, both for flexibility in the game and also for safety of transporting the game so that things don't get broken off during transit.

The air conditioner (that's what I think it is anyway) is also removable.  Just a round thick base with tile spacers cut to be the pipes and the center piece is a wood plug.

Now onto the miniatures themselves.

First ... the man ... Boba Fett!


You can't see his backpack and cape in this image but they are there.  Honestly, his "look" is perfect for the way the figures are constructed.

Next up, the Gamorrean.

Lots going on with this guy.  The head is the newest part of the figure.  The top is a split round bead and the sides are two small long beads creating the "jowls".  The nose is a tile spacer cut to fit correctly as are the horns and tusks. 

This is one of my favorite of Jabba's henchmen.  His helmet is cool, his face covering is cool, his armor is cool, and he's the one in the movie that shoots Luke in the hand.  Just a cool dude and I'm very happy with how he turned out.

The droids!  Happy with both of them, R2 in particular.

Leia squaring off against another of Jabba's henchmen.  She also turned out better than I expected.  Her hair is awesome, you just can't really see it in this picture.


I am running a test game tonight.  I'll try and remember to take pictures.


Contributors

Followers

Blog Archive

Popular Posts

Labels I Use in Posts