Saturday, November 10, 2012

Hats, hats, and more hats

As I continue to explore more historical periods to make new figures it occurred to me that largely the defining shape of a model soldier is its' hat. With that idea in mind I decided to explore how to make different hat shapes.

I have been thinking about using the Peter Pig's AK-47 rules to run a fictitious campaign in modern (1970's) Africa. The idea is to make two different hats, one for one side and one for the other, in order to easily distinguish each side. (The base uniform color will also be a distinguishing feature.) The first side will have a field cap that looks a cross between a Marine barracks cover and an old Afrika Korps field cap. As I want the creation of it to be minimalist I have decided that the cap's peak will be painted on rather than made as a separate piece as in my Napoleonic shakos.

The cap is made by making one straight cut with a miter saw then making the second cut at 15°. By gluing the back edge of the cap as close to the back edge of the figures head, the front of the cap sticks out as a peak would.

The other side will wear a beret. This is essentially made the same as the hat above, except you use a dowel one size larger than the diameter of the figure. I also cut the piece thinner then I did the hat above.

When gluing the beret to the figure the high side is glued to the left side of the figure's head. This makes the low side stick out on the right in an exaggerated fashion. I then use my Dremel sander to shape the beret taking the hard edges off and thinning out the right side as much as possible.

It is also important to rough up the top of the beret, where the cut is made, as this is usually smooth and glossy.

Be sure to flatten out the front and back of the beret. It should be oval, not circular. The front and back of the beret should be flush with the head; only the right side should overhang.
I use the sander to curve the top of the beret, to round it out. Keep working it until it looks right.
Don't worry about it not being consistent. I work with the US Army – where the beret is standard issue now – and they all wear the just a little bit differently. Some "punch them out", some slick them down to follow the curve of their head, and some have them stick out. Then there is the angle that you wear it at. All this variation just makes it more realistic and gives the figures a certain charm.
Moving back to the Napoleonic period, I wanted to make an Austrian Grenadier's hat. Previously, when I have made Grenadier's hats, I simply used a dowel and cut it appropriately. This is good for a French Old Guard Grenadier's bearskin but less so where the shape needs to be more rounded, or barrel-shaped.

Here I took a barrel bead and cut off the top with a 15° miter saw cut. I then filled the hole with carpenter's wood filler. Later, this will receive a peak, as with a Napoleonic shako.
The first wooden soldier project I ever did, as a kid, was to create medieval knights using beads. Here I created a Crusader knight with a barrel helm. I simply cut a length of dowel and attached it to the figure, which had the majority of the head removed with a miter saw.

As the Dark Ages are becoming very popular right now I started exploring ways to represent simple round metal helmets. You could simply paint the head of the basic figure as if it had a helmet on it, but it does not look exactly right. Most helmets are slightly taller than the head itself when it is not covered. To achieve the correct effect I simply removed a portion of the head and inserted a thin slice of dowel in between the figure and the top. You can either keep the thin slice as is and paint it as a band on the helmet or you can sand the edges down in order to make it a smoother shape.
The figure shows an example where the helmet is smoothed and filled.

With the addition of a front and back peak, this is probably the best way to create a picklehaube.

I started all of this because I was looking to create a few figures for an ACW skirmish game. Of coarse the most common hat in this period is the kepi.

For this I started with the same pattern as the first hat. The difference is that I glued the high end flush to the back of the figure's head.

I then shaped the hat so that the cylinder of the kepi "falls forward", which was the style worn during the ACW. I also sanded a little "dimple" in the top of the kepi to give the crown more definition.

The images below show the sequence of creating the kepi; simply sanding with a Dremel. I make the angle sharper on the back than on the front, but as with the beret, historically the kepi was worn in all manner of form.

The last image shows the method of adding the dimple. I use a round burr bit to remove most of the material, then follow up with a much smaller sanding bit to smooth out the roughness.
Shape the BackShape the FrontEnsure Top is EvenAdd the "Dimple"

I am now experimenting with using foam for the cap peaks. It is not that the wooden ones do not look good, but that they are so time consuming to make. (Not to mention that I tend to sand my fingertips when trying to shape very small bits.)

Add a Foam PeakTrim and Cover with Glue

An interesting variation of the kepi is to make two parallel 15° cuts with the miter saw so that the front and back of the hat is sloped forward. This shape is very similar to a German police officer's cap in the late 19th century and is also reminiscent of a German Jager shako in the Franco-Prussian War.

The last figure is a Zouave in turban (or a Sikh, or any number of Asians that wear turbans). This requires you get a "beehive" bead and carefully cut it in half.

To make the turban look a little better, you need to cut the top of the figure's head at a 15° angle so the turban is high on the forehead and low on the back of the neck.

For Indian turbans, like Bengal lancers, you can add a foam rectangle to the back to represent the end hanging down.

Well, I hope you have found this instructive. My next project is to show how to make small accessories that are hard or tedious to duplicate in wood, such as an assault rifle (to go with my beret-wearing African troops).

See you next time!

Saturday, September 15, 2012

Experimenting with Foam Tricornes

As many people know I like the American Revolutionary period. I have many units in 15 mm painted up that I use with various rules, but despite my joy in building and painting my wooden soldiers, I have not done this period in wood simply because of the tricorne hat. All of my previous attempts have not been satisfactory. This time I think I may have it.

I started by using a drafting circle template to draw a circle on a foam sheet. I figured out which circle to use by simply holding the wooden figures head inside of the circles in the template until I found one the right size for the hat and another for the hole in the center where the head would go. I then cut the larger circle out of the foam and the smaller circle out of the center of the larger circle.


The next step was to pull the foam down over the head to the neck. Note that the center hole is slightly smaller than the diameter of the head, so the hole  stretches and then snaps back.


It is important to pull down and then pull back up because you want the cupping of the hat to go upward, as in the figure below. Make sure the bottom is as even as possible, unless you are going for a cocked hat look (which is always good for variation).


Carefully use thinned white glue to keep the hat in place. Note that I used a micro brush applicator to lay down the glue and to sop up some of the excess (after this picture was taken).


Here are the micro brush applicators that I use. These were purchased from Micromark and although they are very expensive, I have had these for awhile and typically reuse them. (They also served as scrap plastic. I used one as the telescope for my French Napoleonics artillery officer.)


After the glue has set enough for the hat not to move, but before completely dry, I added two spots of Gorilla Glue Superglue to glue the sides to the head. You can start to see the three corners taking shape, which is where the tricorne name ("tri-cornered hat") comes from.


A little more superglue on the rear to bring up that flap.


Yet more superglue on the front-left and front-right to get more of a "point" on the front corner.


Here is the tricorne painted up, giving you a better idea of how it looks.

Front ViewSide ViewRear View

If you are a tricorne aficionado you will probably note that it is closer in appearance to earlier tricornes (War of Spanish Succession, Great Northern War, War of Austrian Succession, etc.) and less like that in the American War of Independence. I strongly suspect that the pattern for tricornes (or bicornes, for that matter) is not a perfect circle, but an elliptical shape. I would require more study.

So, am I going to get into a new period? No, not yet. I need to get more Napoleonic troops ground out and "finish" that period. Like my work with using foam for arms, I would need to make a template for the tricorne in order to ease the process of making a large number of them. For now, it is simply an interesting experiment and something to tuck away for future use.

I will probably use this same technique to make big floppy hats for Musketeers, a skirmish period I have wanted to game in for awhile.

Not Quite a Standard Bearer

Here is another figure I have been working on for quite some time now. As I could not find a properly scaled French Napoleonic standard, I went with a porte fanion to represent my French Napoleonic standardbearer.

FrontSideRear
He is pretty much standard as far as the build techniques, however I decided to put the halberd through his hands allowing for a different pose. All in all a nice clean figure and paint job.

I am, however, looking for a 40 mm or 50 mm scale French Napoleonic standard. There are some to be purchased but I am trying to find a free one that can scale up. If so, I can paint a proper standardbearer and use this figure as a guard. Nothing like having a veteran armed with pistols and a halberd in Songs of Drums and Shakos.

Tuesday, September 11, 2012

Some French Artillerymen - Finally!

I have finally finished some French artillerymen for the cannon I built quite sometime ago. Okay, so "finished" is a relative term; I still have to make a bucket for one of the figures.

I am definitely experimenting more with craft foam, especially in making arms. The ramrod is simply a thin wooden dowel with two cylindrical beads glued on each end.

The officer's spyglass is a simple piece of plastic scrap, as is the linstock (which is really too short). But it was my first crack at it, so I will probably improve it over time.

The French artillerymen's uniform is rather nice during the Napoleonic period. This is really a novelty piece and one that will probably not get much play given that most of my Napoleonic games are at the skirmish level. Given all of the handcrafting that went into the cannon, if I had to make a large number of them I would probably go crazy (or more probably, never finish).

By the way, this was the first blog entry in which all pictures were taken with, and edited on, the iPad, along with writing the blog entry itself. Pretty handy!

Saturday, July 28, 2012

Toy Making Dad

Had a blog reader contact me recently. He saw my French Napoleonic artillery and pointed me to his blog articles on how he makes toy cannons and spoked wheels. Must better stuff than mine, but he appears to be strictly a "build from scratch" type with a much better workbench than mine. Definitely worth a look though!

Articles on Cannons

Articles on Wheels


Sunday, March 25, 2012

Cold Wars Report (6)

First off, I would like to welcome new reader Kaptain Kolbold. I hope you enjoy the blog.

In case you don't read my other blogs, I went to Cold Wars 2012 and so I am (slowly) writing up the games and sights. My reports that were of a more general wargaming nature appeared on my Dale's Wargames blog (first, second, and fifth reports), while the DBA and HOTT oriented ones appeared on my Dale's DBA blog (third and fourth reports).

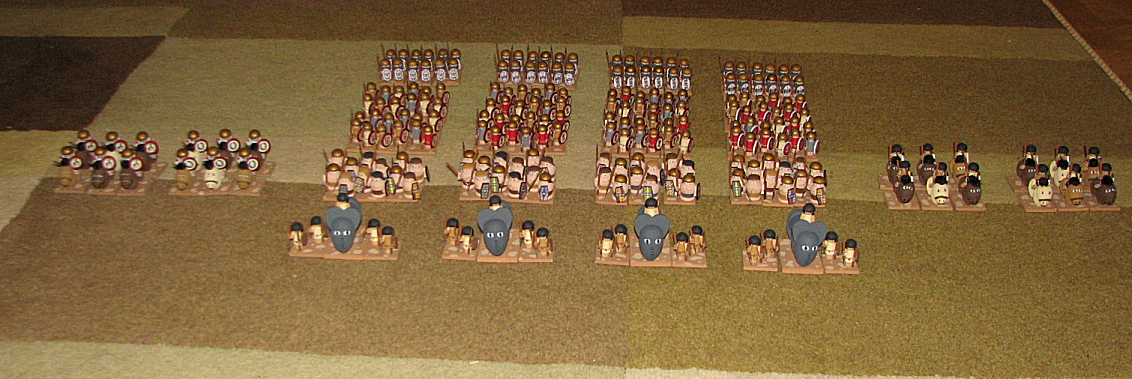
This blog has the two games recreating the battle of Zama, using Matt Kirkhart and John Acar's "craftees" – wooden soldiers made from wood craft parts like thread spools, plugs, split eggs, and such. Believe it or not, this was the game that I travelled across the country for. I wanted to see these wooden soldiers for myself, plus play a mass ancients game using Matt's rules, Arrayed for Battle! It was well worth the trip.

First off, a little about the rules. They can be found for free on the Wargaming on a Budget forum on Yahoo in the Files section. They are based on Joe Morschauser's rules with a command and control element similar to DBA. Units have morale, fighting, armor, and movement attributes. Morale and fighting is expressed as a value to be rolled on a D6 or less.

The Scenario


Game One

In the first game I played the Romans, specifically the right flank command consisting of the Numidian cavalry and warriors and one "column" of Romans.
Game Two

Unfortunately, my camera had died before the second game, so there are no pictures. The basic battle went roughly the same. This time, however, I was on the Carthaginian side, on the opposite flank (with the Carthaginian cavalry facing the Roman cavalry).

The biggest change was that the elephant's Rampage rule was put into effect. Initially it sounded like the Rampage rule would be a benefit – of a sort – to the Carthaginian player. That was not so. Basically this rule reflects that the beasts are unmanageable and they automatically rampage at the end of each melee round. The net effect was that once elephants got into melee, they would continue to drain you of Command Points in order to keep them effective.

I will be honest; I don't really know how effective elephants were in combat in the ancient world. Against untrained, superstitious barbarians they probably were. Against the Romans they apparently became less effective as time wore on. By Zama, they appear to have been useless, if the Zama articles in Slingshot and many rules are any indication. (In DBA they are pretty effective in combat, but they are just harder to get them into it, or to maneuver in general.) In hindsight, if we had really wanted to win, we should have pulled our elephants back into reserve and used them at the end of the battle, when things are less ordered. They would have been destructive hitting the flank of a heavy infantry unit.

In the second game, having experience in why the Carthaginians failed in the first game, I encouraged all of the infantry commanders to press forward hard. One difference that came in to play this round was that the Celts lost their 9" charge. This was a bad change, in my opinion, as it allowed the advancing Romans to game their approach and stay just out of 6" range, making the Celts lose their charge bonus. I think this was a factor as to why the Carthaginian infantry battle could not make any real headway and all of the Celts died quickly in the second game.

I, of course, cheated a little and rather than keep the rigid "column" formation had peeled off the elephants and the third line Veterans to support my cavalry attack on the flank. It worked, to some extent, but while my missile dice were hot as the Romans, my melee dice were not as the Carthaginians. The cavalry melee came down to two units on two units, equally matched. One of my units broke first, but his first broke quickly afterwards. The cavalry continued to grind until both sides had simply to kill one base of the other side, and then it to fail its morale check, and it would be all over. After some tense die rolling, it was the Romans that cracked, and the Carthaginians victorious!

One change that had made a difference in the second game was to rate the elephants as Expendable. This allowed the Carthaginians to lose those five units and not have them count against the army morale. This was a good rule change but it was count-balanced by making the elephants Command Point drains. (I actually cheered when my damn elephant died!) Seems like the rules need to be tweaked more there.

The Carthaginians again lost the left flank, which like the elephant losses, was inevitable. The Roman-Numidian player did much as I did and wrapped the flank firing at the infantry, and using one to harras us in the rear. With time running out, Carthaginians units falling faster than Romans the game was called at about 11 PM in favor of the Romans. The Carthaginians had not won – not by a long shot – but it had made a better showing than in the first game. Given that the rules changes might have been net negative to the Carthaginians, I think that was a good result for us. Can't have Hannibal winning, now can we?

Rules Review

I like the rules Arrayed for Battle, and would gladly play them again. I would like to run my own game of them to see where the hole might be, but they played well and allowed the Player-General to focus on tactics and not on the fiddly bits of unit maintenance. The key to games these rules are the special rules themselves. Get them right and the scenario goes well. I think that, for the most part, the special rules were right.

As for the core rules I think the only part lacking is the inability of a unit to turn to flank or rear after combat has started. I think that if a unit is unengaged to the front, and after it has fought one round of combat against the unit to flank or rear, the unit can elect to take a Disorder marker and face the opponent.


Another area that caused some heartburn is the contact rule. This was cleaned up for the second game, but I can see some problems coming up in complex melees. Basically the rule, as I understood it, was to center each unit's front edge on the edge that it struck, after the initial round of combat. The figure below shows an example.


Note that the dashed green circle shows the "anchor point" (for want of a better term). As the red unit is attacked on two edges it is essentially anchored and the other units around it must shift. At the beginning of the melee on turn two, the shifts are as follows:

  1. The blue unit in contact with the front of the anchored red unit shifts to the left so its front is centered on the front of the enemy.
  2. The blue unit in contact with the flank of the anchored red unit shifts up so its front is centered on the flank of the enemy.
  3. The unanchored red unit shifts back and to the right in order to center its front on the blue unit's flank.
This brings to mind a few questions though.

  • If this shifting occurs at the beginning of the second melee round, but only for units that have gone through a melee round, what happens with units that have just entered the melee this round? (Multi-round melees are very common.)
  • How do you pick the anchor unit (the unit that will not move?
  • What happens when a unit is shifted out of multiple contacts into a single contact?

Like every good rules, special cases will have to be worked out but just with my own thought exercises I think the shifting of units should occur at the end of the first melee round rather than the beginning of the second melee round. This solves a number of problems about who can and cannot shift, and who should shift in the case of conflict shifts.

Figure Review

As this is the Wooden Warriors blog and not Dale's Wargames it only seems appropriate that I review the figures. John's Carthaginians included five elephant units, each consisting of an elephant figure and two stands of supporting light infantry.


The infantry are micro shaker pegs and tile spacers for the arms. The elephant consists of three split robin's eggs, a heart, and a spool. John seemed to think that the spool he used was too long, not giving the elephant enough of a belly. I think it looked great. The eyes were great as some were scowling.

The Celts were a very beefy figure, as shown below. They were distinctly larger figures and easily identifiable on the field (which is a good thing).


These figures were simple constructions in that the majority of the figure is a candle cup (upside down). Either a round head plug or a button plug served as the figure's head, while tile spacers made up the arms. Shields were decorated with custom inkjet printed shield designs. Very effective!

The Carthaginian citizen units also received the printer treatment for their shields, with each unit having a different (uniform) device (primarily to sort which stands belonged to which units, if I understood correctly). Clothing was not uniform, however, which made for a nice effect.


Again, the figures are micro shaker pegs and tile spacers for the arms. Very simple construction that looks great on the table.


The Veteran infantry is constructed a little differently, largely to show that they wear more army and to make them distinctive on the table. Their body is a spool with a button plug serving as the head and helmet. Again, tile spacer arms and printed shields make these units look great on the table.


The Carthaginian horse was constructed very similarly to the Veterans. They are spool and button plug with the horses being three split wren's eggs and a spool. Tile spacers serve as the arms and legs of the figures.


Note that because the bottom of the thread spool was not cut off (and I don't blame John as cutting round spools is a bear of a task), it makes the cavalry a hit taller than normal. But, then again, what is "normal" with a craftee?!?


The Numidian light horse are micro shaker pegs on horses of three split wren's eggs and a spool. Very effective paint jobs. Also, now that I have seen the pipe cleaner manes I think they are very effective. If I were to get more into the 25mm scale (as these are), and I could find the appropriate chenille pipe cleaners, I would use them too.


This is what the Carthaginian army looks like arrayed for battle.

Matt's pictures for the Roman army can be found on the Wargaming on a Budget forum on Yahoo. I cannot link to the photos there as they will only be visible if you are a member. And if you are a member, well you can just view them over there!

Contributors

Followers

Blog Archive

Popular Posts

Labels I Use in Posts