Sunday, September 12, 2010

Painting Digitally

My current project is taking a beating as I decided to take some shortcuts that are turning out to be a nightmare (or in other words, not a shortcut). And no, I don't want to talk about it. : (

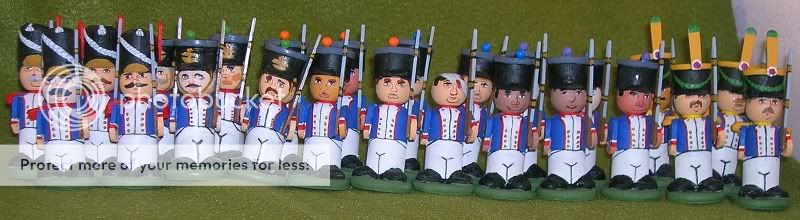
Jim Walton, over on the Wargaming on a Budget forum, introduced a concept that combines the advantages of paper soldiers with the look of wooden toy soldiers. Here are a few samples of his figures, used with his kind permission.
Copyright © 2010 Jim Walton. Used with permission.
As you can see, Jim has printed out a figure, but wrapped it around a wooden dowel to make the figure 3D. Jim has taken the repeatability and ease of "painting" from the paper world yet attained the 3D look of the traditional figure world.

Although I think this is a great idea and look, I initially did not want to junk my initial work and trade it in for this, despite the fact that I have drawn a number of such figures in the past. (I have a number of flat paper armies.) For one, my current system makes each figure unique. For another, it looks about like what I want it to look like.

That said, there are some problems with my current system, not the least of which it takes too long to paint a unit of any size. It is great for skirmish gaming, where I might have 5 or 6 figures in the same uniform, but when the number is more like 36 to a unit, I haven't gotten it down to where I can sustain interest.

Upon analysis of my painting habits, the problem is that I want certain detail, but it is very tedious to paint and take a lot of time. For example, good looking shako plates or crossbelt badges. Same with lapels, with piping and buttons. It looks great, but takes a lot of time.

So, rather than "painting" the whole figure with printed paper, as Jim has done above, how about if I print out part - detail - and glue them to the figure? This would give me the detail I want, the look would be repeatable (I only want uniqueness in the face and hair, primarily), and it should save time. That will be my next experiment.

Thursday, August 26, 2010

British (King's German Legion) Light Dragoons

Next on the table are some King's German Legion light dragoons. I decided to try two things differently this time:

  • Not put so much detail into the initial figure. As I am mounting the figures singly, theoretically I can always add the detail later.
  • Build the figure completely before painting.
Interestingly, the second point taught me why the first point may be more theoretical than fact. Once the figure is completely built, it is very hard to get the paint brush in to some confined spaces. With cavalry, there are more of those spaces than with infantry (e.g. the entire front of the rider is hard to reach once it is glued to the horse).

I hope to have pictures of the prototype (which is finished) by the end of the weekend. I've made pretty good progress on the remainder already.

I figured out that I have got to find a way to use these figures soon, otherwise I will lose momentum - and thus interest in finishing the project - which would not be a happy thing! So, I decided that I have got to take up Napoleonic skirmish games, like Song of Drum and Shako (horrible name, fun game) and Sharp Practice. The former is good for up to about 20 figures, I think, while the latter plays better at 20+. So, by the time SDS is getting unmanageable, SP will be starting to get interesting.

So far I have:

  • 4 French Grenadiers of the Ligne
  • 4 French Voltigeurs of the Ligne
  • 16 French Fusiliers of the Ligne
  • 4 French Chasseurs of the Legere
  • 1 French Chasseur Officer of the Legere
  • 1 Russian Guard Cossack
I am working on:

  • 6 British King's German Legion Light Dragoon Troopers
  • 1 British King's German Legion Light Dragoon Officer
  • 1 British Foot Officer (Mounted)
I will probably need to paint a British Foot unit next.

Sunday, August 1, 2010

Finished with the French Ligne (sort of)

As I hinted in my last post, I am finished with the French Ligne unit for now. I have the shako plates to paint, but I just haven't been able to muster the effort. However, I've already started making my British Light Dragoons (pictures and tutorial on that coming up), so that is getting the old blood flowing.

Here is a picture of the full 24 figure unit (six companies of 4).


The last ones to be finished were the Ligne Voltigeurs.


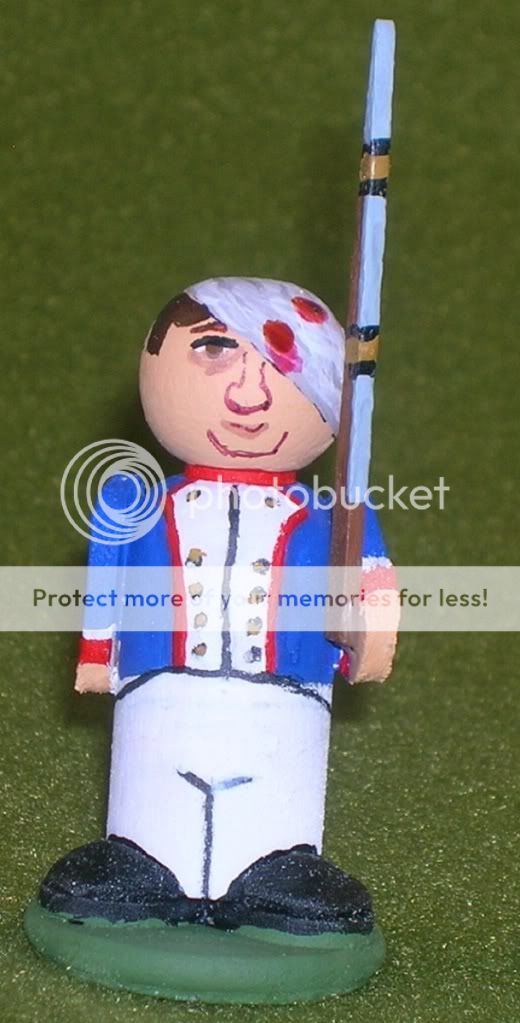
I've also got one wounded soldier, for a little variety.


All in all, a very fun unit to paint. I look forward to starting the next unit, but next time I am going to try and cut down on the detail. We'll see if I can hold to it.

Saturday, July 31, 2010

French Napoleonic Ligne

I read an interesting article in the pilot issue of the Classic Wargamer's Journal in which Stokes Schwartz discusses painting large units and how to avoid losing momentum. That's basically what has happened to me in my project; I have lost momentum. Stokes makes the point that painting the smaller details earlier helps. That way you finish with the big stuff.

I've been trying to figure out how to do that - not really sure how you paint buttons on lapels before you paint the jacket, but I thought I would try to give it a try on the next batch. For now, I am mired in painting muskets (four more to go) and shako plates for 20 shakos. I am dreading that last piece.

That brings me to my point: how many people out there, when mounting figures singly, paint to an "acceptable point" and then go back and add the details later? I was thinking of doing that - stopping now and varnishing the figures - and then moving on to another unit. When the 'detail freak' comes out, I can paint one or two shako plates. I'll love to hear your thoughts, either here or on the Wargaming on a Budget forum.

I've decided to give the rules Sharp Practice by Too Fat Lardies a go - I've owned these rules since they were released - using these figures. In addition to using them for Command & Colors: Napoleonics, of course. The next unit should be something usable, like British Lights, but I want to do some cavalry, so I will probably do the King's German Legion Light Dragoons.

Sunday, July 11, 2010

Tutorial on Painting the French Ligne - Part 5

Back to the tutorial. The next part can take a lot of time, if you let it. Now we are going to paint the faces.

First I start out by drawing the nose, bridge, and chin with a brown pen. This helps define where everything else will go. Go crazy with different types; it will give each figure character.


Next, I define the ears a little better with the brown pen. Again, don't be afraid to make different shapes.


Next, I do the eyes in stages. The picture below shows, from left to right, the steps I follow.


  1. Paint an almond shape in white for the eye. Don't worry about being perfect as the other colors will define the final shape.
  2. Paint the iris color. Most should be brown, unless the ethnicity of the figure dictates otherwise.
  3. Here I have painted the eyebrows next using the figure's hair color (or a darker shade).
  4. Paint a thin black line on the top of the eye for the eyelashes. Paint a darker shade of flesh on the bottom for the "bags" under the eyes.
You might find it easier to switch steps 3 and 4. If you want a flesh colored gap between the eyelash and eyebrow, it is easier to reverse the steps.

Finally, I paint the mouth. As I still don't have a satisfactory method there, I am going to cop out and leave that for when I do. For now, you can draw a thin line with your brown pen so the chin won't look like the mouth.

Making a Shako Jig

I think jig is the proper word. If not, someone let me know.

My Napoleonic figures have been on semi hold for a while as I was waiting for a new mini-miter saw (see last blog entry) to cut the wooden spools in half, which serves as the basis for the shakos. Just one little problem: the round spools did not want to sit in the vise nice and tight so while I was cutting, the spool would shift, leaving me with an angled cut!

What I needed was something where the sides were flat, so the vise could get a proper purchase, but would also fit around the spool's curved surface, gripping it properly. So, I needed to make a custom vise, or a jig.

I started by measuring the inner and outer diameters of the spool. By inner I mean that portion where the thread wraps around. The outer portion is the widest part at the top and bottom. The inner measurement was 5/8" while the outer portion was 3/4".

I took a wood strip (from another project) and bored out a 5/8" hole about one-third of the way through the strip. Notice that the tip of the borer penetrated to the opposite side (the white hole) allowing me to find the center on the opposite side. This was necessary because I then took a 3/4" borer to bore out the opposite side.


With the hole properly bored the larger end of the spool will fit in the 3/4" hole on one side and the smaller center of the spool will fit in the 5/8" hole. Note that the spool used in the picture below has already been cut in half.


The next step is to cut the block in half so that it resembles a two-part mold. Each part will wrap around a whole spool acting as a gripper for the vise. The second picture shows you how the spool fits the two sizes of holes nicely.


Here is the jig in action.


And the results.


In this case I simply lopped off the top of the pawn so it would glue flush with the bottom of the spool.

In the past I used modeling material to fill the spool's hole, but given that its diameter is 1/4" I decided to try both 1/4" flat head plugs and 1/4" dowel; both worked fine although the plug required a tap hammer and the dowel required glue to hold it in place.

While I was experimenting, I actually purchased one 1/4" round head plug by mistake and noticed it made a nice pom-pom, if a little large. I will look for smaller ones and consider using those rather than the heads of dressing pins for the pom-poms, further saving construction time. The larger wooden pom-pom is a little exaggerated, but that is probably good.

Thursday, July 8, 2010

My new miter saw is in!

Woo hoo! My new miter/chop saw from Micro-Mark is in! UPS could not find me way out where I am, so it was not there waiting for me when I came back from vacation.

Expect to see me start to finish off the French, now that I have an easy means of cutting the spools in half to finish off a batch of shakos. I may even try lopping the tops of some game piece heads so I can simply glue the spool to the game piece (pawn), as Just suggested, and save even more time making these guys.

Expect pictures soon. : )

Contributors

Followers

Blog Archive

Popular Posts

Labels I Use in Posts